 Connect with Google
 Connect with Facebook
How to prepare your 3D files?
Posted By Arthur Cassaignau on Dec 4, 2013 | 0 comments
If you’re willing to 3D print something, the very first thing you need is a 3D file. But not all 3D files are doing the trick when it comes to 3D printing. The prime file format for 3D printing is STL. If you don’t have one however, it’s not the end of the world, we accept up to 25 different file formats. You can find the list here. The goal of this post is to give you the best advices to let you prepare your 3D file for a print. If you follow it correctly, You won’t need any extra work, however our developers have done wonders, and we can print most of the files; even if they have not been thought for 3D printing.
Before Nora live webinar later on today on 3DTi, we will review here the best practices to prepare your file for 3D printing.
Polygons. You need to remember that we don’t accept file over 50Mo and file that contains more than a million polygons. There is a reason for this rule. This has to do with the processing time of our system that analyses the 3D files. If you have too many polygons, it will take hours to process the design. Spend your polygons wisely and only add them where they matter; subdivide only areas that need smoothness, for example.
Size and solidity. Remember to check the size and solidity. When you upload a model, it is wise to check the size and maybe rescale it. First, we have different length units and it’s possible to scale a design in centimeters, millimeters, meters, inches, and yards. Also, it’s possible that your design exceeds the maximum possible size. If it’s the case, you can either change the material (some are made with bigger printers) and scale down your model.
Once it’s done, it’s really usefull to enable the solidity check. That way you can be sure your model is printable. Our system analyses your file, and depending on the material and the size you select, it tells you if parts of the model are going to be fragile. Green means everything is alright, red means you have to do something. You can either change the material or the size. For instance, our multicolor material is more fragile than our white plastic, so looking at the solidity check for those two materials for the same model will give you different results.
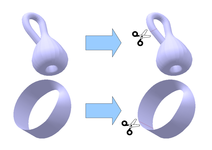
Normals. Another thing to check are the face normals. They define the ‘inside’ and ‘outside’ of your model. If some of them are pointing the wrong way, 3D printers are not able to print. They need to know what’s inside and what’s outside.Incorrect orientation
In most 3D modelling applications, surfaces are oriented to have a “heads” side and a “tails” side. When the surface is closed, this orientation is used to define the inside and outside of the enclosed volume. Sometimes, the entire surface is not oriented consistently, and does not clearly separate the inside from the outside of the object.
Most of the time, this issue is fixed by flipping the problematic facets. However, some surfaces cannot be oriented consistently (such as the Moebius strip or the Klein bottle). To build these kinds of objects, their surface must be cut open and thickened via extrusion.
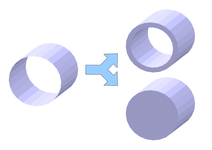
We need volumes. This means that a surface is not a volume. The walls of your 3D model must be thick enough. If you want a model to be 3D printed, a wall must be at least 1mm thick.
A design may contain surfaces with borders, that do not enclose a volume. These surfaces have no thickness and therefore cannot be constructed. Sometimes, small holes prevent the surfaces from being ‘watertight’. This issue may be fixed either by simply removing the problematic surfaces, by extruding them (via the “push/pull” or “displace” tool of your 3D modelling software), or by filling the gaps.
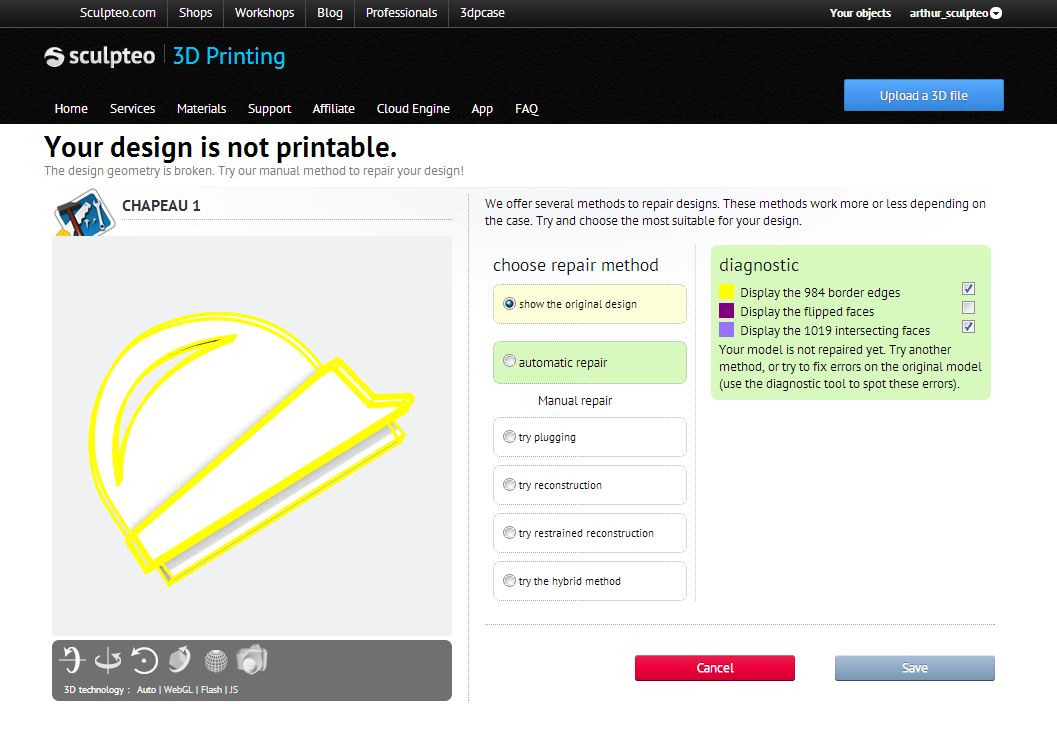
In any case, if you’ve some 3D skills but you’re not sure you can actually design for 3D printing, you first need to take a look here to learn the basic rules about designing for 3D printing. Once it’s done. You can upload your file on Sculpteo and see what kind of repairs our system has done on it. You can then choose between an automatic repairs or to do it manually in your software.
All you need to do is to click on repair when your design has been uploaded. (see below)
Hollow your models. If you hollow your models, you’ll make their prices drop. Plain models are expensive because we need lots of material to build them. If you want your model to be cheaper, what you can do is hollow its inside. However you have to make sure to leave two little holes of at least 1,5mm for us to be able to collect the unused powder.
This should get you started and if you’ve any more question, feel free to contact us: arthur_at_sculpteo_dot_com or to follow Nora’s webinar.