 Connect with Google
 Connect with Facebook
Solidity Check 2.0
Posted By Arthur Cassaignau on Dec 17, 2014 | 0 comments
When it comes to 3D printing, you can never be too careful when checking the different characteristics of your 3D file. Closed volumes? Check. Wall thickness? Check. Size of the embossed details? Check. If you want a full list of all the things you should double check to ensure a quality 3D print, head over to our materials pages. Now if you feel like it’s your online 3D Printing Service’s job to do all those things for you, our updated solidity check and brand new thickening tool will be very useful.
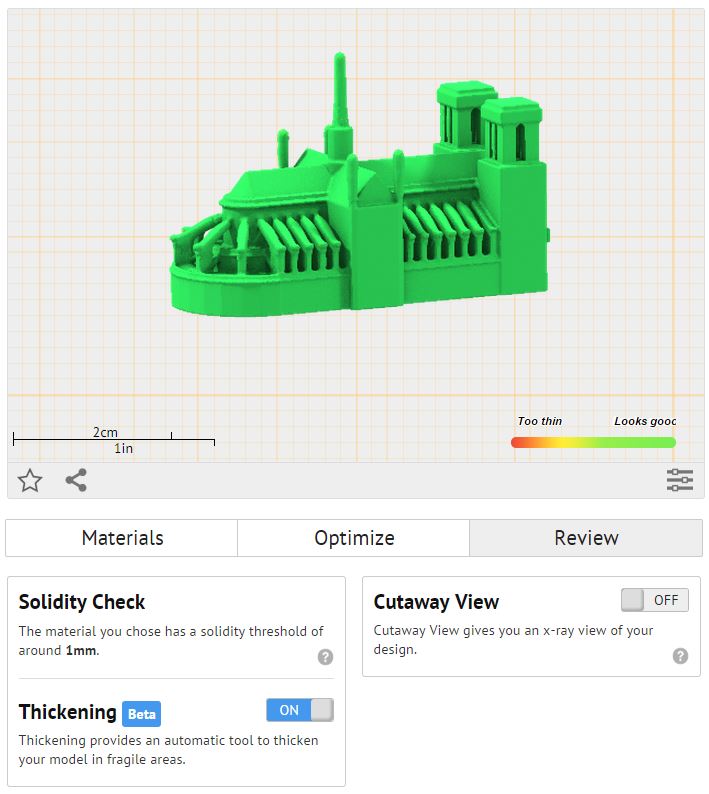
Once you’ve uploaded your 3D file, you’re directly redirected to what we call our “print page”. That’s where the magic takes place. On this page, you’re able to set up all the parameters for your 3D prints from the size to the materials and finishes, and you’ll also be able to access our verification tools.
Under the button review (located next to the Material and Optimize ones), you’ll find three tools to makes 99% sure your file is printable.
-
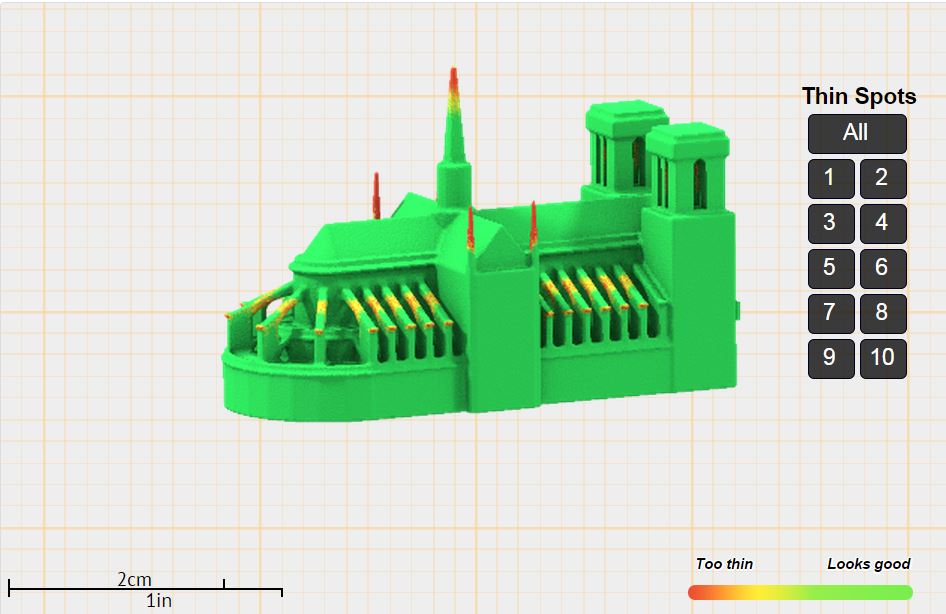
Solidity Check:
The verification of strength is automatically activated when you click on the “Review” button. This functionality is made simple to use thanks to a visual code from green to red illustrating the strength of the 3D object.

The automatic tool Sculpteo strength verification allows you to observe and verify the risk areas before printing. If it’s green, you can print without risk, otherwise, you should try to print in another size or a different materials. Of course, this tool is dynamic. That way, if you make any changes on the size or material, it will automatically adjust the visual proofing. You should use this tool to adjust the best possible size-strength-material ratio of your 3D prints.
-
What does the updated version of the solidity check brings ?
The new version comes with a list of the most fragile points of your 3D model. Once you’re in the review window, you’ll find a list of those points on the right side of the 3D viewer. Selecting one of them will automatically rotate the model to offer you the best view of the problem. Clicking on all will just highlight all the points that are under the requirements.
So what’s next? two things either you’ll change the model manually or you give our brand new thickening tool a try.
-
Thickening :
Just under the 3D viewer, you’ll find the button to activate the Thickening tool. Activating it will miraculously thicken every too-thin-to-be-printed areas of your 3D model. We just rolled out this feature in beta, so it’s still buggy sometimes. But you should give it a try and send us your feedback so that we can improve.
That’s all folks !