 Connect with Google
 Connect with Facebook
3 new features in CAD software for 3D printing material testing
Posted By Sculpteo on Oct 12, 2016 | 0 comments
One major issue while dealing with digital manufacturing is the ability to test your 3D printed model. Thanks to a better understanding of materials, new features in computer aided design software allow you to improve this process. Here is a list of a few new functionalities in CAD software, based on generative design implementations in molding simulation, structure optimization or mechanical behaviors. Enhance your CAD experience in 2017!
1. Dassault System / Solidworks plastic 2017 – Molding simulation.
1) Design for manufacturability
As a leading company in the field of Computer Aided Design (CAD), Solidworks has developed a range of tools dedicated to the production of plastic molded pieces. Integrated into the software, these tools allow designers to easily check that their geometries can be manufactured. Solidworks Plastic is a new extension of the software addressing the production phase.
2) Mold Generation
Designing for a plastic molded piece slightly differs from designing with traditional 3D techniques. You can have an overview of a mold injection from a 3d model designed on Solidworks at this address. Typically, one has to take into account specific aspects such as undercuts – trapped areas in a model that cannot be extracted from the mold – or parting lines – the plane where two halves of a mold are meeting. Solidworks Plastics thus offers analysis and visual tools in order to help you automatically generate mold from a 3d model.
3) Injection Molding Simulation
The true innovation for 2017 is a possibility to test the manufacturability of your mold through running a mold filling simulation. The simulation tool shows the flow of molten plastic during the injection molding process. It helps you predict potential defects related to the manufacture of parts and molds based on material library containing critical information such as viscosity, elasticity, thermal expansion coefficient or even heat conductivity. Thanks to this new feature, it is now possible to quickly modify parts of your design before producing the mold, in order to avoid costly mold rework.
You can check out this vidéo: Solidworks Plastic first Look Out
And the image below illustrates:
- Parting lines generation with Solidworks Plastic.
- Molten plastic injection simulation with Solidworks Plastic.
- The material library interface in Solidworks.
- Creating a mold with Solidworks.

To go further, see our Solidworks tutorials, learn many tips and design guidelines! Improve your design skills for 3D Printing.
2. Autodesk / Inventor 2017 – The shape generator.
1) Topology Optimization
On the other side, Autodesk proposes a design approach based on a light weighting process. Light weighting could be defined as a step in your design where you refine the shape of your piece conserving key constraint axis. The process is traditionally obtained with an optimization algorithm which finally reduces the amount of used material. This design flow has been successfully implemented with an easy to use parametric interface into Inventor 2017.
2) Shape Generator workflow. How it works.
Starting with a rough volume with a force applied to a surface, you can first delimit preserved zones. Into the Shape Generator module, design criteria allow you to reduce the mass either based on a percentage of the original geometry, or to a specific weight. Once the function is run, a primitive lightweight volume is generated that you can use as a template for further transformations. Playing with this primitive volume enables to refine your piece while keeping a resistant structure.
3) Lattice and Internal Structures.
Autodesk goes well beyond designing outer shape of your model. One year ago has been launched Within software who let you design internal structures based on lattice researches. For medical applications, for instance, you can easily generate porous structures. Likewise, Inventor features it is possible to test your design through running a stress simulation in order to evaluate the resistance of your structure.
If you are interested in this design approach, you can check our online tutorial Inventor for 3D printing and try our online optimization tools, such as the hollowing tool, solidity check and thickening, that we talk about later on in this article.

- First applications of optimization for lightweighting airplanes wings (Airbus).
- A primitive generated shape obtained through running an optimization algorithm with Inventor.
- A step by step optimization process from build volume to refined piece.
- Creating latticed structures with Within.
3. Hasso Plattner University – Custom metamaterial editing and simulation software.
1) From microstructure to metamaterial.
Research on internal microstructures has led a german team from Hasso Plattner University to study and experiment with metamaterials. These are artificial structures with mechanical properties. They are not defined by the material they are made of, rather by their repetitive cell patterns geometry. This structure allows creating different levels of rigidity from hard to soft regions.
2) Mechanical properties. What it allows you to do.
Researchers first focused on mechanical properties of Metamaterials. Starting with two types of cells, rigid and flexible ones, they created deformation behaviors which allow compression, rotations or even directional movements. Simple mechanisms such as a door handle, a pair of plier or even a Jansen Waker can thus be done with a single block of laser cut rubber foam. They finally define metamaterials not as material anymore but as machines.
3) Developing a custom software: voxel editor for mechanical simulations
Metamaterials were previously done by using scripts, but it was then very difficult to test the mechanical features. In order to run mechanical simulations and test their design, researchers from Hasso Plattner University developed a custom editor which allows users to easily apply forces and constraints to the parts they have designed. The software is designed as an interactive voxel editor corresponding to the 3D grid nature of metamaterials. A good description of the interface can be found on the published paper, waiting for this amazing software to be openly distributed.

- The custom voxel software allowing users to test mechanical behaviors.
- A basic stretching transformation with two different metamaterial cells.
- A metamaterial door handle mechanism.
- A metamaterial pair of plier.
4. Sculpteo.com – online optimization tool for 3D printing.
When your file is ready and you’ve gone through all the software possibilities displayed above, optimization and testing are still possible. Once you’ve uploaded your file on our platform, here’s what you can do.
1) Hollowing your design: save material and money
Hollowing your design before 3D printing allows you to reduce the material you use and thus your unit price. Rather than having to upload, edit and upload again, you can hollow your design directly online. No need to have special design skills, our software does it all for you! Combined with the cutaway view option, you can check if everything is alright inside your model. Learn more!
2) Solidity check and Thickening your design: assure printable files
Another one of our tools is the solidity check. When you’ve uploaded your file for 3D printing, we show you which parts of your design are too fragile for 3D printing, and need to be redesigned.
Another useful feature is the thickening tool. Thickening allows anyone to turn their 3D model into a printable file with just a click. Instead of inflating your existing geometry, which generally distorts it, our thickening tool recreates a new mesh that envelops your design. This appears to be the best way to conserve design intent in the majority of cases. Learn more!
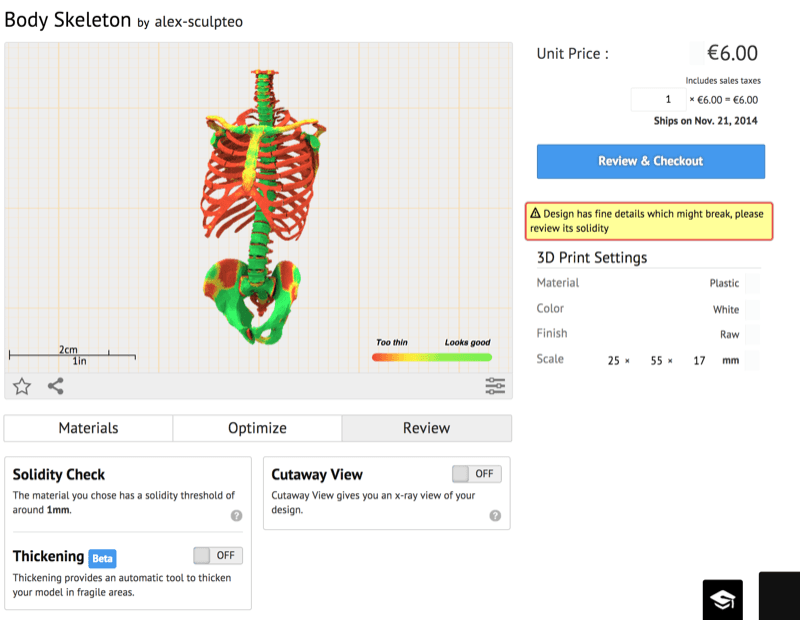
The red areas show were the object is too thin (the thickening option is off)
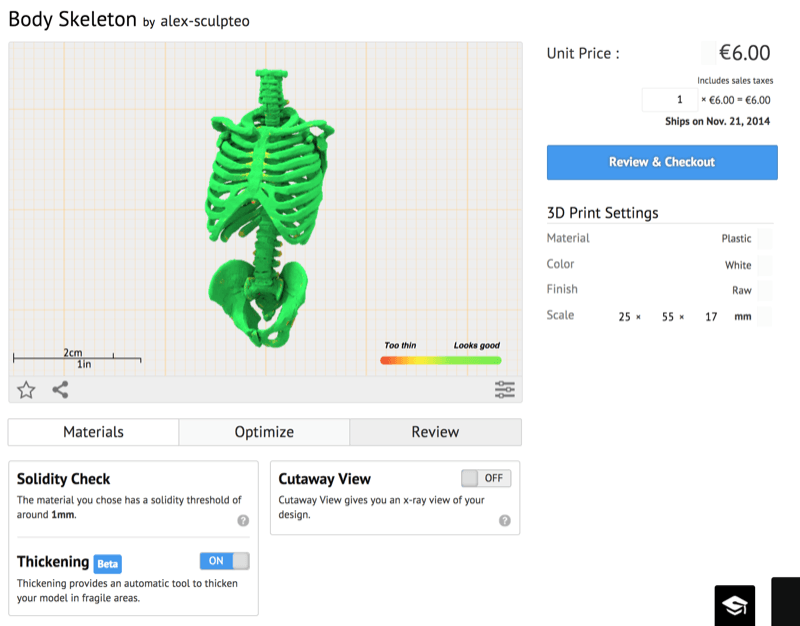
The thickening tool is on, the object is thicker and all good to go (fully green on the solidity check)
3) Final Proof: get a simulation of your final part
FinalProof is a high definition rendering of your 3D object. Unlike the traditional 3D viewer, FinalProof offers what the individual layers of your object will look like at the scale you’ve chosen. Learn more!
Conclusion:
As we’ve seen, material libraries are now better integrated into computer aided design. Mechanical properties are virtually mapped so well that it allows users to optimize their design from macro to micro structures. Simulation tools are progressively implemented, so that testing your design with high engineering constraints are now accessible through user-friendly interfaces.
Pending the creation of a worldwide material library for additive manufacturing, you could check our own material catalogue at this address. If you feel like trying it, check our tutorial section for further exploration of 3d printed materials and don’t hesitate to upload your model for testing experience.