 Connect with Google
 Connect with Facebook
How to connect two parts with 3D printed joints and snap fits
Posted By Amandine Richardot on Apr 25, 2018 | 0 comments
How can you efficiently connect two 3D printed parts? You could glue some components to connect them, but there are other ways to do it, more convenient. Indeed, you can integrate some specific design features directly in your 3D models. These interlocking features will help you drastically reduce assembly time, and designing snap-fits or other kinds of 3D printed joints is not so hard! To learn how to create the best 3D printed joints and snap fits for your parts, follow the tips of our 3D designers from Sculpteo Studio, our 3D design studio specialized in additive manufacturing!
What are 3D printed joints and snap fits?
3D printed joints are all the design features you can insert in your 3D model to connect parts together without using external components (not even glue).
One of the most common kinds of joints for 3D printing is snap fits. These special connections work as follows: a design feature similar to a hook is inserted in another part, where there’s a special hole or space made for it. This is made possible thanks to the fact that this hook is quite flexible and moves while being inserted, and then gets back to its normal position when in the right spot, which blocks it.
3D printed snap-fits and joints are very commonly used to design enclosures, even if it’s far from being their only applications.
Interested in learning more about how to create the best enclosures using the 3D printing process? Read our previous post to make the best enclosure designs!
The benefits of inserting connections directly in your 3D design
Thanks to 3D printing, you can connect your 3D printed parts together with design features that are directly part of your design. What’s the point of using this kind 3D printed joinery? Here are the main benefits you can get from joints specifically designed for 3D printing!
Additive manufacturing makes you save time
First, if you implement 3D printed joints directly in your design, you will drastically reduce assembly time of your objects. For one prototype, that’s already a good start, knowing that accelerating product development is a major priority for businesses. But try to think of mass-production. This gain of time can be extremely precious in order to manufacture your products faster.
Your 3D printed parts can be strong but flexible
3D printing helps you play more easily with wall thickness thanks to the strong but flexible materials you can use with this technology. Indeed, the plastics used for additive manufacturing are particularly suited for the creation of joints such as 3D printed snap-fits which require flexibility, but strength.
Additive manufacturing, for great precision
Additive manufacturing is also particularly precise, often more than injection molding. Indeed, accuracy is good for multiple 3D printing materials. And in the case of 3D printed connections, you need your parts to be perfectly assembled.
Iterate more easily thanks to 3D printing
When you work with injection molding, you first need to create a mold for your part. Thus, if you realize after a first try that something doesn’t quite fit in your joint, you will have to make a whole new mold. It takes time, and it has a cost. With additive manufacturing, you don’t have this issue. If it doesn’t fit, you just need to edit your 3D model, and then 3D print it again.
Which material should you use for your 3D printed joints project?
For this specific post, our 3D designer chose to 3D print all of her parts in HP Multi Jet Fusion Nylon PA12, in its non-dyed version. This is a great choice for your prototyping projects. It is both strong and flexible, and it’s our cheapest material.
For finished goods, with better surface finishes, or if you want a different aspect, you can choose other plastics, as long as they are both strong and flexible. SLS Nylon PA12 can be a great choice for this use. Indeed, SLS 3D printed parts perfectly match these requirements.
On the other hand, very rigid 3D printable materials are not recommended. For instance, metal 3D printing is not really compatible with snap-fit design.
The different types of 3D printed snap-fit connections
Cantilever Snaps-fits
Cantilever snap-fits are the most common kind of snap-fit connections. In this kind of 3D printed snap fit, a protrusion (just like a hook) on one of the parts is inserted in a specific cut-out. Inse it’s inserted, the protrusion bends back, which locks the connection and makes sure it doesn’t move.

Cantilever Snap-Fits, with two different lengths
Cantilever snap-fits can be more or less flexible, depending on their shape. When they are in U-shape, they are extremely flexible, and thus, easier to take off. When they are in an L-shape, they are more rigid, but still quite flexible. Here’s an example of both shapes.
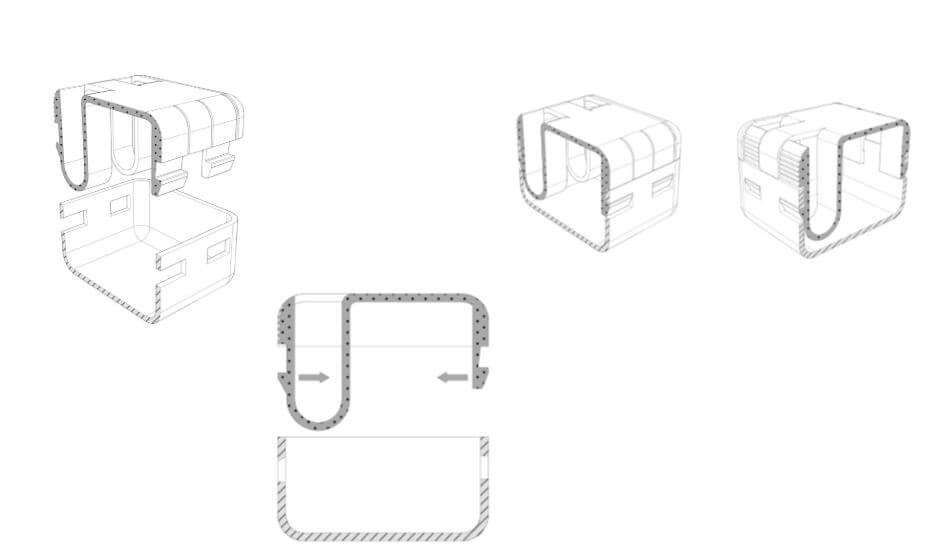
Cantilever snap-fits in U shape on the left and L shape on the right
Here’s a variation with separable cantilevers. They are easier to take off and less visible.
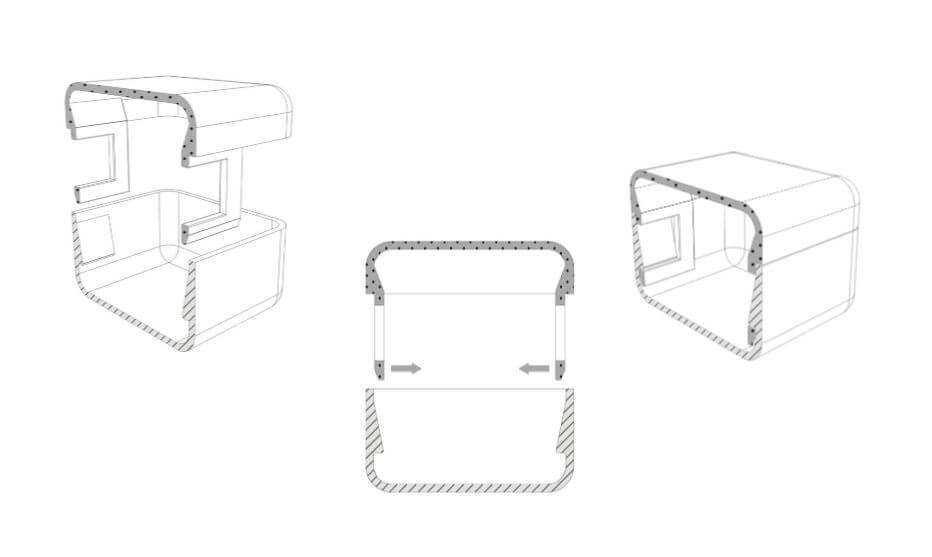
Separable cantilever snap-fits
Annular cantilever snap fits are more robust, but harder to take off.
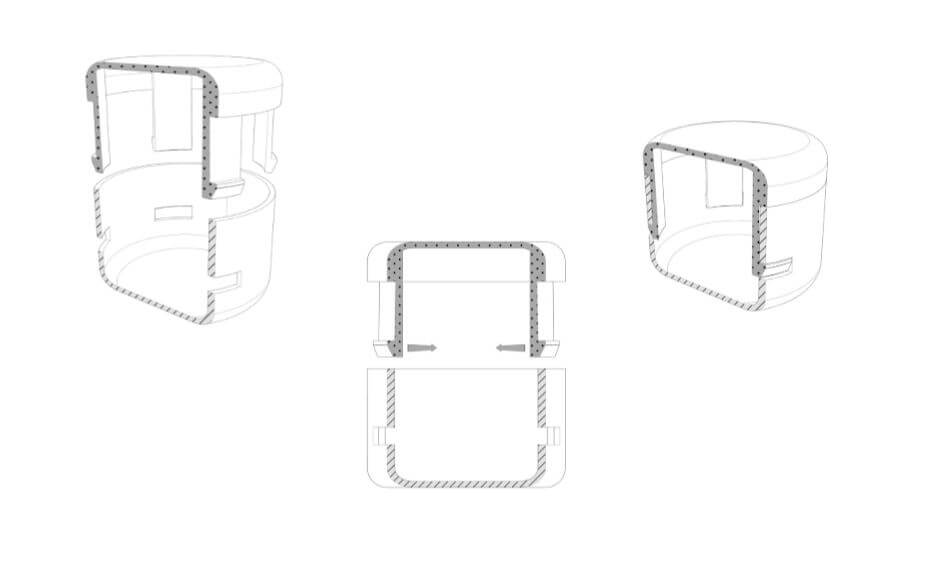
Annular Cantilever Snap-fits
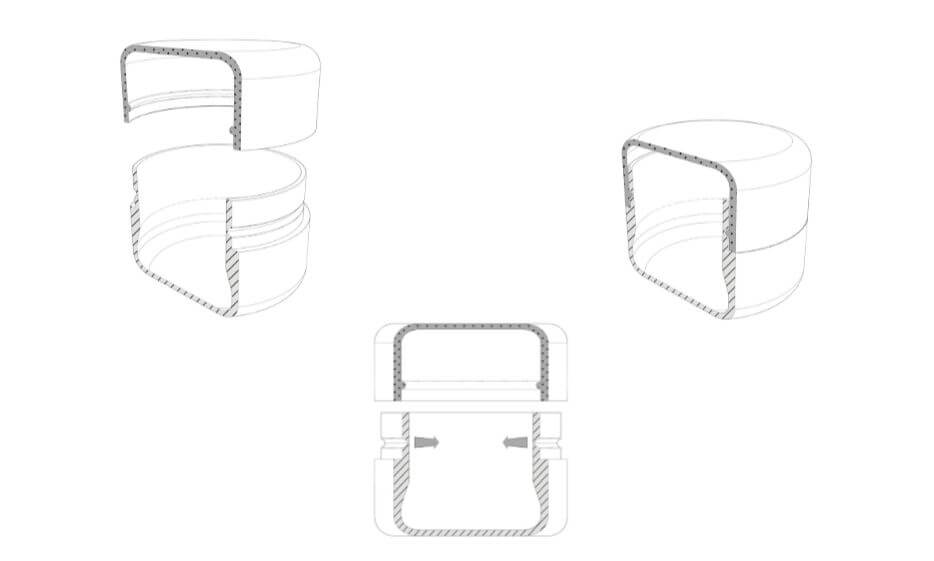
Last but not least, here are Clips, another kind of cantilever snap joints. They are very hard to take out but very robust.

Long Cantilever snap-fits, also known as Clips
Of course, in all of these cases, you can adjust the shape depending on your need and on your part.
Also, here’s one special tip from our 3D designer. If you need to take off the part quite often, we advise you to implement holes where the protrusion is inserted, it will make it easier to make it move afterward. Moreover, reducing wall thickness (as long as your 3D model is thick enough to be 3D printed) will increase the flexibility of your snap-fit joint.
Annular snap joints
Annular snap joints work just like pen caps. There’s a groove on one part, and another groove, exactly similar but inverted, on the other part. It only works on circular kinds of parts. Are you in need of taking the part out quite often? The deeper the groove, the harder it will be to take out. Thus, working on this parameter of your 3D design will help you. Another interesting feature of annular snap joints is that they can turn around, unlike cantilever snap fit joints.
Annular Snap Joints
Here are some variations of annular snap joints, which are articulated. They can move more or less, depending on the shape of the inserted part.
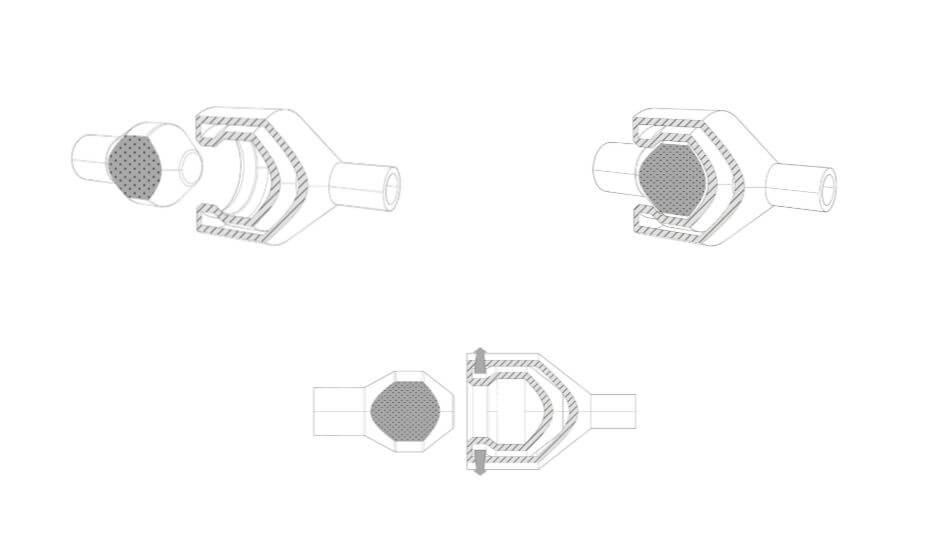
Annular Snap-joints with Hexagon shape
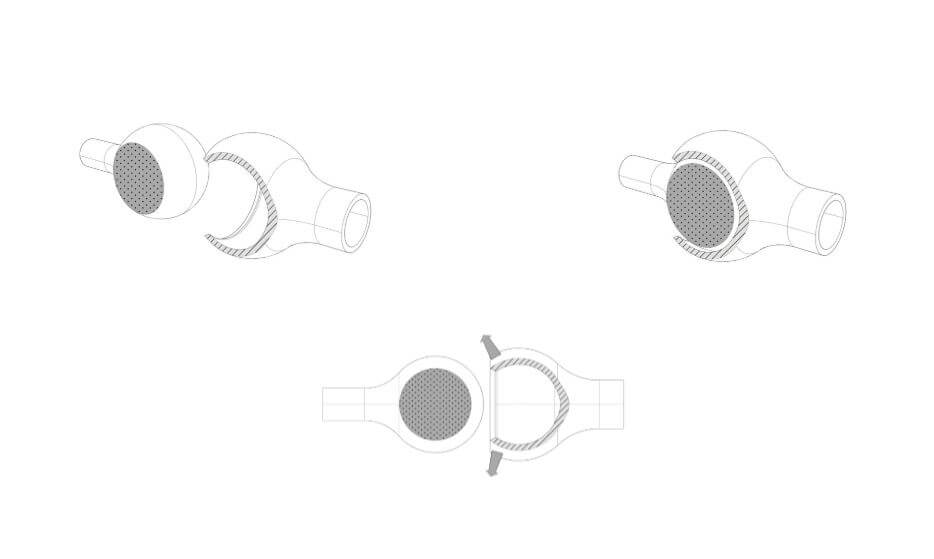
Annular snap-joints with Sphere shape
Torsion snap joints
Torsion snap joints are very interesting to produce using 3D printing. Indeed, they fully capitalize on the flexible properties of 3D printing materials, and on the fact that they can slightly move, while being strong.
When you push the sink, it makes the bar very slightly turn, which opens the joint. This system is particularly suited for connections of parts you will take out quite often.
Torsion snap-joints
Other types of 3D printed joints
There are other types of 3D printed joints, apart from snap-fit joints. Here are two of our 3D designer’s favorite ones.
Screw joints
Screw joints work exactly like a screw. Thus, you can only use it for round-shaped objects. It is particularly suited for objects that need to be opened very often since it allows for an easy opening. A major advantage is that even if it’s easy to open, it’s still a strong and robust connection.
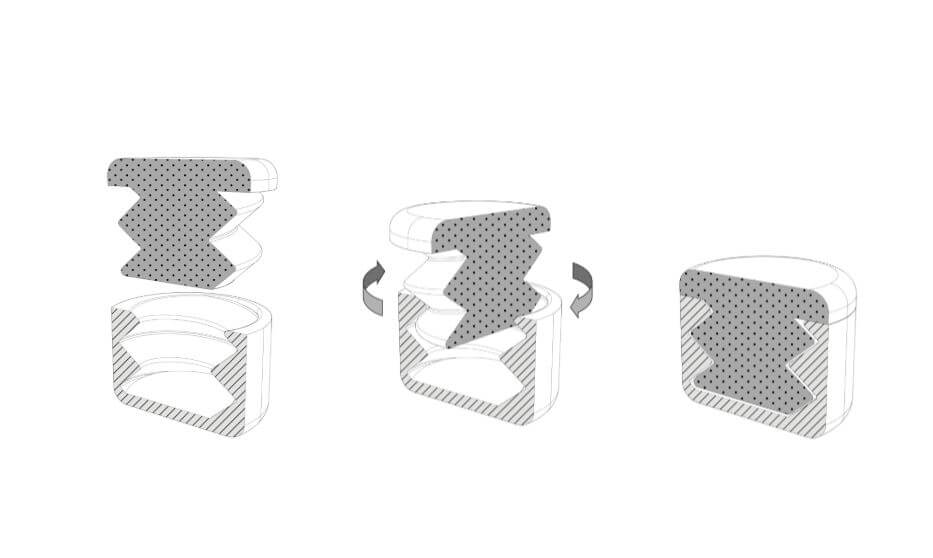
Screw joints
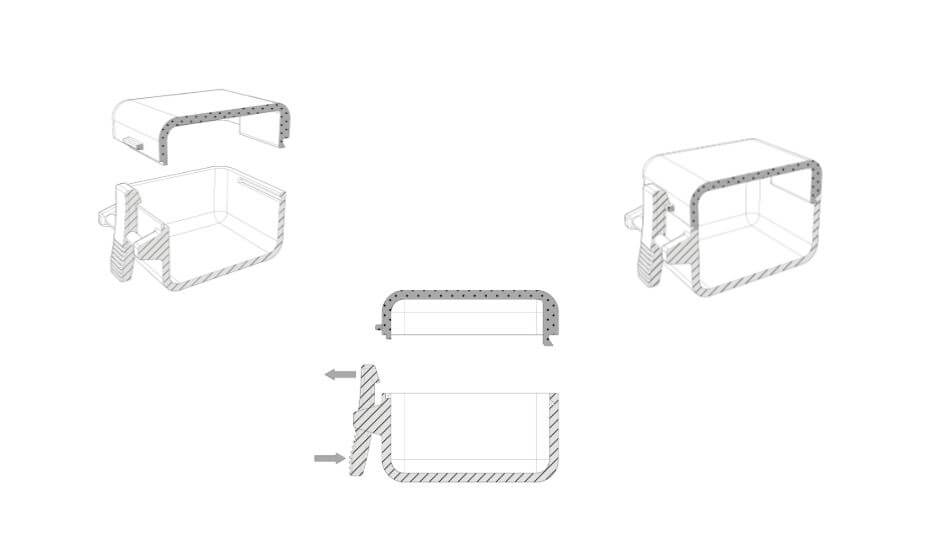
Gutter
Another very interesting way to create 3D printed joints is to create gutters, just as shown in the following pictures. Here, you just need to make your parts turn until it’s blocked.
Here, our 3D designer slightly increased progressively the height of the plane surface with holes so that the two parts are really blocked. This makes a very strong 3D printed joint.
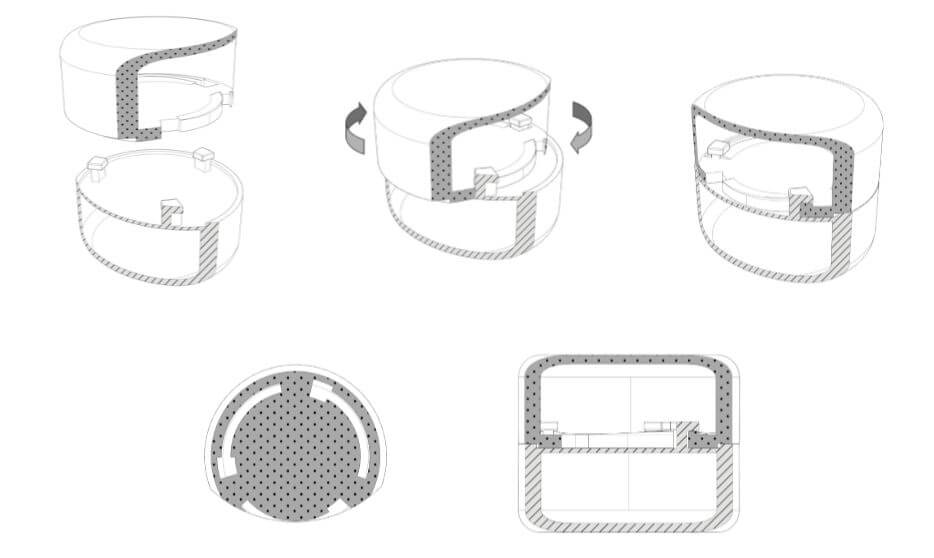
Gutter joint
Now you’re ready to create your own 3D printed joints and snap-fits for your additive manufacturing project! Do you already know which tool you can use to create your 3D printed snap-fit? Here, you will learn how to choose the best 3D modeling software to create your own STL files, the most commonly used file format for 3D printing!
Your 3D file is now ready, with the best joints for 3D printing? Just print it with our own 3D printers, using our online 3D printing service!
Also, do you want to know more about the multiple applications of additive manufacturing, or get advanced design tips and increase your 3D printing knowledge? You can subscribe to our newsletter! For instance, do you want to get inspired to design and construct your own furniture with this technology? You can read this dedicated blog post! Or, you can also learn on our blog where to download the STL files you need for your project!