Updated Solidity Check
Posted By Arthur Cassaignau on Apr 8, 2015 | 0 comments
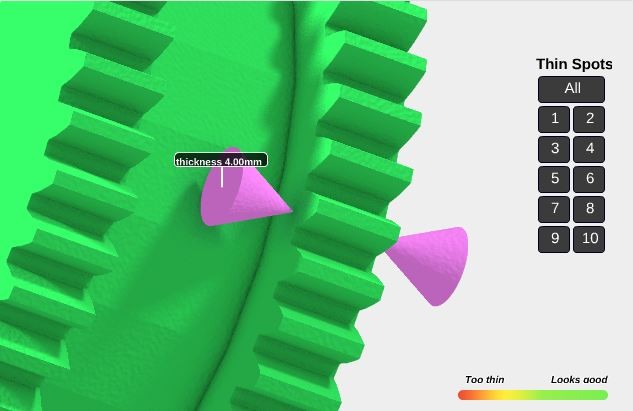
The “Solidity Check” is among the first tools we developed to let you order your 3D prints online with as little surprises as possible. In a nutshell, it’s a visual simulation of your 3D print’s strength. It’s fairly easy. If your model is all green, it’s a go. If you’ve got big red areas, you should consider to thicken them, make your print bigger or change your printing material. Now there is more to it. We’ve just improved it by making the “thickness measurement” feature of the solidity check a bit more user friendly. Let’s get to it.
When you order online from a 3D printing service, the strength and solidity of your future 3D print is a big concern. It’s even more important than every 3D printed material don’t have the same characteristics. For instance, when 3D printing in our plastic material, the minimum thickness is one millimeter, while it goes up to two millimeters if you use the multicolor material. (By the way, you can find all the design requirements for our printing material on this page.)
This is why we created the Solidity Check as a dynamical tool. It automatically updates the result as you’re changing the settings of your 3D print. For instance, modifying the printing size or the material will give you a different simulation of the strength. That way you’ll know before hand if printing your object is possible or not. Now under some circonstances, you just can’t want to change the material of your print or even make it bigger because your part is intended for a specific purpose. What are the options left, if the Solidity Check gives you multiple red alerts ?
There are actually two:
- You can use our “Measurement” feature inside the Solidity Check and then correct your model using your favorite 3D modeling software. How does the measurement feature work?
By clicking left on the model, it will give you the thickness of the area you’ve just clicked. The updated version brings a more accurate view of the thickness you’re actually measuring. That way you’re not confused on which part you’ll actually have to thicken. Used with “Thin Points” (a feature that points to every fragile area by specifically displaying them), this new measurement feature is a very effective way to :
- notice the fragile areas
- measure them
- fix them in your modeling software
- Or you can just use our Thicken tool. By turning it on, it will thicken the areas that are too fragile. That’s also one way to do it 😉
In case you got any question on the different tools that we’re offering online head over to our ressource pages or even better download our latest ebook. We’ll find everything you need from the most common mistakes when modeling for 3D printing to Sculpteo’s online tools.


 Connect with Google
 Connect with Facebook