Rigid Polyurethane 3D printing material

Our Rigid Polyurethane (or RPU) has strong mechanical properties. Here are all information, tricks, know-how, and advice to help you print your 3D model with this 3D printing resin material.

Colors

Characteristics

Surface Look
Details
Strength
Flexibility

Rigid Polyurethane Material Guide

What is Rigid Polyurethane?

Our Rigid Polyurethane resin material creates 3D printed objects from a base of photosensitive polymer liquid. Rigid Polyurethane is very stiff and strong with material properties that outperform ABS plastic and rivals Nylon. This material is perfect for mechanical parts that need to be tough, heat-resistant, and abrasion-resistant.

RPU is certified by the UL 94 HB flammability classification for more secured use.

What can you do with Rigid Polyurethane?

Parts printed with CLIP (DLS) are much more like injection-molded parts than objects produced with other 3D printing techniques. CLIP (DLS) produces consistent and predictable mechanical properties, creating parts that are smooth on the outside and solid on the inside.

Rigid Polyurethane is our stiffest and most versatile polyurethane-based resin. It performs well under stress, combining strength, stiffness, and toughness. These properties make RPU particularly useful for consumer electronics, automotive, and industrial components where excellent mechanical properties are needed.

Pricing​

The printing price of your design is calculated automatically the moment it is uploaded. As you modify your object (changing material, finishing, size, using batch control or hollowing feature, etc.) you will note that the price changes automatically. The pricing is based on a series of factors, including total volume, object size, and bounding box – to name a few.

Keep in mind that adding finishing will extend the processing time. The estimated shipping time is also calculated automatically as the object is uploaded and each time you make a modification on it. Delivery time should be added to processing time.

For more information, check our pricing page.

3D printing process of Rigid Polyurethane

Just like some our other resins materials such as flexible polyurethane, this material is 3D printed through a process called CLIP, for Continuous Liquid Interface Production (DLS), developed by Carbon. That liquid is then solidified by UV light layer by layer to create rigid and highly detailed prints that are comparable to injection molded plastics.

CLIP (DLS) is a photochemical process that carefully balances between light and oxygen to rapidly produce parts. It works by projecting light through an oxygen-permeable window into a reservoir of UV curable resin. As a sequence of UV images are projected, the parts solidifies and the build platform rises.

What are the finishing options available for Rigid Polyurethane?

We remove the support structures during our post-processing steps, the surfaces where the supports structures come in contact with the part will be visible but can be sanded and finished by a technician upon request. This means there are considerations you should keep in mind during the design of your part to facilitate not only the successful construction of your part but also the removal of support structures and the finishing of your surfaces.

There are multiple finishing options available through Sculpteo:

  • Raw: Supports are removed from the model. Support scars/bumps will still be visible.
  • Polished: Supports and support scars/bumps are removed.
Standard layer thickness100 µm
Accuracy±0.1 mm tolerance in the XY plane
and ±0.4 mm in the Z direction

Our printer by Carbon3D allows us to print with a layer thickness of 100 µm or 0.1 mm. In consequence, it is important that your prints are exported with the highest quality possible. This will avoid any sort of triangulation during the print – though keep in mind your file cannot be greater than 50mb.

The CLIP (DLS) process is very reliable, but the parts it produces are susceptible to shrinkage and other sources of variation in the part.

It is important to note that accuracy and tolerance are dependent upon the material you select, and these values may change respectively. Furthermore, as tolerance is tighter in the XY plane, you should consider placing features that require a higher degree of tolerance facing the same directions. This way, when the build is prepared, the part orientation can be selected to place these features in the XY plane.

Maximum size 180 x 110 x 290 (z) mm

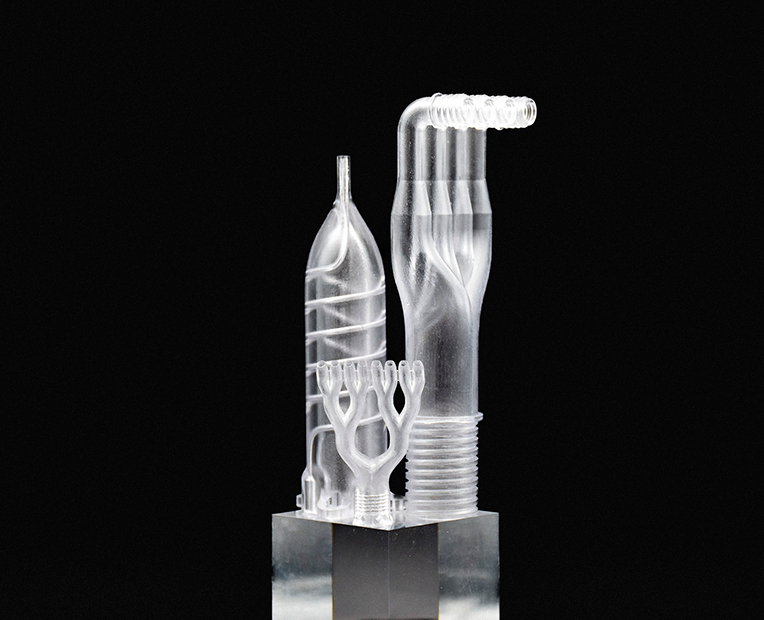
With CLIP (DLS), parts are limited by the area of the build platform and the height the platform can travel to. If you need to build something larger, you’ll have to print your design in several parts and assemble it later. Check out our tips regarding Minimum Clearance and Spacing.

Tips

Use wall angles above 40 degrees: Wall angles above 40 degrees don’t need to be supported. Printing self-supporting parts is faster and uses less resin thus shorter lead time for delivery. It also eliminates the step of removing the supports.

Tips

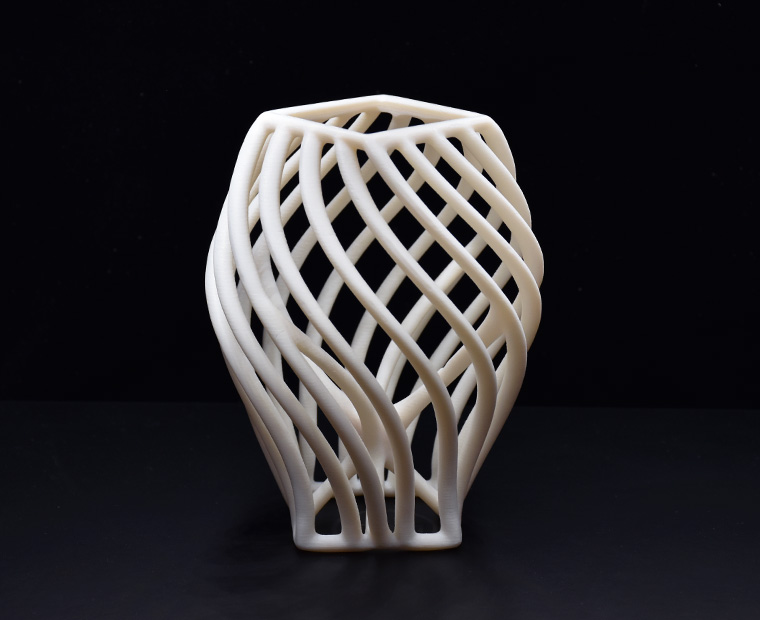
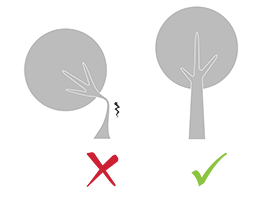
Avoid sharp angles, use curved corners: Gradually curving forms, are well-suited to CLIP printing. If your starting design has sharp angles, try to smooth the design. You can add fillets, bars, and ribs to support and smooth 90° angles.

Do not forget

Icon to keep in mind that solidity check tool don't detect physical aberrations

Keep in mind that our solidity check tool does not detect physical aberrations such as floating parts, unstable position, parts supporting too much weight relative to their thickness, etc. Particular care must be given to the geometry of your design and the most stressed parts must be thickened.

Minimum wall thicknessUnsupported: 2.5 mm
Supported: 1 mm

Recommended thickness for certain structural features will vary based on their specific nature. For example, a vertical wall 5 cm in height will be somewhat flexible if it is printed at a thickness of 1 mm, but rigid if it is printed at a thickness of 1.5 mm.

The walls of your object must be thick enough to support the weight of the object without breaking under its own weight. We recommend designing your model with the material’s minimum design standards located in “Tips & Tricks.” This resolution holds true for short walls on the order of 2mm protruding perpendicular to the build direction (XZ and YZ planes) as well as in the XY plane. As it is the case with any thin or small feature, anything with a high aspect ratio (long and thin) will be fragile and need to be supported by other design features (ribs or fillets) or removable support structures. When designing thin/small features, keep aspect ratio 1:4 to minimize distortion. For the upper limit, try to design your walls no thicker than 1cm as bubbles may develop.

Moreover, tall and large parts have a tendency to warp and must be supported to maintain rigidity throughout the printing process. Warping can be caused by heat, vacuum forces, and thin walls. For larger parts, 0.5mm may not be enough to avoid warping depending on the cross sections.

Tip

Make walls thicker than 1 mm: Walls thinner than 1 mm are difficult to print and are best avoided. It is possible to add a support structure to maintain stability. For example, if you are modeling a bust of a person, you can attach thin aspects of the design like the ears in more places around the model’s head. Doing that will avoid cantilevered and easily breakable elements in the final print.

With a 0.8 wall thickness, your design will be slightly flexible. To obtain more rigidity, we advise a 2mm wall thickness.

Tip

Make walls and solid blocks of resin thinner than 10 mm: As parts thicker than 10 mm may suffer from heat-related distortion and bubble formation, try to avoid printing block-like models. However, by hollowing out solid areas and adding supporting 3D lattices, you can convert blocky designs into ones more suitable for CLIP (DLS) printing.

Tip

Keep cross­-sections below 50 mm: We are able to design models as small as 1 cm3 as small parts are light and therefore resistant to being deformed by gravity. We can print parts longer than 50 mm in the z-axis, but we try to avoid designs with cross-sections larger than 50 mm because they may distort during printing.
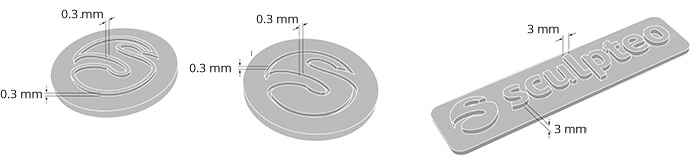
Minimum size of details0.5 mm
Minimum height and width detailsEmbossed: 0.3 mm 
Engraved: 0.3 mm
Minimum height and width for a readable text3 mm
Enlargement ratio1/1

A detail’s minimum precision is mainly determined by the resolution of our printers. However, during the cleaning process, a fine layer of detail can also be lost. In order for a detail and text to be visible we recommend following our recommended sizes at the very least. It is possible to go to a minimum etching and embossing detail of 0.1 mm but visibility will decrease. To ensure details will be visible, their width should be at least as big as their depth.

The smallest resolvable text is 8 points (which equals to 11 pixels or 3 mm), in both recessed and protruding features. In some instances, especially in the XY plane, font sizes smaller than 8 points may be possible but run the risk of losing detail due to over-curing, the unintended resin of curing across a feature.

Enclosed parts?No
Interlocking parts?No
Minimum spacing between fixed walls0.4 mm
Minimum clearance between parts0.4 mm
Assembly?Yes
Minimum space0.4 mm

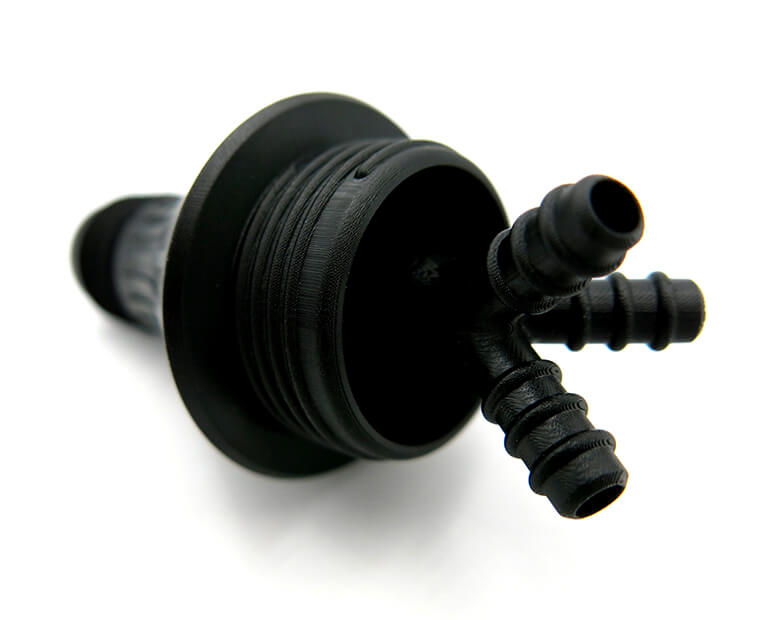
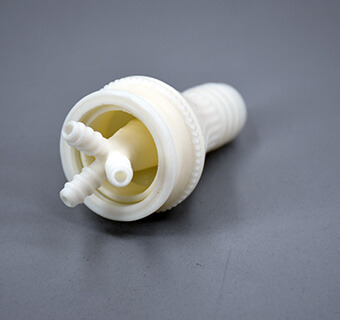
Objects printed in polyamide can be printed to be assembled. As long as a width of at least 0.4 mm is left between the different parts of the object.

Hollowing?No

hollowing

The resin does not allow for the hollowing of your object. For this reason, the option is not available during checkout.

For the same reason, it is not possible to create an empty cavity within a closed Rigid Polyurethane resin object. If the object were hollowed, the 3D printer would add support elements in the empty space which would be impossible to remove and trap uncured resin inside. Those elements run a high risk of breaking as the object is handled and releasing uncured resin.

Files with Multiple Objects ?No


Icon to show that you can't print a 3D file containing several objects

It is not possible to upload a file to be printed in resin with multiple objects.

It is not possible to print a 3D file containing several objects, that’s why we cannot accept files that contain clusters of multiple objects . However, don’t worry, this doesn’t mean you’ll pay more for your multiple objects: to reduce the 3D printing cost, we set up a different price calculation as soon as you order two or more objects with CLIP (DLS).

You can also use our online tools and see our tricks and tips on how to reduce your 3D printing price.

To get more information on our additive manufacturing service, you can contact our qualified sales team.

Grappe Material no.jpg

Mechanical PropertiesConditionsUnitValue
Elongation at break%90 – 120
Tensile ModulusMPa1700 – 2200
Tensile strengthMPa42 – 47
Impact StrengthJ/m21 – 23
Glass Transition Temperature°C80
Heat Deflection Temperature°C70

Ready to 3D print with Rigid Polyurethane?

With Sculpteo’s online 3D printing service you’re just a few clicks away from professional Rigid Polyurethane 3D printing. Your 3D model is printed with the highest quality and delivered straight to your door. 

Get started now!

Discover our other materials...