3D Learning Hub
See all categories

3D print a photo: How to convert photos into a 3D model? (2024 Update)

Introduction

3D printing gives life to all your best projects. Do you know that it could also give life to your picture? Yes, you read it right, if you have a picture of it then you can turn it into a 3D model and 3D print it! From 1 to 100 hundred pictures, several effective solutions are available to help you convert photos into a 3D model.

In this article, you will find an overview of different solutions to answer your question “how can I convert my picture into a 3D model ?”. With any of these solutions, you have to keep in mind that results are highly dependent on the source footage. That’s why there is no one-fit-for-all solution. Based on our experience, we will give you some practical advice to create the most efficient shooting.

From the shooting to the final choice of the 3D printing materials, you can do the whole process on your own. Don’t be scared, if you really don’t know how to use 3D modeling software, you can get a little help from a designer to get a 3D printable file.

How can you turn one picture into a 3D model?

First, the results of your model depend on the number and quality of the photos you take; the more photos and the higher the resolution the more detailed your 3D model will be. You don’t need to be a professional 3D artist or 3D designer, but with an ounce of 3D skill and enough time, everyone can achieve a good 3D character or object and print it.

You’ll see that 3D printers can give life to your best images. You can create any avatar or model that you want with the 3D printing technology, you can also create a CAD model with images from video games. Everything is possible. We split the solutions on the number of images that you have already taken to generate your 3D file.

Did you know that you can create a 3D model even with a single picture?

Don’t get too excited – creating a 3D model from photos is possible, but you should keep in mind that the possibilities and the details allowed would be more limited. For example, you cannot expect to create a perfect 360° file of your pet or your home based on one picture. To obtain the desired shape with a printing process, it is better to have a lot of pictures to get a detailed model and an impressive result. Maybe it will be possible to print a perfect CAD model thanks to only one picture in the future of 3D printing, but it’s not possible yet.

But still, if you only have this option you can create an interesting 3D printed object with the additive manufacturing technology that we know today.

From one 2D image to 3D model: The best tools

  • Use the Extrude tool

A picture is a 2D file, meaning that you will only be able to play with two axes to use it in your 3D model. The extrude tool will help you to create a third axis to create new geometry from a selected component. This tool will help you to give volume to your 2D model based on a specific algorithm (most common is converting your image in levels of grey and calculates the height based on the intensity of grey). It’s a pretty common tool that you can find on CAD software. If you don’t own a graphic software you can have a look at one of these free amazing 3D software: SketchUp, Blender or Meshmixer.

To convert your 2D photo Smoothie 3D might be the easiest solution. This free online software is a game-changer in the creation of a 3D model based on a single picture. With only one picture it helps you to create a simple digital model online that looks closer to the kind of result that you get with a scan or photogrammetry. What’s the trick? Well, if your 2D images can be symmetrically replicated you can get a surprisingly lookalike 3D model. However, if you need to create an asymmetrical model with a lot of details you will probably need to use another software with more pictures. 

smoothie3D

smoothie-3D.com

  • Artificial Intelligence

This AI powered tool, developed by researchers, is able to convert one single photo into a 3D model. This 3D Face Reconstruction online app explores a face, using one picture and generate a model that you can totally use for 3D printing. 

  • Lithophane

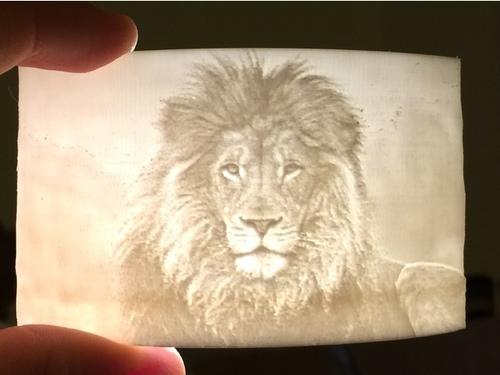
First, what is a lithophane? A lithophane is a way to 3D print a photo using the thickness of the print to show different shades of grey, some will be dark when others will be brighter when illuminated from behind. To generate a 3D model, there are options available: Cura, or Image to Lithophane

Once your model is generated, you will have to slice your model. In order to slice the model, you will have to choose a slicing software, to create layer and guide your 3D printer. To get a good 3D printed lithophane, it is not recommended to use an FDM printer, the layer height might not be good enough.

3D printed lithophane

https://www.indiamart.com

How can you convert a few pictures into a 3D model?

Many times people are contacting us for a solution based on 10 or 20 pictures. For example, when you’re looking to create an avatar of – let’s say – your grandpa, you start asking around to get pictures, try to find a good portrait of him, another picture of him sitting in the garden, the third one playing with your kids, etc. 

When you think you have grabbed enough material, you’re looking for an automatic solution to build a 3D model based on these various pictures that have been taken at different time, with different devices etc. Unfortunately, there is none. Because a very special secret-sauce is needed in this case and its imagination. You have to mentally organize the pictures and sculpt your model based on the measure and details that you can grab from the pictures.

It takes a lot of time to create a model from photos like this. So the only way to get to an optimal result is to convert a lot of pictures to make a very precise digital design. Then, you’ll be able to print an interesting model and get a good print quality.

To summarize, you have 3 solutions to go from 2D to 3D with few pictures:

  • you can still use the solutions described for one photo
  • you can launch yourself in 3D modeling software (such as Zbrush or Sculptris)
  • you can ask a 3D designer to help you modeling your 3D file.

Indeed, with more perspective thanks to the different pictures, you would be able to create a more detailed and accurate 3D model. If you need more information to find a 3D designer for this process, please feel free to contact us.

How can you generate a 3D model from multiple images?

Even if 3D printing enables you to create 3D objects with complex shapes you first have to create a detailed model to get an optimized result. In this part, we are giving you few tips to optimize your pictures in order to create the best 3D model. To do so, the best way for you is to use photogrammetry. 

This technique implies a process of collecting a series of points in space from a series of photographs. First, you snap a series of photos of the object from every angle that you can, once you have those photos you upload them into a photogrammetry software and you can generate a file to 3D print it.

photogrammetry

To get the best 3D model for photos, you first have to get good photos. Here are our best tips.

  • Choose the right material for the best result
  1. A digital camera: of course your old camera won’t make the trick, as you need to have digital files to upload on your computer. Your smartphone’s camera can be a good start but you’ll obviously get a more detailed result with a digital single-lens reflex camera as the pixel’s resolution will be three times better and the setting more customizable. We strongly recommend using this type of camera since you need to to make the most of the light and the outline of your subject. The best settings are a low ISO to diminish the most noise as possible. The main advantage of it is that it will help you to get a small aperture with a reduced depth of field. This would allow you to increase the sharpness of the subject outline, making it less confusing for the software. If you are considering taking a subject in movement, be aware that the setup could be far more complicated.  You will need many digital cameras as above in the picture (between 50 and 100) with a simultaneous triggering mechanism.
  2. A lighting device: Even if you can settle your camera settings to improve the light sensitivity, an additional lighting will be key to improving your shooting. Adding a light will help you to earn at the same time a good light sensitivity and lower the noise. Indeed, your ISO could be lower and you will gain in speed and reduce the grain. Whether you use natural or artificial light, what is key is to avoid as much as possible shadows that would blur the outline of the subject
  3. A Tripod: or any support allowing you to stabilize the subject and your camera. The pictures will be less blurred and more consistent. It will provide more high-detailed and flat pictures.
  • Follow these ten commandments of an optimal shooting to create your 3D file
  1. Try to place your object in a way it is raised and you can easily turn around to take pictures from all the angles.
  2. Shoot various loops and change your angle every time to be sure to cover the surface of your object from the top to the bottom and from the left to the right.
  3. Take at least 30-40 photos to get a detailed model.
  4. In order to make the process on your software easier put some newspaper or sticky notes on the surface in contact with your object, it will help to distinguish it from your object.
  5. Limit the variation of light, moves and focus between your pictures
  6. Make sure that the exposition will be enough to get the precise shape of your object.
  7. To make the most of your camera’s pixel you can try to do your shooting in RAW image format to get the sharpest pictures possible.
  8. Use a lens with a low deformation between 30-60 mm
  9. Have a small aperture between 8 and 16
  10. The smallest ISO possible between 100 – 200

Selection of approved photogrammetry software to create your 3D file

Once you have this series of pictures you can upload them on specialized photogrammetry software such as the following ones:

Autodesk 123D Catch

123D catch is an Autodesk software which allows you easily to create a 3D model from your pictures with your smartphone or your computer. The application is free. The YouTube channel of 123D catch is full of tutorials that will help you to master easily the software from your first try and will give you precise tips to improve your set of pictures.  Check also our 123D Catch tutorial.

Agisoft Photoscan

Photoscan is a computer software that is also a good alternative. It offers a free license for individuals or a professional license costing $179. There are some technical requirements on your computer to make it work properly (for example RAM more than 256 GB). But the results can be impressive when you choose to upload a lot of data. For example, this software was used to create an impressive 3D model of a whole university campus based on 5000 pictures. It is less accessible than Autodesk’s software and will be more targeted for experimented users.

Context Capture (previously Acute 3D)

In the same way that Photoscan, Contact Capture is a more complex and professional oriented photogrammetry software. Acquired by Bentley system, this software is at the edge of the technology and offers astonishing results.  

Reality Capture

Reality Capture is a pure photogrammetry software, it doesn’t include any laser scan feature. This photogrammetry solution is easy to use and has quite a friendly interface. Speed and quality are the main advantages of this Autodesk program. You will be able to work on different file format, and even small objects using this complete software. 

Other ways to turn an object into a 3D model

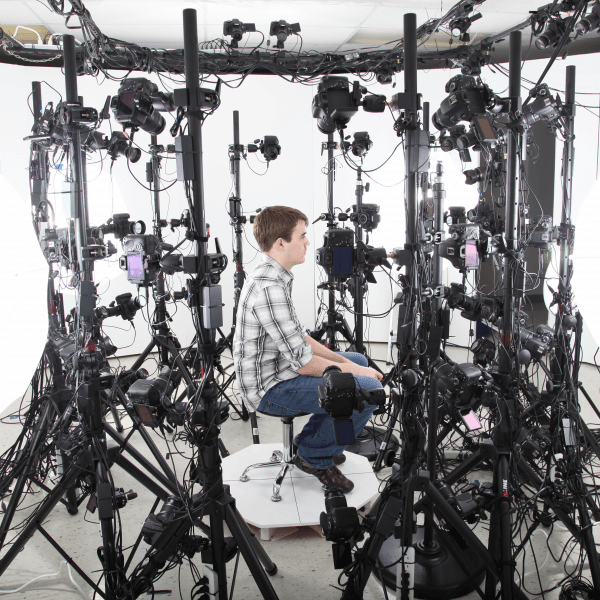
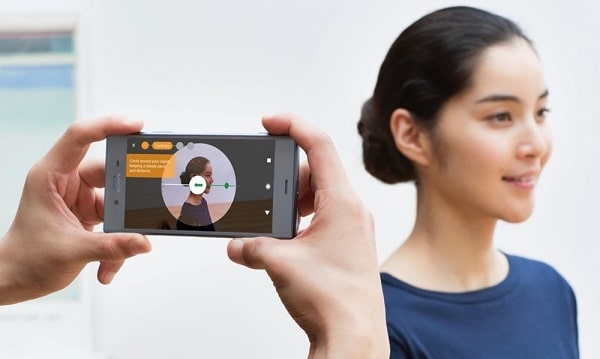
The best method to turn an object into a 3D model is 3D scanning, to capture the shape of your item. We are pretty sure that you don’t have a 3D scanner at home, but did you know that you could create a 3D scan only using a smartphone? 3D scanning is an easy method to turn an object into a CAD model.

Thanks to CT scanning, you could also create a 3D model of your own brain, and you could also 3D print it!

3D scan smartphone

Once you have a 3D file, what should you do?

Here are the last steps, and then you will be done with 3D printing your photos. First, you need to finish and optimize your 3D file in another software than the ones described above. It happens often that your 3D file can be non-printable since it’s very difficult to create a solid mesh based on a set of pictures (i.e. textures). Some 3D software are offering efficient tools for creating proper files such as MeshLab. You’ll be able to work on the resolution and size of your file, by creating a high or low poly mesh.

Then, you have to pick a format for your file. 3DS, OBJ, C4D, DAE, STL. STL files are the most common for 3D printing. 

The last, and the easiest part: you just have to 3D print it by uploading your 3D image on our online 3D printing service! There are a lot of possibilities to 3D print models because various 3D printing materials are available. You have to choose the 3D printing material that you want for your CAD model, it will determine the additive process. 

Usually, we recommend using the full color sandstone material in order to get a colorful and likely result. As you can see, with the 3D printing technology that we have now, it is not that difficult to turn photos into 3D models. You can do it on your own or with a little help, and the good news is that you don’t need to have a 3D scanner or 3D printers at home!

Even if additive manufacturing is very useful and efficient for rapid prototyping, or even to work on industrial designs thanks to impressive technologies allowing to create a large variety of projects from medical devices to kitchen equipment, office equipment or architectural exteriors. Witch technologies such as Digital light processing (CLIP)Multi Jet Fusion, or Selective Laser Sintering, you can work on anything, or just experiment these printing processes.

Thanks to this little guide you’ll be able to create a 3D character without using 3D scanning. We’ll be delighted if you share with us your project. We are always excited to see what you can achieve with 3D printing technologies. It’s the occasion to show us how you can get impressive results by turning your photos into 3D models!

Don’t forget to subscribe to our newsletter to get all tips you need to use additive manufacturing!

Picture credit: A 3D portrait. Toolfarm.com

How do I make a 3D model from a photo?

Can you 3D print from a photo?

How do I convert a picture to Lithophane?

Get the latest 3D printing news delivered right to your inbox

Subscribe to our weekly newsletter to hear about the latest 3D printing technologies, applications, materials, and software.