 Connect with Google
 Connect with Facebook
3D scanning for 3D printing using photogrammetry
Posted By Jess Hedstrom on Nov 11, 2015 | 0 comments
Photogrammetry makes 3D printing easy. Using a series of photos, Meshmixer and Meshlab can reduce the tallest of statues and buildings into a replica that you can hold in the palm of your hand. Let’s discover how this process works.
3D modeling can be as easy or as hard as you wish, there are professional software options that allow you to create elaborately engineered models from scratch. Or you can use free software to re-engineer or replace a broken household item. Photogrammetry is a great option if you have no 3D modeling experience and no engineering experience!
Photogrammetry is the process of collecting a series of points in space from a series photographs. When this scanning process is applied to 3D printing, the application of this technology is the easiest way to generate a 3D print. First you snap a series of photos of the object from every angle that you can, once you have those photos you upload them into a software like AutoDesk 123D Catch or something similar and upload. After doing so you’ll see that the software can provide you with an .obj or .stl file that you can use for 3D printing.
Although most photogrammetry to 3D modeling software works well, there are usually additional errors that need to be cleaned up a little and that’s where this tutorial comes in handy. We’ll walk you through the process of cleaning up your 3D scan from photogrammetry so that it’s ready to 3D print.
If you would prefer to watch the FULL PHOTOGRAMMETRY TUTORIAL video rather than reading the steps below please feel free to click here.
Here is the breakdown of what we’ll cover in this tutorial:
-File Too Big
-Surface Repairs (video tutorial)
-Create Shells (video tutorial)
-Base Needed (video tutorial)
Reducing the amount of polygons in your mesh will reduce the size of your file for 3D printing
A polygon mesh is a collection of vertices, edges and faces that defines the shape of an object in 3D solid modeling. Here is an image of all the parts of the mesh model broken down.
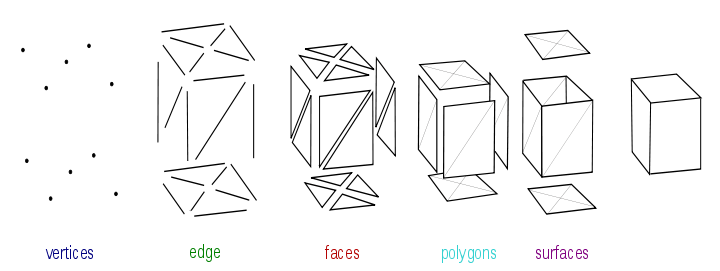
Polygons are the combination of vertices, edges, and faces; by reducing your vertices and edges you’ll reduce your faces which will reduce your polygons. In the process of photogrammetry the software plots out the vertices based on the series of photos and often it plots a lot of unwanted area around your object. We call this background noise. If you want to replicate a garden statue, your series of photos will undoubtedly have the garden in the background. This means that trees and the blades of grass and leaves can have their own series of polygons in your 3D model.

How do we fix this issue? We can reduce the 3D model’s size using MeshLab by deleting the garden background and isolating only the statue. This will reduce the size because it removes those unnecessary polygons. Watch the video below to see the steps for deleting the background.
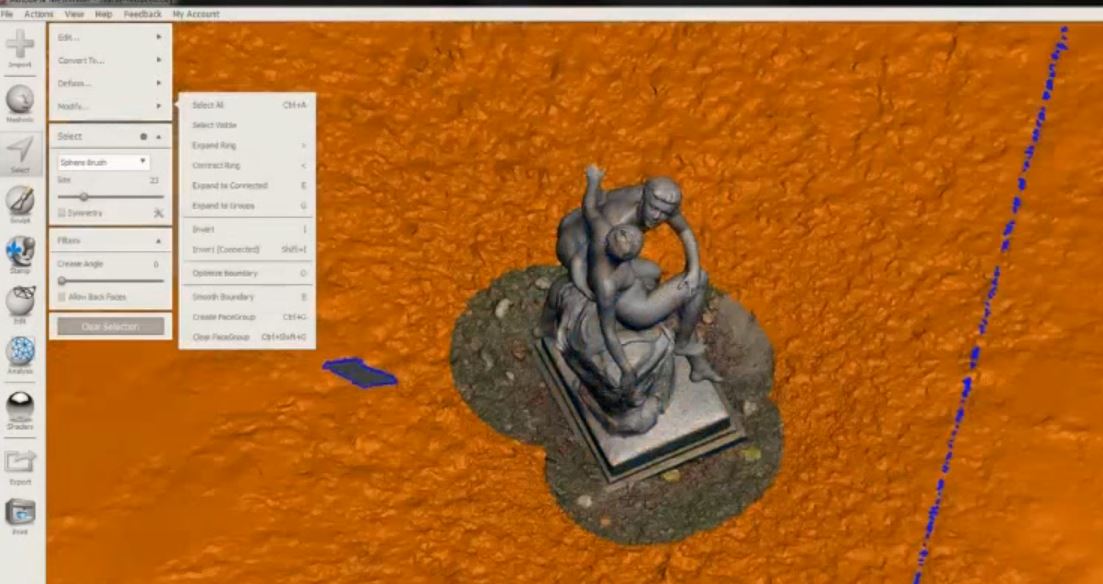
In MeshLab we select only the area we want to keep, then we invert, so now everything that you don’t want to keep is selected. Then we can discard the unwanted area. If you’d like to watch the video of this process click here.
How to fix the surface of your 3D model & create shells using MeshMixer
When using a series of photos to create a 3D model you need to be aware that there can be many errors that naturally take place in the process. The software can sometimes drop vertices from your model, which will leave a hole in the shell of your model. This means that when you upload it to the Sculpteo website for printing it will automatically close the hole by creating a flat surface. If you are printing a geometric shape, uploading to the Sculpteo website and letting the software automatically close the hole for you would be the easiest method. However if you are printing an item with texture or a curved surface you will want to follow our instructions in the video below.
Thank you so much for watching our webinar today and reading our tutorial about 3D printing using photogrammetry, we hope that you utilize this method of 3D printing for your future projects, and remember Sculpteo has a Multicolor material available to capture the vibrant colors in your photos.