 Connect with Google
 Connect with Facebook
The best tips for multicolor 3D printing
Posted By Jessica Van Zeijderveld on Apr 4, 2018 | 0 comments
Have you ever thought of 3D printing your 3D file into multiple colors? With so many 3D printing materials out there, imagine being able to have every color of the spectrum 3D printed into your object like they do with offset printing for things like business cards. Possibilities could be endless. Due to the machine’s precision, the coloring will be extremely accurate. Multicolor 3D printing creates multicolor objects: fast, inexpensive, and simple all the while having full control over the colors, tints and shades.
Here at Sculpteo, we offer you quality multicolor 3D printing for your 3D objects. First of all, you might wonder what exactly multicolor 3D printing is. If you already knew, you might ask yourself ‘’What’s the purpose of multicolor 3D printing? What are the benefits exactly for the people in the 3D printing industry?’’ Even if these questions don’t trouble your mind, you might be curious as to what tips we have in order to create a perfect multicolor 3D print. Tips based on some issues we might face with multicolor projects that prevent us from printing your 3D file in the exact way you imagined it. Issues with file size, resolution, things like coloring mistakes or troubles with creating a 3D scan might occur that withholds us from creating your ideal 3D print. The answer to all these questions will be fully answered below.
What is multicolor 3D printing?
Multicolor 3D printing is a fully colored 3D printing process meaning that 3D objects are directly colored during the additive manufacturing process. The colors that you have in mind for certain parts of your 3D object will be applied automatically and not manually, resulting in accurate coloring. The 3D printing technology which makes it possible to achieve printing in multiple colors is called Colorjet.
Tips on different aspects of multicolor 3D printing
During the years we have existed as a 3D printing service, we have encountered issues here and then with multicolor projects that we have processed for our clients. Issues ranged from faulty 3D scans to changing color palettes. Below you will find our best tips written in the frame of these issues we faced, in order to 3D print your multicolor project in the best way possible.
How to get the right colors
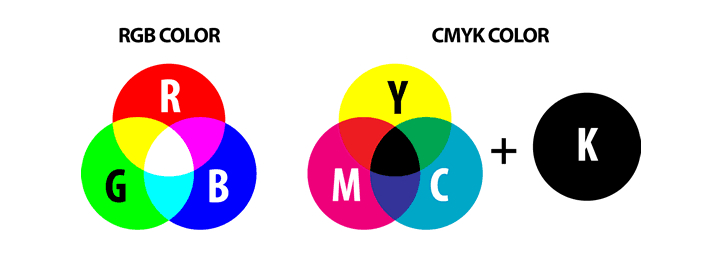
Multicolor printing offers up to 390.000 different colors for your color print. So, when you multicolor a 3D object you might find that your 3D object might not have the precise colors you imagined they would have. This color difference occurs due to the fact that the colors you see on screen while creating your 3D file are different from the physical colors we print with. During the creation of your 3D file, pixels are used, each having either the color red, green or blue, known as the RGB color palette. The physical 3D printing colors make use of the CMYK palette: cyan, magenta, yellow and key (AKA black). These two different color palettes result in (slightly) different coloring.
Adjust gamma, contrast and saturation settings
The rule of thumb you should remember is, the brighter the color of your 3D printing model in your 3D file and on your screen, the bigger the color difference will be between your digital 3D model and your physical multicolored 3D printed object. To avoid this color palette change, we recommend you to set the contrast, gamma correction, and saturation higher. You can use a photo editing software such as Adobe Photoshop, GIMP or with advanced 3D printing software, to help you modify these aspects of the colors.
Create a small tryout test version
Due to a large number of colors multicolor 3D printing offers, it is best to 3D print a small part first with the colors you had in mind for your 3D object (all the while choosing a finish as well). This allows for a better overview of what the colors look like in real life. For example, some colors such as brown, flesh and earth tones (mainly used for 3D printing a human being) are very hard to create as the 3D printer will have to mix the whole CMYK color palette together. By printing a small 3D test piece with multicolor, you can determine the exact CMYK colors and 3D printing materials that you need before 3D printing your final model. You never know if you need or want to change colors last minute.
How to get the right resolution and outcome
So how do you get the right resolution and outcome for multicolor 3D printing? In general, when we look at the threshold for getting your texture resolution right, you need to know that unless you hit a very low limit with your resolution, there won’t be an actual visible difference regarding your 3D object. Although the resolution doesn’t really affect the quality of your 3D print, you need to keep in mind the size of your texture. To get the right size of your texture you may need to subdivide the issue into the following: getting the scale and the compression right for your texture resolution. You can use your 3D printing software to resolve these issues.
Adjust Scale
For scale we recommend the following:
- For prints with a height smaller or equal to 15 cm, use a 1000 x 1000 pixels texture resolution
- For prints with a height included between 15 cm and 20 cm use a 2000 x 2000 pixels texture resolution
- For prints with a height included between 20 cm and 30 cm use a 4000 x 4000 pixels texture resolution
- For prints with a height included between 30 cm and 38 cm use a 8000 x 8000 pixels texture resolution
Adjust Texture Compression
And as for texture compression, we propose the following:
Any texture image file you send us will be altered into a .bmp file. During the alteration your texture file can highly increase in size, some even ending up doubled the size of that of the original file. If your original texture image file is already a heavy file, you will need to alter the resolution in order to lighten the file. If the original file stays as a heavy file, it may end up being rejected during the printing process.
How to create the ideal 3D scan
Some 3D printing projects require a 3D version of an existing object or (living) thing. For example, when you wish to have a 3D printed version of an employee, you have to 3D scan your employee first. This 3D scan will scan the outlines and shapes of your employee. If your 3D scan is not entirely accurate it will result in your employee’s outline being very angulated and rugged, meaning that the final 3D version of your colleague will look angulated and rugged as well. The shadows of these angles will influence the coloring immensely making the angles and jaggy lines even more obvious to the naked eye. Make sure that you use a proper 3D scanning software and adjust the angles in post-processing by making them more smooth so that your 3D file will be 3D printed with nicer colors, shadowing and angles.
Multicolor printing at Sculpteo
At Sculpteo, we use the Colorjet 3D printing process together with advance 3D printing software in order to manufacture your multicolor parts. Your 3D object will be created using a fine powder material that resembles sandstone and we are able to multicolor your 3D object in up to 390.000 different colors!
The Colorjet 3D printing technology
Here at Sculpteo, we use a ZCorp 3D printer for our composite multicolor prints. The process of our Colorjet 3D printing technology goes as follows:
- 3D Model transferred to the 3D printer
Before the actual printing process begins, you need to create a 3D model using a program dedicated to 3D modeling. You will need to export not one but two files from the 3D modeling program, one will include the physical shape and size of your object, the other needs to include the texture and color details. Those two files can then be uploaded to our website in one .zip file.
Your 3D model and its texture details are then sent to our 3D printers and arranged for the next available batch. For composite multicolor prints, the model will be placed in the batch meant for a ZPrinter 650s by 3D Systems.
- The Object is getting 3D printed
During this step, your object is actually being printed layer by layer. A rolling batch will create a uniform layer of a sandstone-like powder. From there on, two printing heads pass over the batch, coloring and adhering the object at the same time. The batch of powder then makes another pass, until the object is completed.
- The Object is removed from the batch
During this step, the objects are manually removed from the batch. The excess powder from the print is kept for a future print in order to prevent material waste.
- Cleaning and gluing
The process is nearly finished. During this step, the excess powder that could not be removed by hand will be removed with pressurized air. The object is then put in a cyanoacrylate bath, which results in further solidifying the object and also enhances the colors even more.
- Varnishing
During the last step, your object will be given an anti-UV varnish to protect it from extensive light exposure. If you choose a different varnishing option for your object, it would also be applied during this final stage as well.
Technical aspects, Resolution and Finishes
Technical aspects
The 3D objects we print with multicolor printing have a porous surface, hence they should not be exposed to any water due to the risk of the colors running and fading out. The 3D printed objects can resist temperatures up to 60°C meaning that being exposed to higher temperatures, they will be prone to any occurring damage. Als, remember that the maximum file size that we accept at Sculpteo of your 3D model is 50MB.
For any specific technical aspects, please consult our dedicated multicolor 3D printing page here.
Resolution
The layer thickness we maintain for any multijet colored 3D print is 100μ. The main side note we make is, because of the limitations of multicolor 3D printers, there may be some imprecisions in the print. Even though, we always ensure a maximum precision of ± 0.5mm for pieces 99mm or smaller and a global precision of ± 0.5% for pieces 100mm or larger.
Finishes
As for our finishes for a multicolor object, we offer two finishes namely: raw (no additional finish after the gluing) and matte varnished. The varnish we apply at Sculpteo is an anti-UV varnish that protects the object from extensive light exposure.
Start your Multicolor 3D printing project today!
So have we convinced you on the use of multicolor for your next 3D object and color print? You have realized it is fast, inexpensive, and that you have full control over the colors, tints and shades? Once you have implemented these tips into your 3D file as well, you are ready for your (possibly first) multicolor and/or multimaterial 3D printing project! Upload your 3D file here and once your 3D object is processed through our color 3D printers, it will arrive in a matter of days. We look forward to seeing what colors you come up with for your 3D object. Happy 3D printing at Sculpteo!