 Connect with Google
 Connect with Facebook
How to design a 3D printed bike: Which material for which application?
Posted By Capucine Lonjon on Feb 22, 2017 | 0 comments
Have you heard of our Sculpteo Bike Project? For CES 2017, we created the first ever fully functional digitally manufactured bike: 70% of its parts were produced by our 3D printing and laser cutting service.
Then, to prove it was actually functional, the two designers of the bike, Piotr Widelka and Alexandre d’Orsetti, went on a long trip from Las Vegas to San Francisco, and rode the bike on over 1000 km!
How did our designers create this digitally manufactured bike? How did they choose which 3D printing material would fit each part? Learn all about how our designers Piotr and Alexandre designed this bike specifically for 3D printing, taking into account all the constraints each part would have to endure.
3D Printing materials and technologies: making the most of their particularities
At Sculpteo, we have a wide range of 3D printing materials with high mechanical properties: plastics, resins, metals, etc. It is important to learn the strengths and weaknesses of each one, in order to make the most of their particularities.
The bike is a great tool to realize this case study, as it is made of many different parts, and each one of these parts has to endure specific constraints. Some have to resist strain, other need to be flexible, or on the contrary, rigid.
On top of the materials, it is also important to take into account the 3D printing technology: each one comes with its own design constraints and will be more or less suited depending on the size, complexity, and aspect you expect for your part.
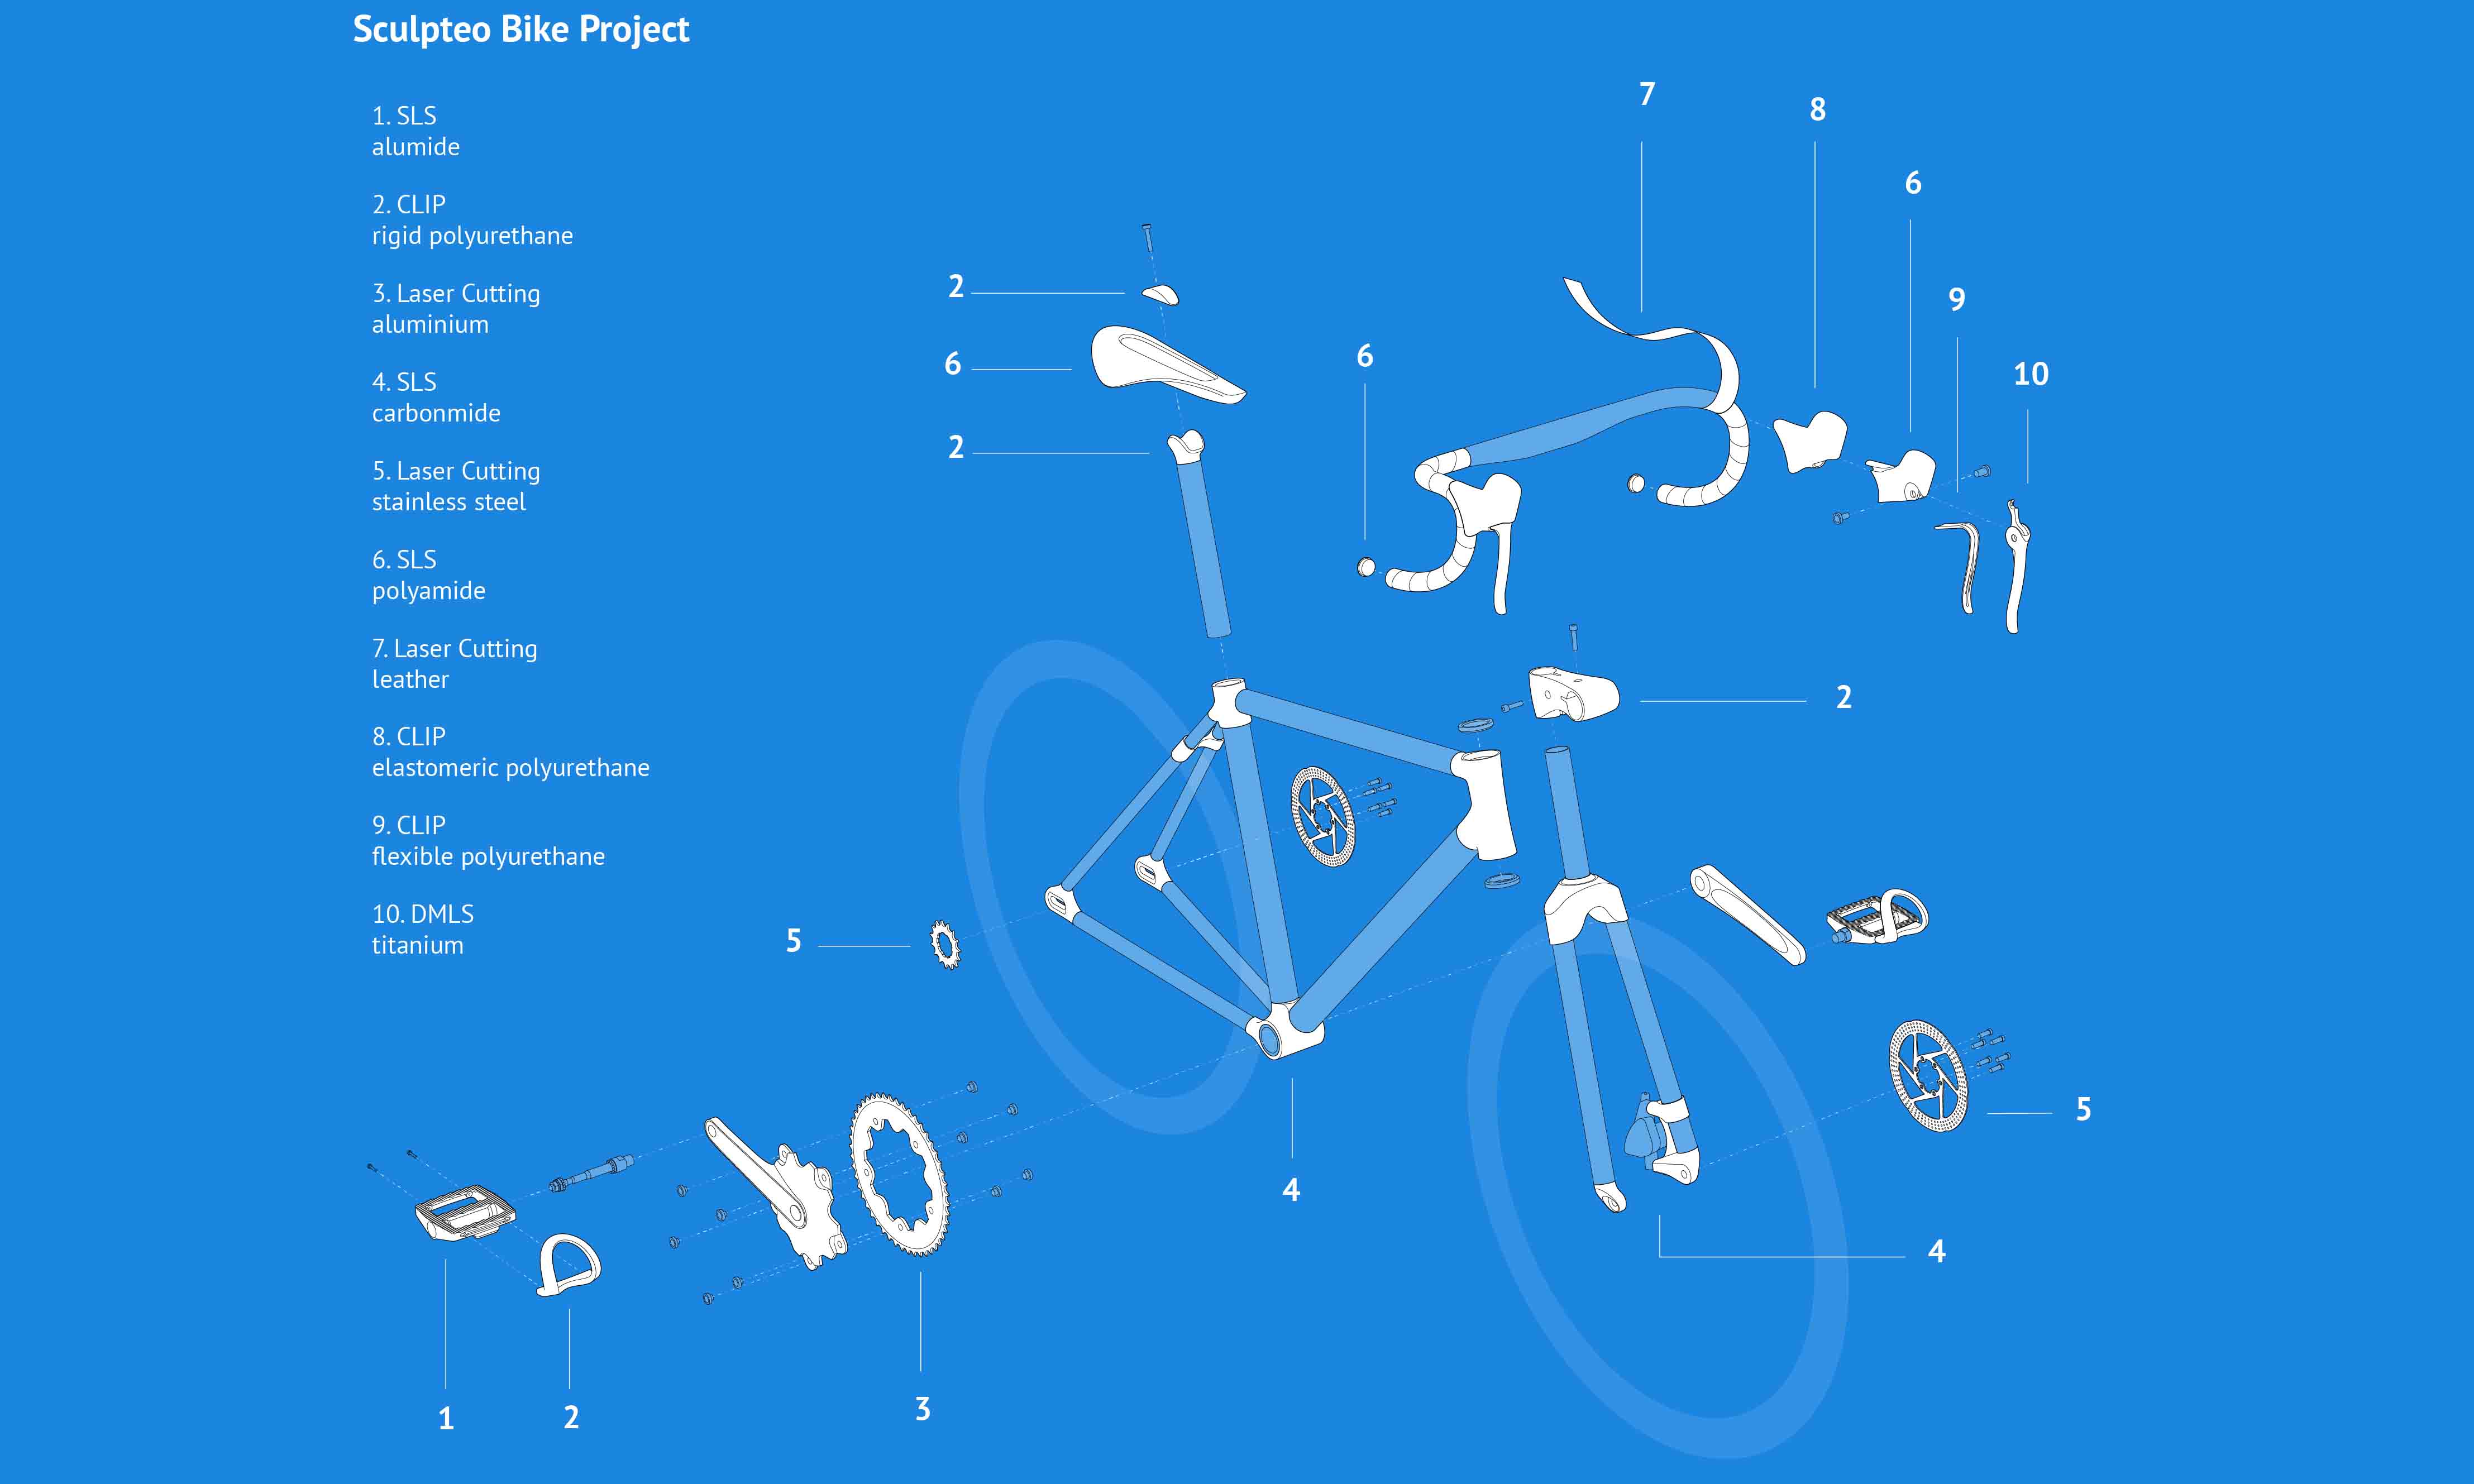
| 3D Printing material | Main characteristics | Technology & Design constraints | Digital Bike Parts |
| Polyamide (PA), painted black | Resistant and flexible, good shock absorbant | SLS: very few design constraints, no need for supports | Saddle, which needed to be thin, resistant, comfortable + connectors + one of the frame sets |
| Carbonmide | Resistant, more rigid than PA. Great surface quality | SLS: very few design constraints, no need for supports | Frame connectors |
| Alumide | Resistant to wear and friction + aesthetic (metallic grey) | SLS: very few design constraints, no need for supports | Pedals, which needed to resist high forces |
| Rigid Polyurethane (RPU) | Very rigid, great surface aspect | CLIP: requires supports | Gallow + saddle fixers + foot-rests which endured high strain |
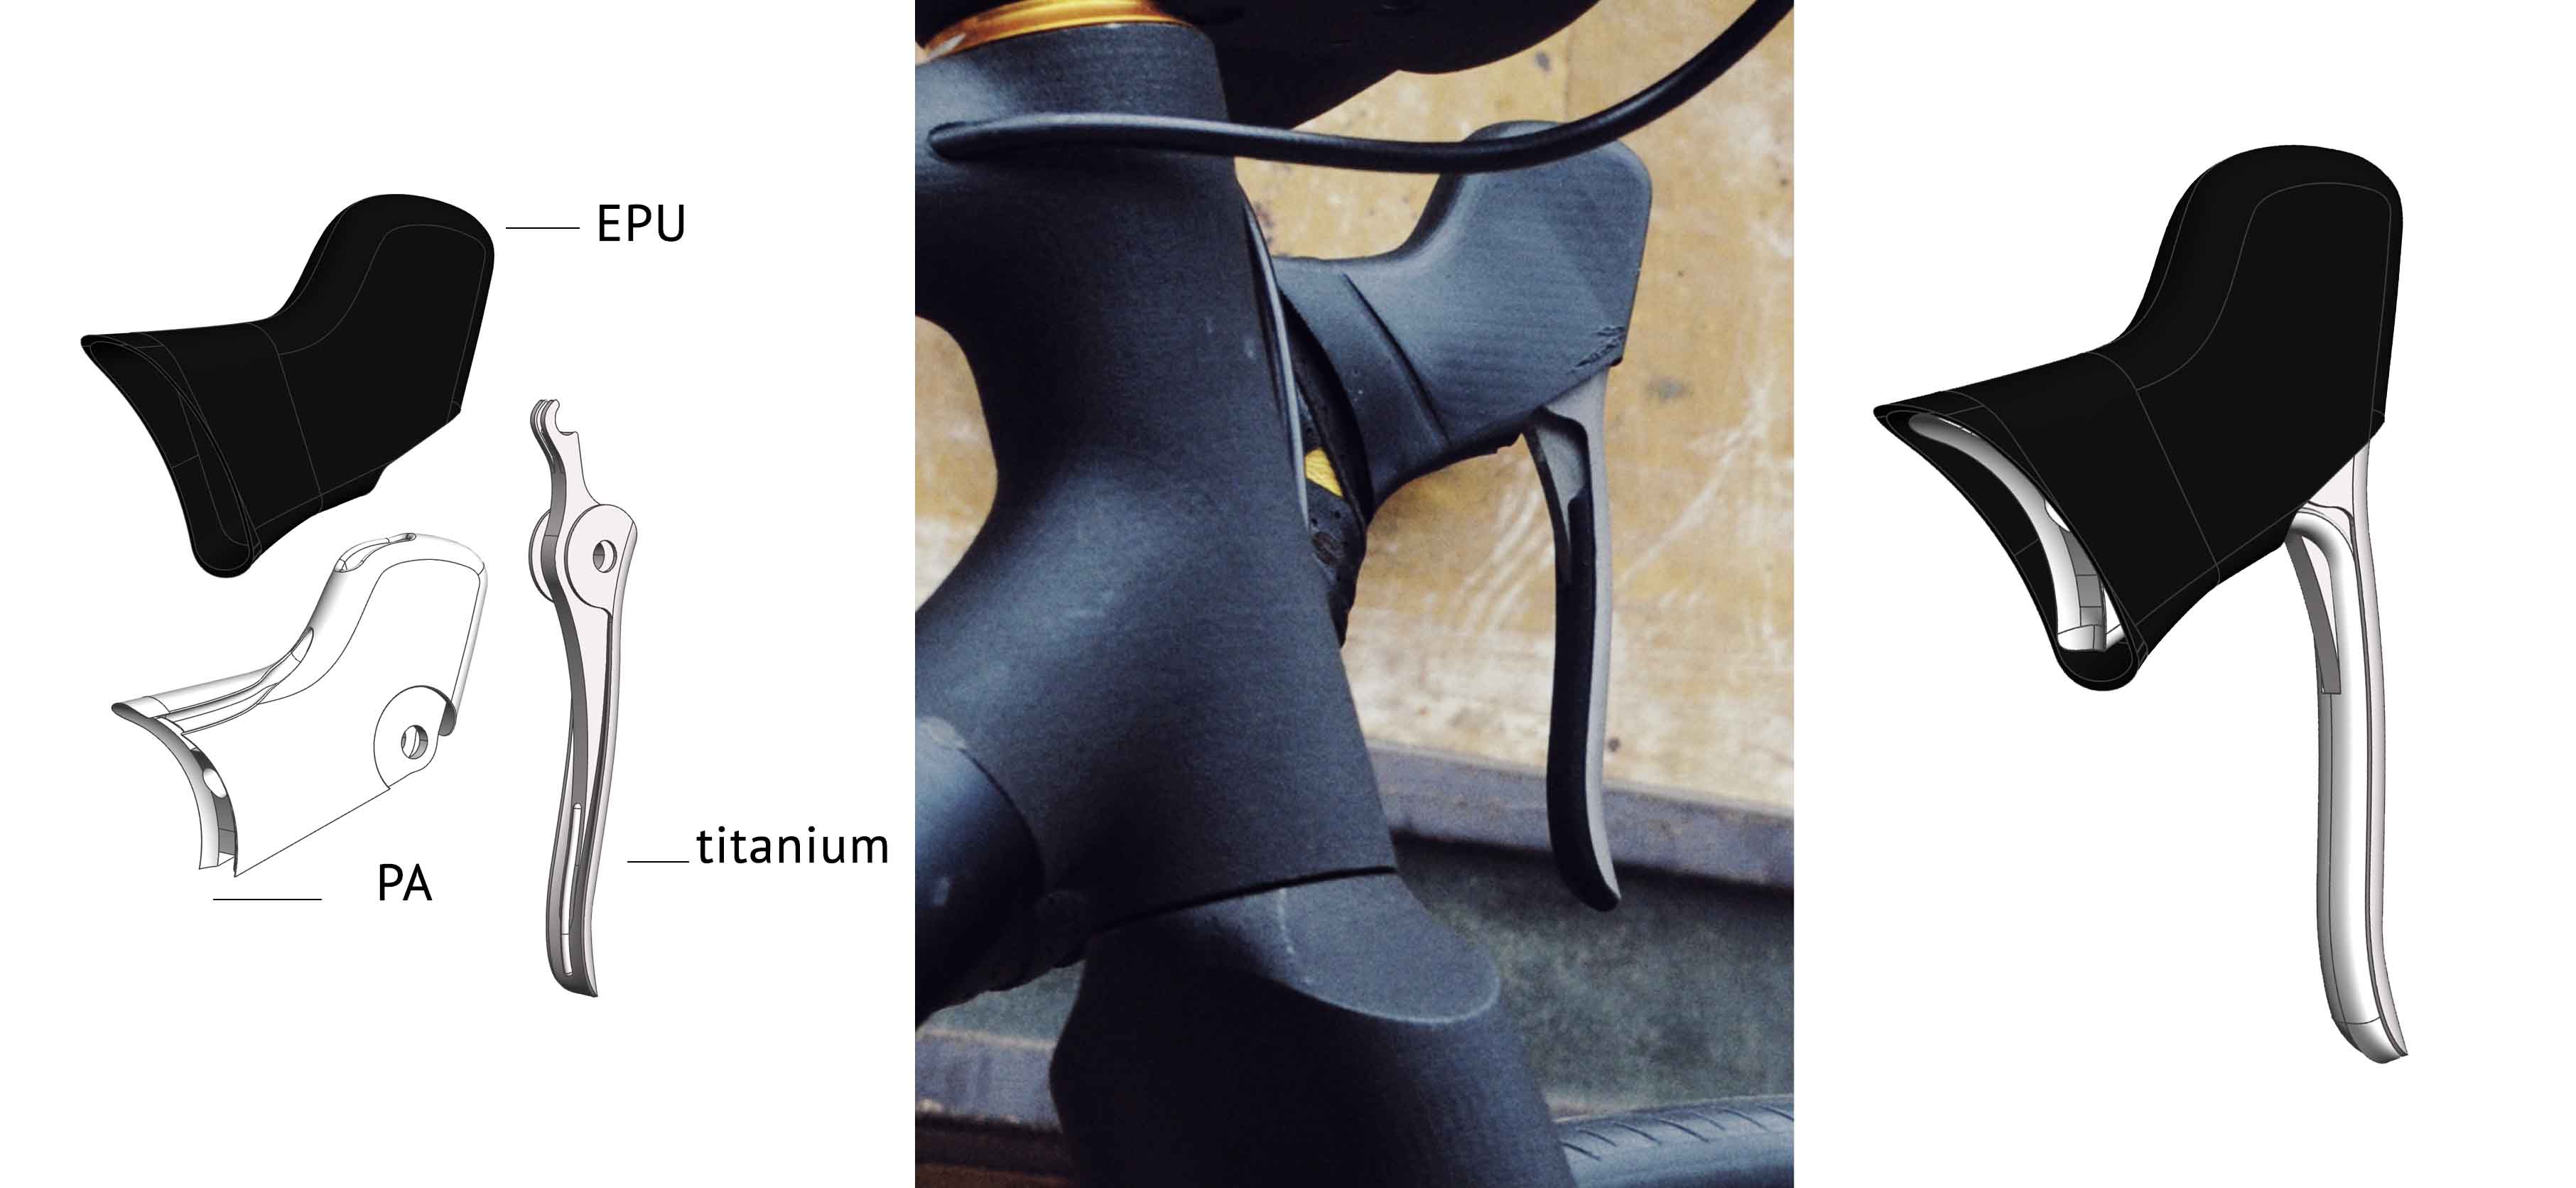
| Elastomeric Polyurethane (EPU) | Very flexible, resists deformation | CLIP: requires supports | Brake levers, which needed elasticity |
| Titanium | Extremely resistant, allows thin designs | DMLS | Brake levers, which needed to be thin and resistant |
Plastic 3D printing: polyamide, carbonmide and alumide
Strong, yet flexible, with very few design constraints: SLS 3D printed polyamide for the saddle and some connexion parts
The saddle
The saddle is, of course, an essential part of the bike. The challenge with it was to make this very thin part both resistant and comfortable – we were going to ride on it for 1000km! Polyamide fitted perfectly because it is very strong and flexible. Even if the bike fell down many times, the saddle never broke.
As for comfort, the polyamide saddle is comfortable in the same way that a saddle of a racing bike is. It’s meant to be efficient, and to get on the road quickly!

The bottom bracket, connexion parts for the wheel, the fixing brackets on the back.
The small parts on the back also represented a challenge because they have special holes for screws, and required mechanical assemblies. They also endured a strain from the brakes. It was one of our doubts before testing the bike: would those parts break?
The other small part prevents the wheel from turning and also supports a lot of strength.
We were very happy to see that it was not a problem at all!
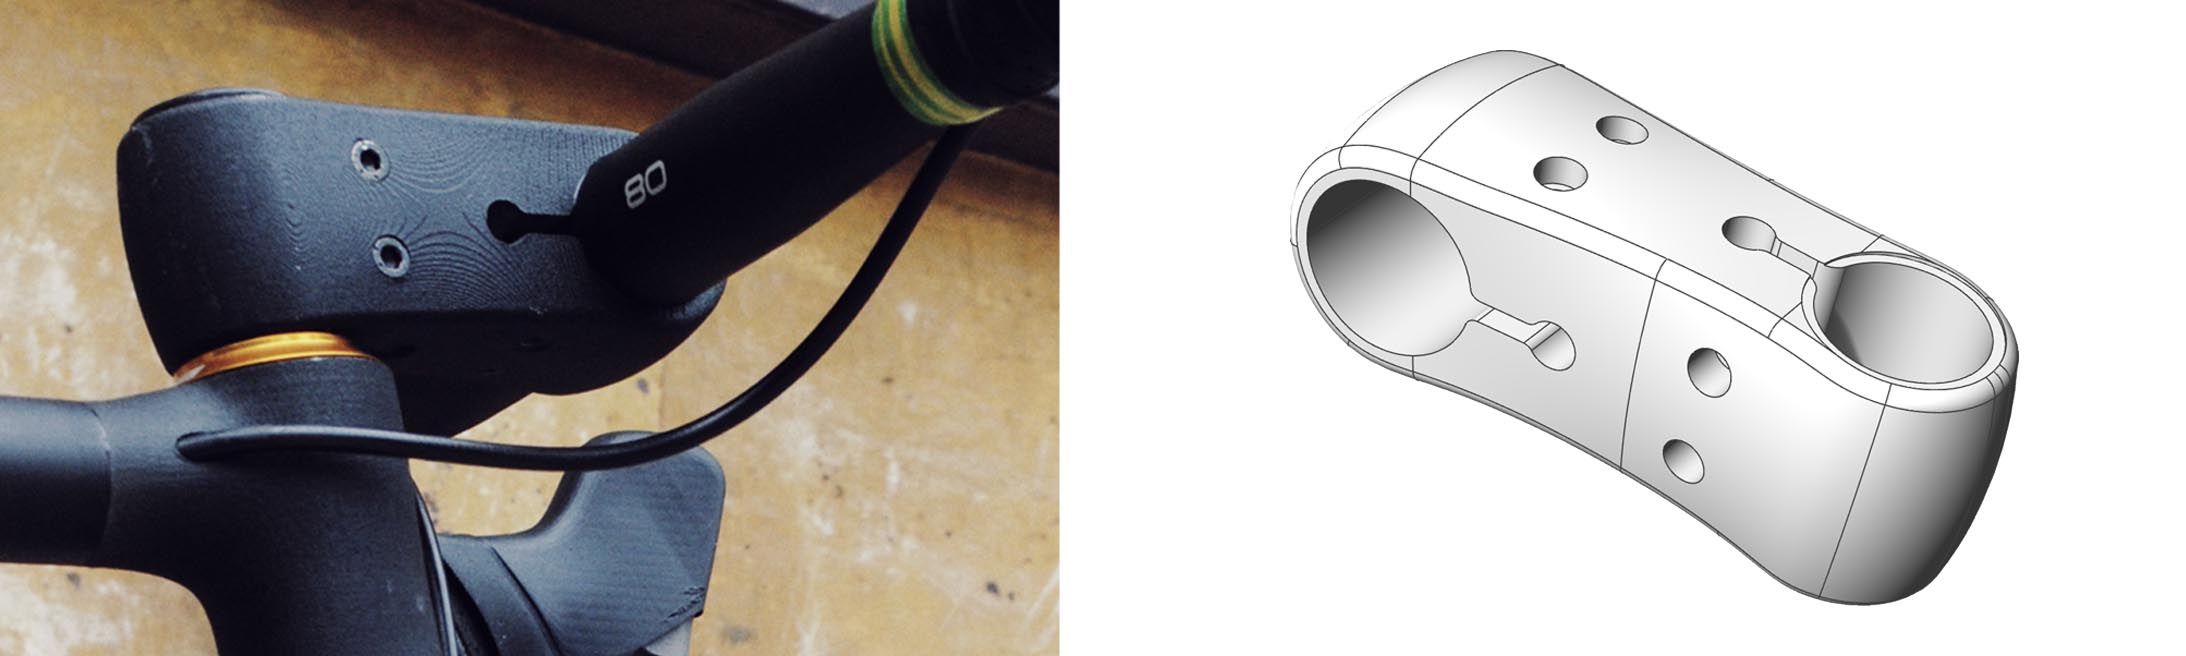
Blockers for the handlebar
We did those blockers for the handlebar, meant to block tape styles in leather thanks to small ailettes that flatten. 3D printing allowed us to invent a new flattening system, different from the ones you can find in the bike trade. We couldn’t have had such a part molded! Here, we can freely think about the function of the part and think of a new design.

Painting
All the polyamide parts were painted in black, for aesthetic purposes, but also to test the resistance of our paint in difficult conditions: we rode the bike in the pouring rain, sea water, sand, mud, water jet for cleaning, it fell, etc. And the paint is still on! After this trip, we can assess paint is resistant!
SLS allows design freedom
Concerning the printing process, selective laser sintering (SLS) requires very low design constraints. It enabled us to design special paths directly into the part for the brake cables.
With SLS, we could produce very thin parts as well as more massive parts. We could really think of a wide scale of different parts to produce in PA.
Carbonmide or Polyamide for the frame
The frame of the bike is made of aluminum tubes, that we outsourced, but what makes it special is that those tubes are connected with 3D printed carbonmide parts. And it’s truly these connectors that give it its flexibility, and that allows to adapt the size of the bike to its rider. Carbonmide has very interesting properties because it is a mix a polyamide and carbon fibers. Carbonmide rigidity is higher than for polyamide. It also has a very nice surface condition, with a velvet aspect.
When designing with carbonmide, we considered using it for compression elements, like the spacer, which is compressed between the gallows and the fork. We’re thinking of designing one specifically in carbonmide (the current one was outsourced), to put it in the next version of the bike.

We also experimented with a polyamide frame, and both the carbonmide frame and the PA one went with us on the trip. The advantage of PA for the frame is its flexibility. Thanks to it, we didn’t need shock absorbers! This flexibility protects the whole bike. We could ride the bike on small rocky roads very easily! It was even very comfortable!
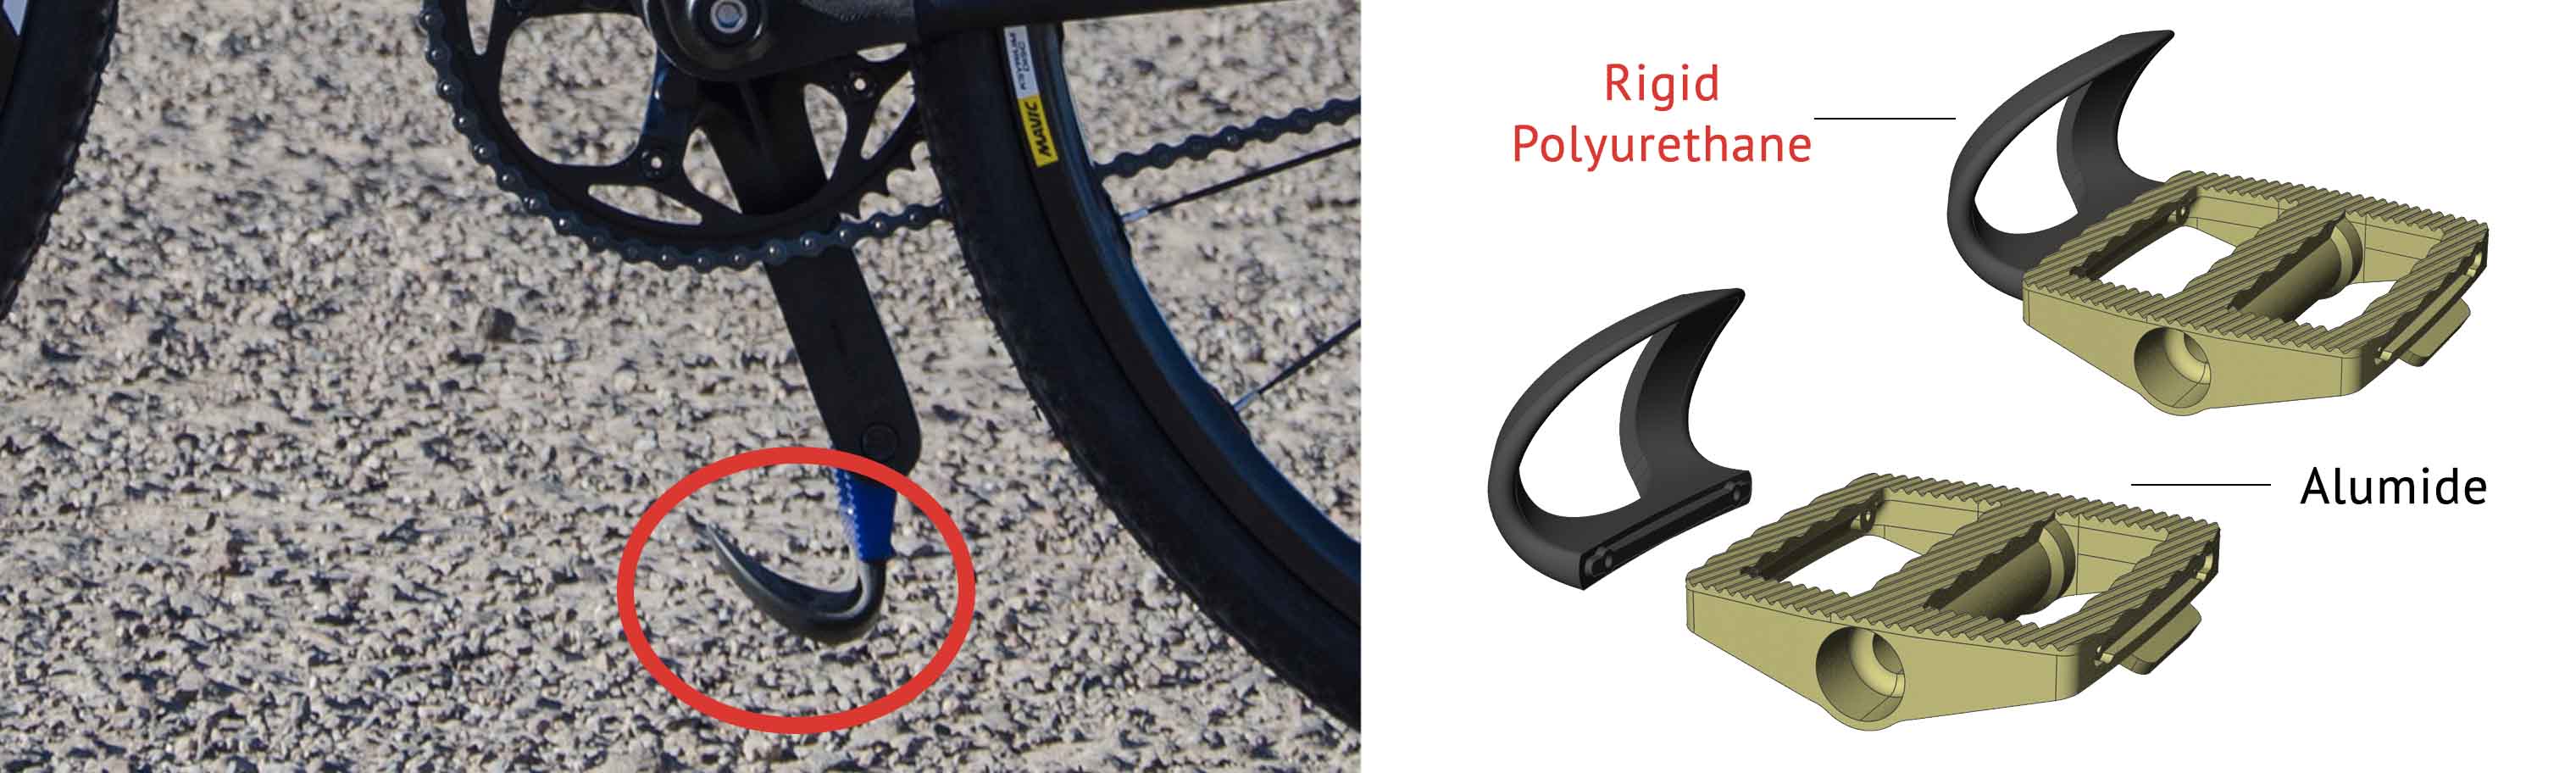
Alumide: for the pedals
Alumide is thicker, harder and heavier than polyamide. We designed the pedals to bear ball bearings which means they have to be resistant to wear. That’s why we chose alumide: it is more resistant to wear and friction than PA.
Alumide is a plastic enriched with aluminum, which shows through its surface aspect (covered in specks) and its density. Compared to a material that would be smoothed or painted, it is more resistant to abrasion and stripes. It is also very interesting aesthetically!
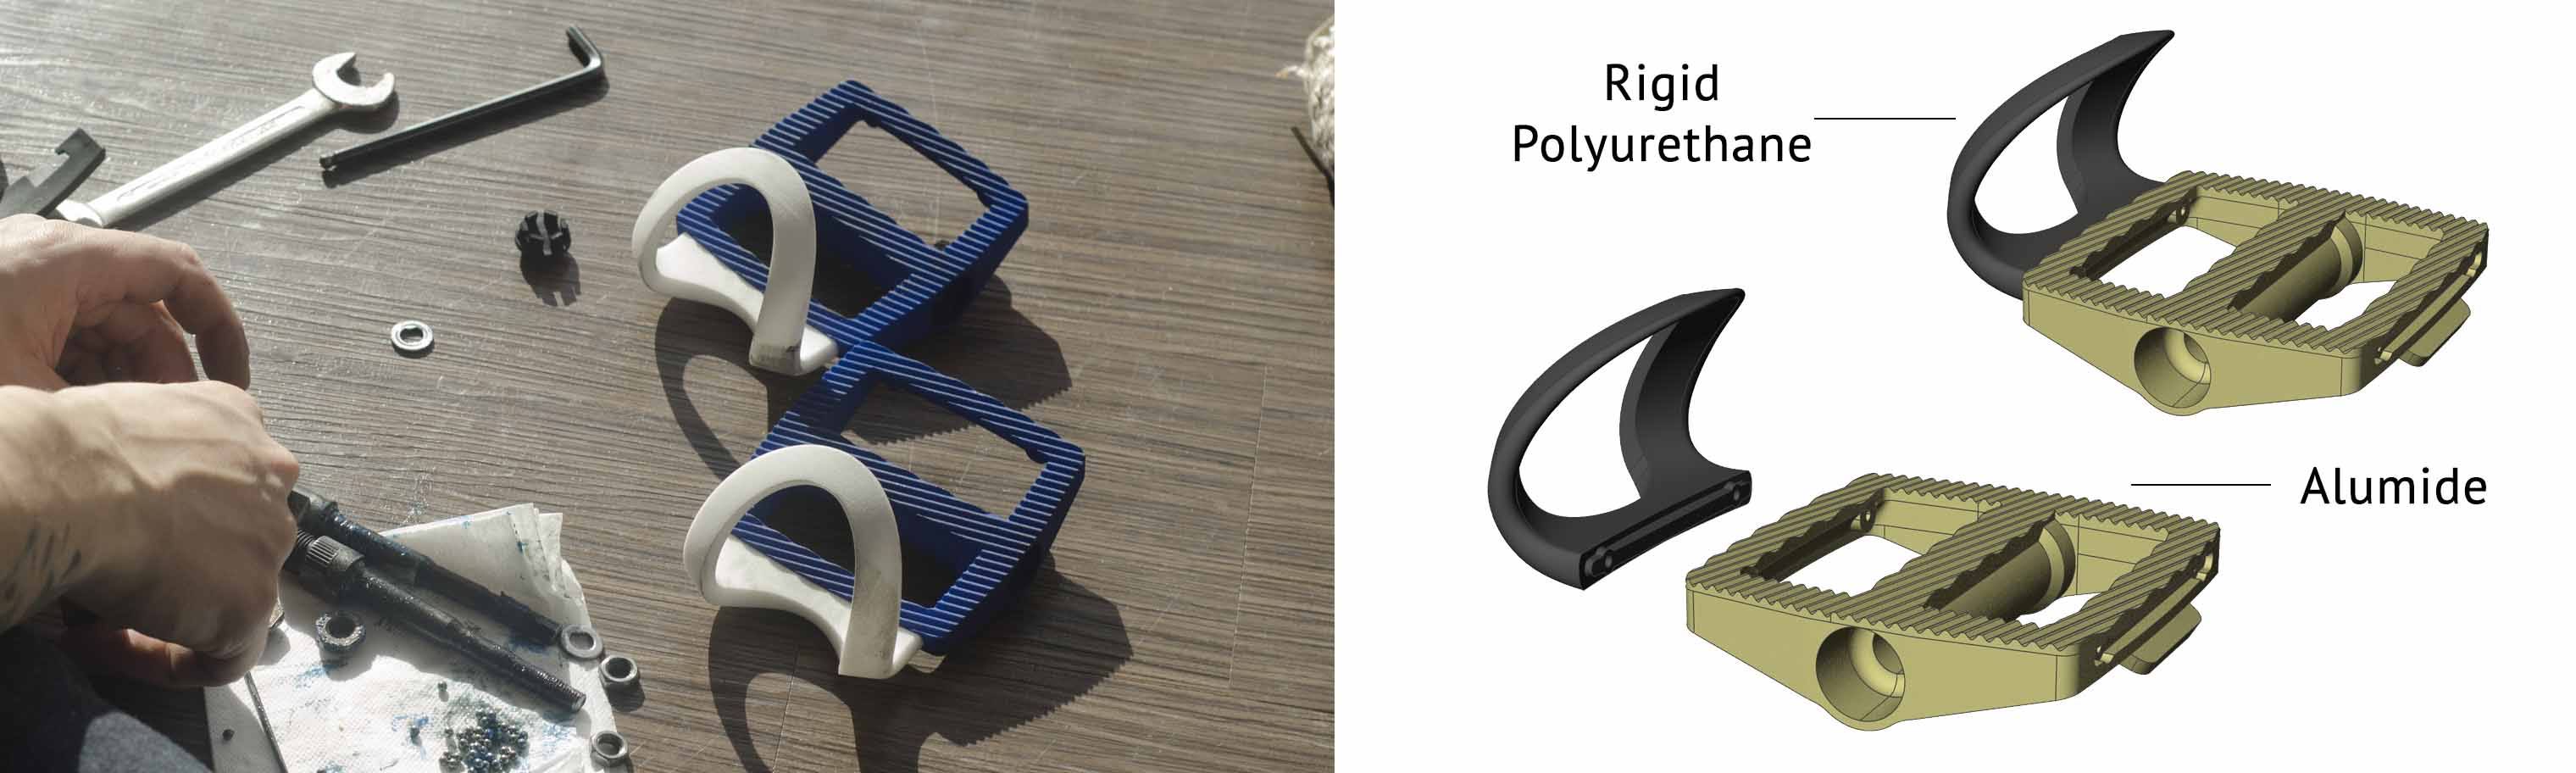
They are tinted PA on the picture, one of Alexandre and Piotr experiments for the pedals
Carbon CLIP resins for 3D printing
Rigid Polyurethane: a rigid material for the gallow, the saddle fixers and the foot-rests
RPU has very good mechanical properties: it has a high density and good resistance to mechanical strains, although it’s a bit heavy. It has a very good surface condition, very smooth, compared to other 3D printed materials. RPU parts look like injection molded parts.
The parts we designed in RPU were either mechanical or structural: connections between different parts. For example, for the gallow (connection between the fork and the handlebar), we decided to use RPU. We started to print a part in PA but it was too flexible. Here, we’d rather have a stiff part.
We also used RPU for all the parts around the saddle, in order to have a mechanical compression. RPU’s rigidity ensured that the saddle wouldn’t move too much.
The foot-rests are quite amazing. This part is wired and fixed with screws to the pedal in alumide. A foot-rest has a very dangerous place, receives a lot of forces, and could break easily. RPU was a very good choice of material, and didn’t break. It also allowed us to make the part very thin. Alumide and RPU 3D printing are very precise and both parts fit perfectly together, which is quite convenient when designing the parts.
EPU: for the very flexible brake levers
Elastomeric polyurethane (EPU) is a 3D printed material which is similar to rubber. The choice of EPU for the grips was quite evident. The risk of this part was for it to tear or be deformed; we manipulated it a lot. To put it on the bike, we had to pull it very hard, and although there were some holes in the design, the part didn’t tear. We had to turn it inside out to clean it, and it wasn’t damaged, it reformed directly.
EPU has a real elasticity, which means the material deforms and reforms. Elongation at break is really good. It allowed very good comfort: we always had our hand on this part. Solid plastic wouldn’t have been agreeable in the long run, whereas EPU was perfect!
Metals
Titanium SLM
We chose to design the brake levers in titanium. A brake lever has a very thin design and we need it to be extremely solid in order to not break.
With titanium, we were sure it would resist the trip! Compared to other metals, titanium allows very thin designs. Our levers here have some walls with 1 mm of thickness, which wouldn’t be possible with aluminum or stainless steel.
Titanium is very fine-grained, smooth and pleasant. We could have imagined a design to grip the hands but it was not necessary, thanks to the grains! It is very homogeneous, we don’t see the different layers of the 3D printing process. It looks like it was sand cast.
If we were to imagine brake levers with another material than titanium, we could think of composite parts: laser cut parts mixed with PA.
Laser Cutting: freedom of design and precision
We call the Sculpteo Bike Project a digitally manufactured bike and not simply a 3D printed bike because it combines all the expertises of our online digital manufacturing platform, both 3D printing and laser cutting. Our laser cutters enable to cut both aesthetic materials (such as acrylic, wood, leather…) and mechanical materials like metals and mechanical plastic (POM).
| Laser cutting material | Characteristics | Digital Bike Part |
| Aluminum | Good strength/weight ratio | Front chainring, which needed to be light |
| Stainless steel | Very strong, but heavier than aluminium | Back chainrings, which endure high strain |
| Acrylic | Mostly aesthetic, a cheaper alternative to 3D printing or mechanical laser cutting | Spacers, which don’t need high mechanical properties |
| Leather | Mostly aesthetic, comfortable | Handle bars covers with Sculpteo logos! |
Aluminum
We used laser cut aluminum for the front chainring (the largest one). We designed it with many prongs, so strength would be spread evenly. Thanks to its large size, it endured less strain. This meant we didn’t need a material as strong as stainless steel, which would have been too heavy. Aluminum material has a good strength/weight ratio and allowed us to create a very light part, which is important when designing a bike.
Stainless Steel
We laser cut the small chainrings in stainless steel, on the back of the bike. They are small and therefore endure a lot of strain. The drawing is very precise and so is the laser cut, we didn’t do any finish, which is great.
Acrylic
We designed some spacers for the brake system, in laser cut acrylic. It was not useful to 3D print them or laser cut them in another and more mechanical material, since they wouldn’t have to support strong strain. So we chose an aesthetic, and cheaper material: acrylic.
Leather
We used laser cutt leather to cover the handle bars. For this part, we could freely do what we wanted. We created really comfortable handlebars. We even took advantage of the design freedom to laser engrave Sculpteo logos on the leather!
And this is it for our panorama of the Sculpteo Bike Project materials and technologies. We hope this gave you an idea of what our materials can do, of what they’re best suited for, and of the wide range of possibilities digital manufacturing offers. Knowing 3D printing materials and laser cutting materials, as well as 3D printing technologies is the first step to making your project the best it can be.