 Connect with Google
 Connect with Facebook
Online Repairing Tools: Diagnose and Fix Your 3D Models.
Posted By Hilmiyati Kusnadi on Apr 12, 2017 | 0 comments
In 3D printing, one small fact needs to be taken into an account: not all 3D files are printable. How can it be possible? The software that most people use is directly programmed to export the 3D file without analyzing the closed volume to 3D print which is why your 3D file often cannot be printed. At Sculpteo, we created repairing tools with multiple algorithms that will analyze and automatically repair your 3D files as soon as they are uploaded on our site.
Last week, we learned about Optimization tools for additive manufacturing such as Hollowing, Batch Control and Customized Orientation. Today, we will focus on our Repairing Tools, which allow to:
1. Diagnose your 3D file
2. Repair your 3D file
3. Correct your 3D file manually
When a file is repaired, we also provide you different algorithmic reparation options to help you fix your 3D file and make it ready to be printed.
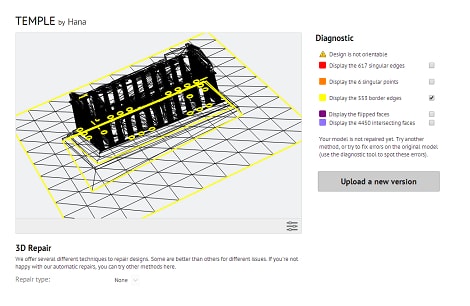
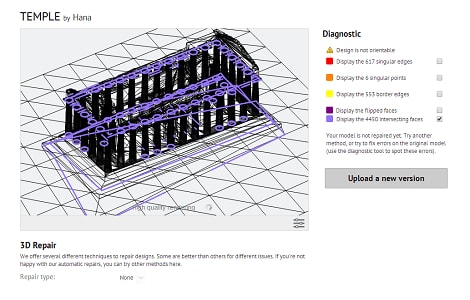
3D File Diagnostic
When you upload your 3D file to our system, our repairing algorithms will directly analyze and correct the file automatically. You can access the 3D file diagnostic through the option “Your object” by clicking the top right corner. Choose “design settings” option and you can find “check repair” to begin analyzing your model.
Once you are able to access check repair, it will show you your 3D file errors and where the problems come from in the 3D viewer. The file will be updated according to the repairing options that you choose. You can pick the “None” option in the drop-down menu and it will show your original 3D file. With this option, it makes it easier for you to visualize each of the errors detected by our software.
Our diagnostic check will show and correct the following errors:
- Singular Edges (surfaces that do not contribute to the border of a volume)
- Singular Sides and Points (non-manifold)
- Intersecting Faces (diagnose the auto-intersections)
- Inverted Faces (orientation)
Repair your 3D file.
Most of the time, you will not directed into our repair tools because check repair will run and repair automatically. After you see the diagnostic of your file, you can choose semi-repairing option to fix your model.
To use the repairing option, you simply need to select one of the repairing types proposed. Once the semi-automatic repairing type is chosen, you can click on “continue” and the file will be updated accordingly.
As you can see on this menu, we offer you a large range of repairing options, such as:
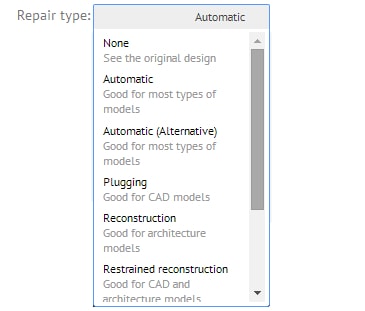
- Automatic: This function is optimized for most file types, that’s why it’s the default option.
- Plugging: This algorithm fixes each problem of the file independently (holes, gaps, duplicate faces…). This option is a good choice for CAD and files with a limited number of issues as it can modify the mesh but only where the problems are.
- Improved Plugging: The advanced option of ‘plugging’ and it is the most used function to fix some model issues.
- Reconstruction: This option is mostly used for architectural models as it uses several volumetric approaches to creating a new mesh that overlaps parts of the original mesh. It can also fill any gaps when needed.
- Restrained reconstruction: This option is recommended both for CAD and architectural models.
- Visible reconstruction: This method is perfect for miniature or small non-mechanical objects. This option will totally ‘re-mesh’ your 3D file using reconstruction algorithms.
- Hybrid reconstruction: This is the combination of several methods which makes it the perfect choice for models made of multiple parts.
Correct your 3D file manually.
You can start to correct your 3D file manually by verifying the structure of the 3D model. When the 3D file is transferred to our system, the most common problem that we face is that your file doesn’t consist of a single, solid and uniform object. This often prevents our machines to process the 3D printing as the printer is unable to determine the interior and exterior of the model, which will make the file ‘Not Orientable’.
Here you will find the information on how to correct your file and of course, you will learn to prevent the most common mistake in the 3D file.
1. Conceive a 3D file with a closed volume.
To be able to 3D print your file, you have to be sure that your model is “watertight” or closed. All the edges of your model have to be connected to one another and the model’s geometry should not contain surfaces which do not bound with a volume. Keep in mind that a surface without thickness and volume cannot be printed.
How to correct your 3D model?
This problem can be corrected by simply giving the surface(s) volume or by deleting the object. Most of the 3D modeling software have a “Fill” option to quickly solve the problem in case there are small holes preventing the volume from being closed.
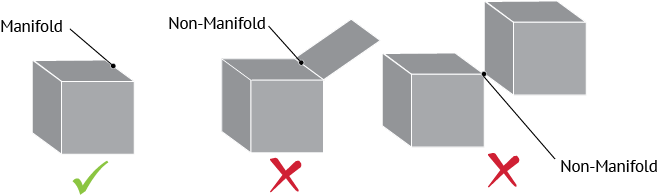
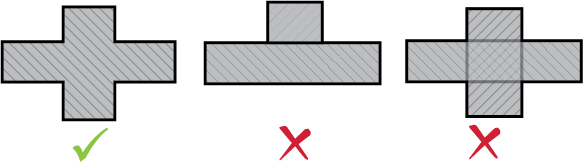
2. Correct non-manifold edges and singular points.
During the conception of your 3D model, our online tools may not be able to determine the volume of the model. Certain operations can create unattached and ambiguous/separate surfaces and then lead to the creation of singular point of connection.
Non-manifold is when two faces only share one point (as shown in the image below). To create clear volume, each side of the model must be connecting two and only two adjacent faces. Similarly, you should have singular points connecting with multiple faces.
How can you correct it?
These singularities can be eliminated by either disconnecting the non-manifold surface and giving more volume, or by deleting it completely.
3. Eliminate the auto-intersection.
When you design your 3D model, you may create one which is ambiguous and there is a point when two or more volumes cut into each other.
You can try to fix this issue using 3D Modeling software as they have a function that can merge these elements using Boolean operations. These operations can help you unify, subtract or differentiate the volumes.
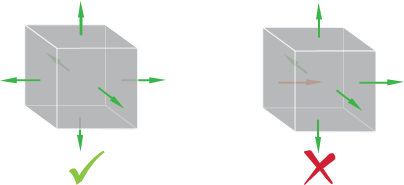
4. Correctly orient your model’s surfaces
In most of the 3D modeling software, surfaces of 3D models are oriented with an inside and outside to help determine the model’s volume. This has to be precise because if one of the object’s faces is oriented in the wrong direction, our online software will not be able to determine the volume. Before you finish creating your model, it is important to verify that each face is oriented in the correct direction.
If you want to learn more about how to correct your file, you can visit our tutorials on how to prepare your file for a 3D print in various software.
It is also necessary to check that your object is physically feasible by following the design guidelines of the material you are planning to print. Each material has its own restrictions in terms of size limitation, minimum thickness, and etching/embossing depths. You need to ensure that your 3D file is able to support the weight of its own cantilevers and that the object’s walls are thick enough to support themselves.
To upload your 3D file to our online 3D printing service, double check its format and size. It should not be too large and it has to be exported in one of our 25 file formats that our programs are able to read and print.
You can also download and learn more about our repairing tool on our free ebook: “Fix your Files for 3D Printing”