 Connect with Google
 Connect with Facebook
3D Printed Screws & Threads: Which 3D Printing Material, Which Design?
Posted By Hannah Bensoussan on Mar 29, 2017 | 0 comments
No matter what’s your 3D printing application, you might at some point need to attach two parts together thanks to screws, whether you want your object to be easy to put together, or you want it to fit into another pre-existing object. Because 3D printing is the champion of integrated assembly, it is tempting to design the screws and threads directly into your 3D printed object. Today, we’ll answer the questions:
Should you 3D print your screwing assembly system?
How can you design screws and threads for 3D printing? and
Which 3D printing material is the best for screws and threads?
We tested two 3D printing materials from our 3D printing service: our Polyamide and our Rigid Polyurethane (RPU). We tried out different configurations, sizes, and shapes of threading systems, and tried to point out the advantages that 3D printing can bring to your screwing assembly. You’ll find here some methods to make assembly easier and more convenient with 3D printing.
1. Our testing system
So you understand our tests, it’s important that you know the different elements of our testing system. We 3D printed several screws, and two testing supports, one in white polyamide (3D printed with SLS or Selective Laser Sintering) and one in Rigid Polyurethane (3D printed with Carbon’s CLIP technology). You can see them both in the images below.
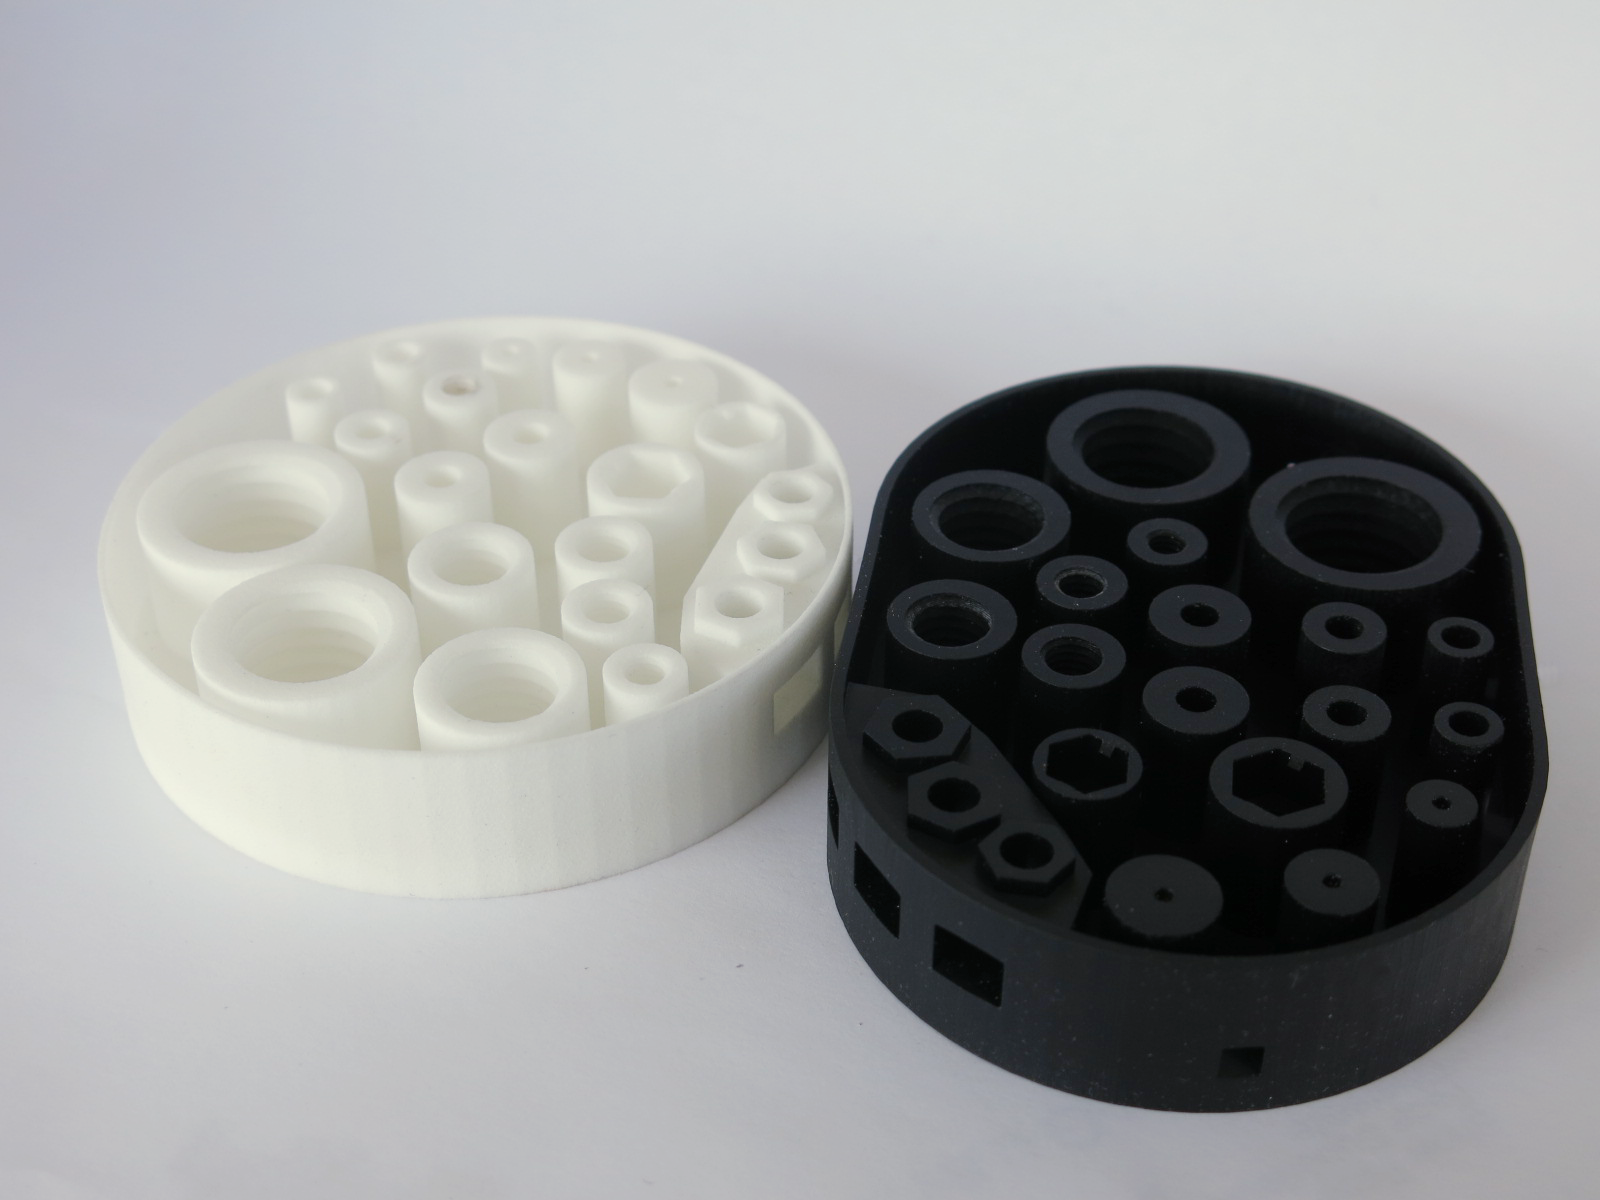
The different shapes (one circular, the other oval) is only due to machine size restriction from the CLIP machine, the dimensions of the screw threads and holes are the same in both.
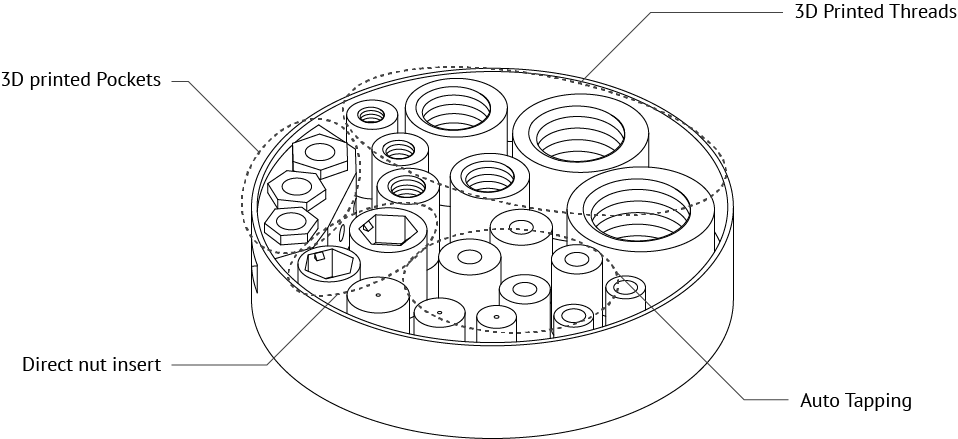
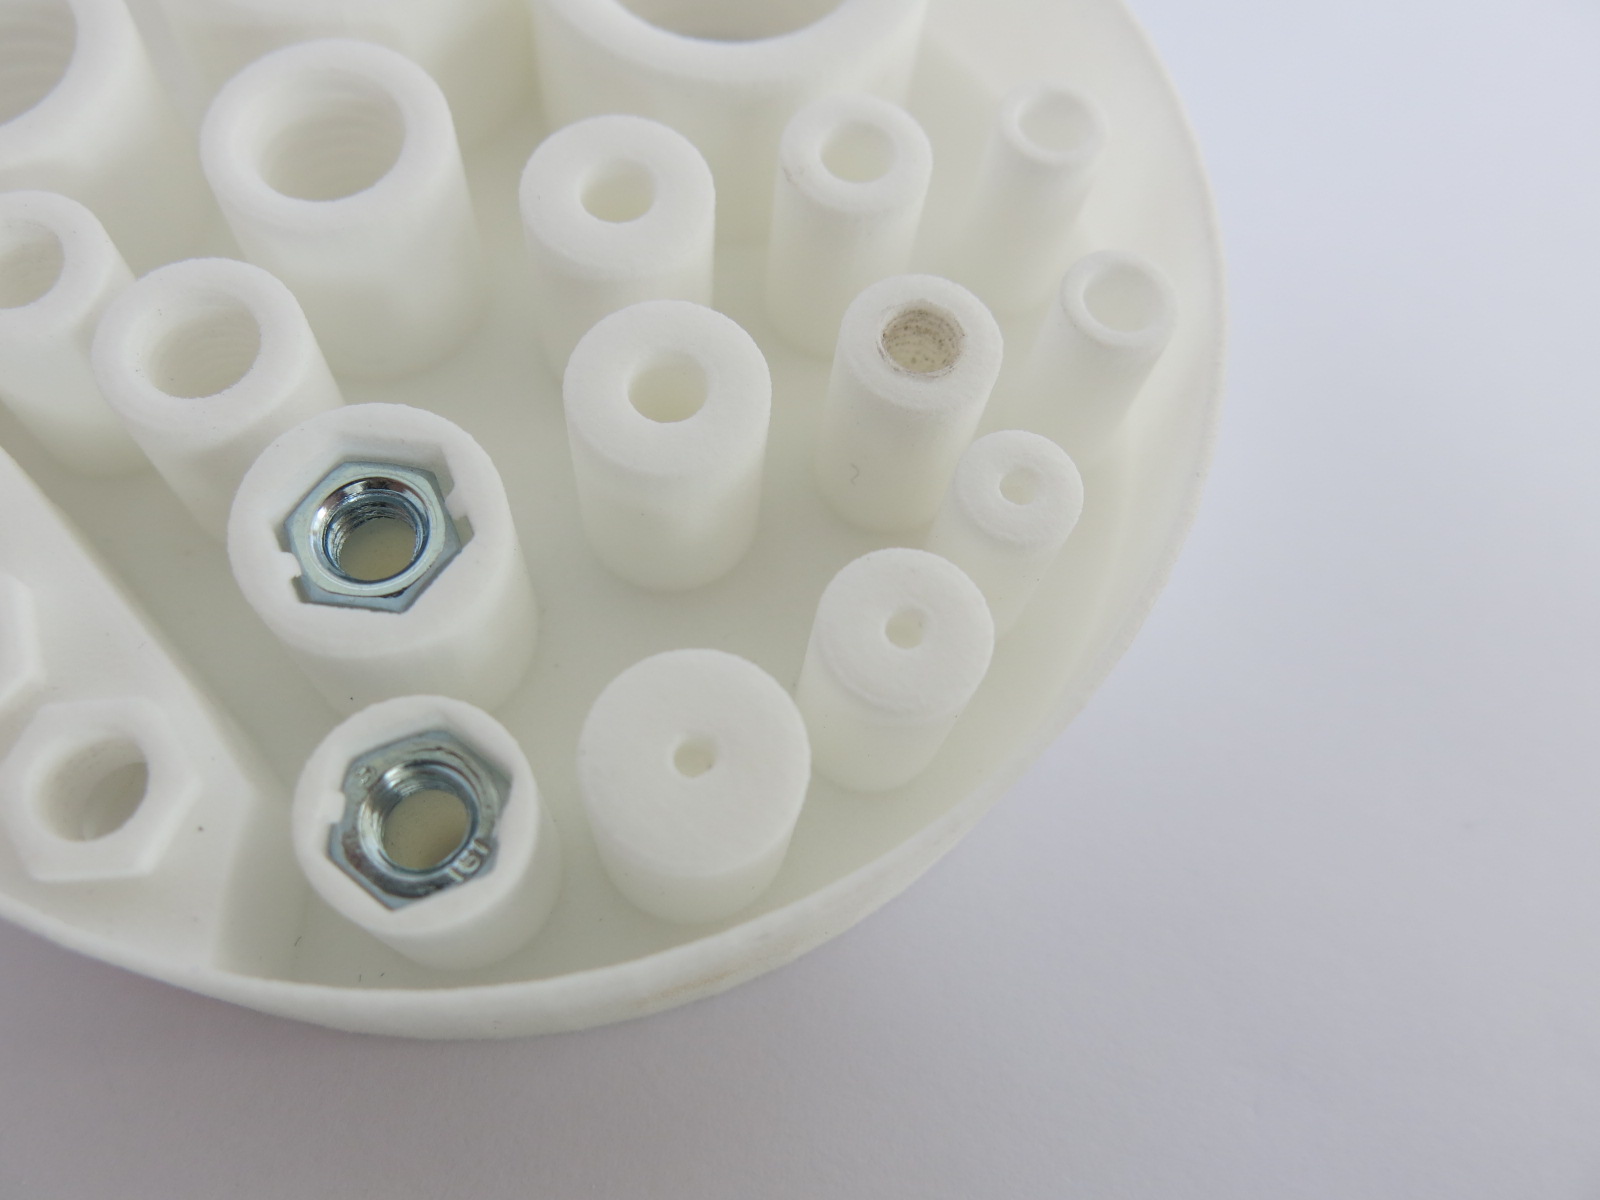
They each contain 4 elements (as you can see in the image below):
- 3D printed pockets
- Direct nut insert zones
- 3D printed threads
- Auto tapping zones
We tested those arrangements with 3D printed screws or with standard metal screws and nuts. We also tested the tensile resistance of the 3D printed screw threads to a tension up to 500N (equivalent to a 50kg pull). With these various tests, we figured out:
- How detailed threads and screws could be when 3D printed in polyamide and RPU
- How resistant the threads were
- Which technique, between the four tested, was the most convenient
- When it was beneficial to use 3D printing for screws and threads, and when it was better to use classical, traditionally manufactured, metal parts.
2. Why use 3D printing for your screws and threads?
If you’re going to 3D print screws that you can find in retail, then using 3D printing is not worth it: it will be more expensive, for no added value. You should use 3D printing for your threading assembly if you wish to create custom sized threads and ingenious assembly systems! Then, you will save on the overall cost of your object, and you will be able to create exactly the assembly system of your choice.
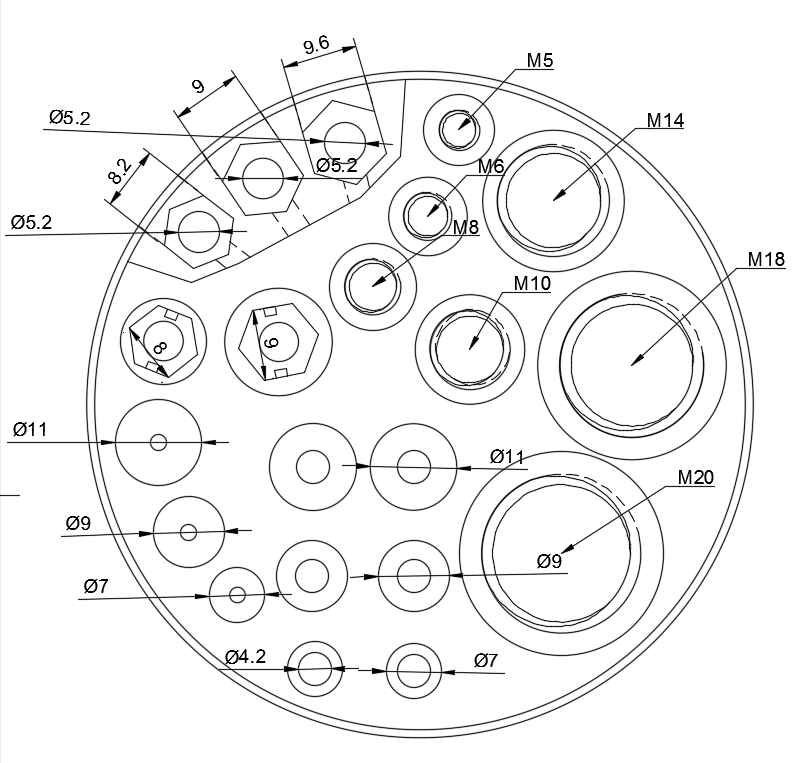
These standards are indicated in millimeters.
In order to illustrate this point, we tried to innovate with the objects we created:
1. Hollow screws: our screws can be assembled together since they are hollow
2. Custom-sized threads: we created threads of multiple sizes. For testing purposes, they fit classical assembly standards. But you could imagine creating a thread of an unusual size, and the screws that fit it exactly
3. Ingenious assembly and composite systems: the pockets and the clipping system to insert nuts. This allows to mix 3D printing with classical retail metal assemblies, and to benefit from the freedom of design AND the cheapness of standard screws and nuts.
3. Results of the tests: tips and benefits for each 3D printed screw threads technique
a) Pockets
How this 3D printed assembly technique works and what it’s good for
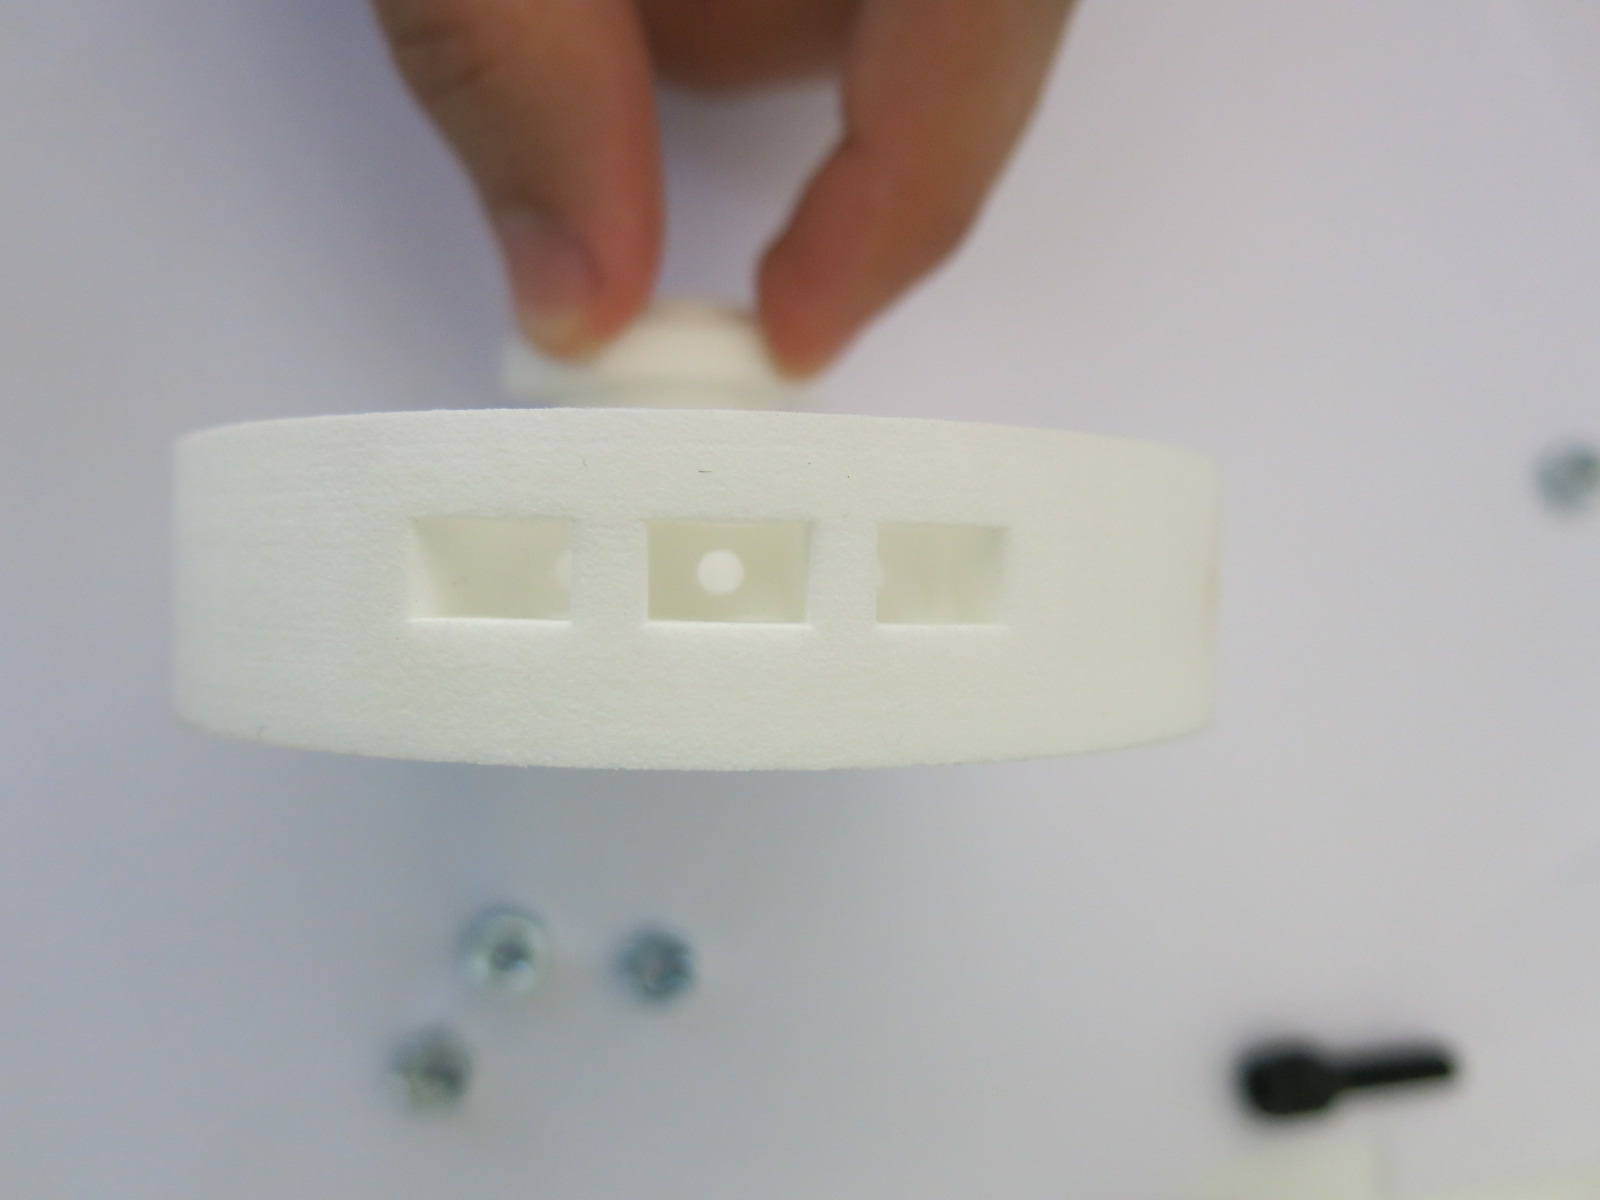
You insert the nut in the pocket that you created on the side of your object, and can then put the screw in from above. The pockets are very useful to offer high resistance for a wide range of assembly systems. It allows to combine the design freedom of 3D printing with the strength of metal screws and nuts.
Tips we learned from the experiment
To allow the screw to find its way to the nut, it’s important to leave some extra play in the pocket. However, it’s important that the pocket be tight enough, so that the nut can’t turn in it.

On the left, the pocket is too large, and the nut can turn in it, which prevents the screw to be screwed in.
If you need the nut to stay in place even when no screw is inserted, you can create a hole on the side of the pocket so that you’ll be able to push it out easily, as you can see in the image below.
Pros and cons of the pocket assembly method with 3D printing
Pros: good resistance, possibility to change the nuts and screws.
Cons: requires several parts, and added assembly time.
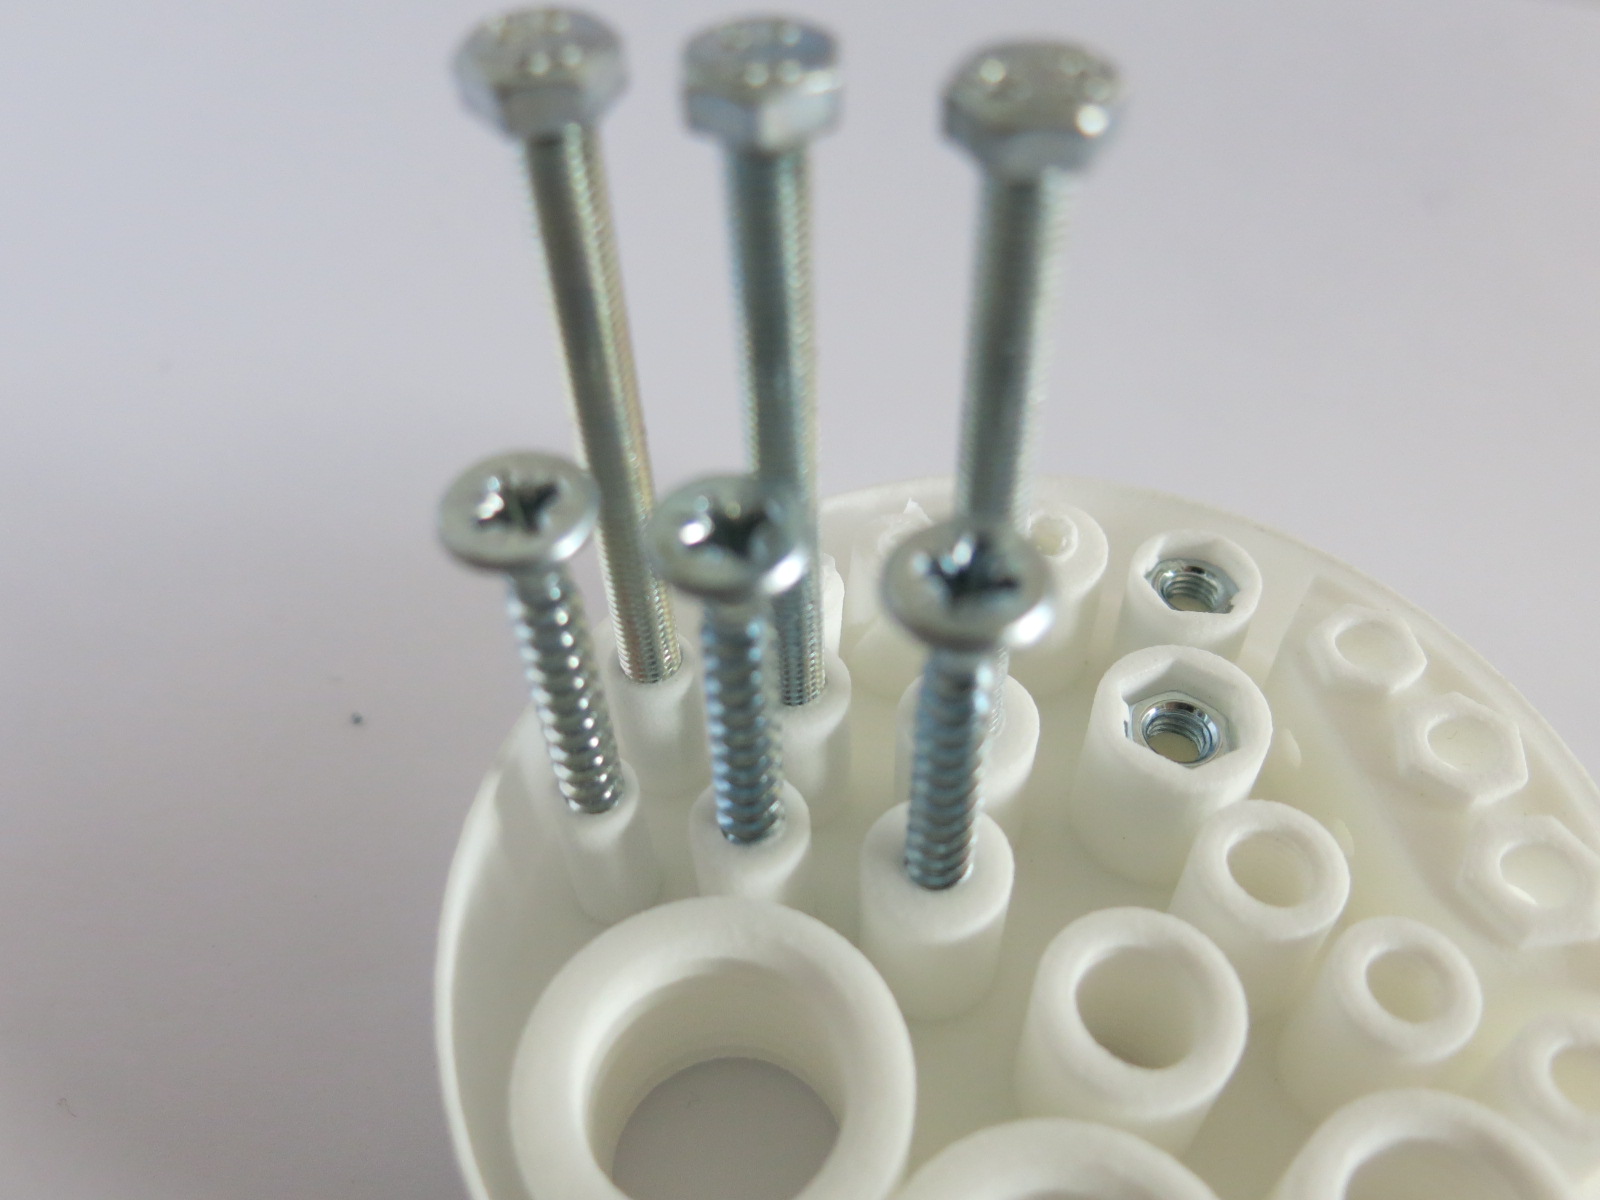
b) Direct nut insert
How this 3D printed assembly technique works and what it’s good for
Here, the nut is held in place by a clipping mechanism, that you can design according to your preferences. You then put your screw in from below.
Tips we learned from the experiment
Of course, you need to make sure the clipping mechanism holds the nut in place properly, so that it is not pushed out by the screw.
Pros and cons of the direct nut insert assembly method with 3D printing
They are the same as for the pocket technique:
Pros: good resistance, possibility to change the nuts and screws.
Cons: requires several parts, and added assembly time.
c) Auto Tapping and wood screws
How this 3D printed assembly technique works and what it’s good for
Without inserting a metal nut, it is also possible to put the screws in directly into the 3D printed material. Especially when using wood screws (which are designed to be easier to screw in without pre-existing threads), a pre-drilling hole can be enough. Here, we created, for example, a hole of 3 mm of diameter for a screw of 5 mm.
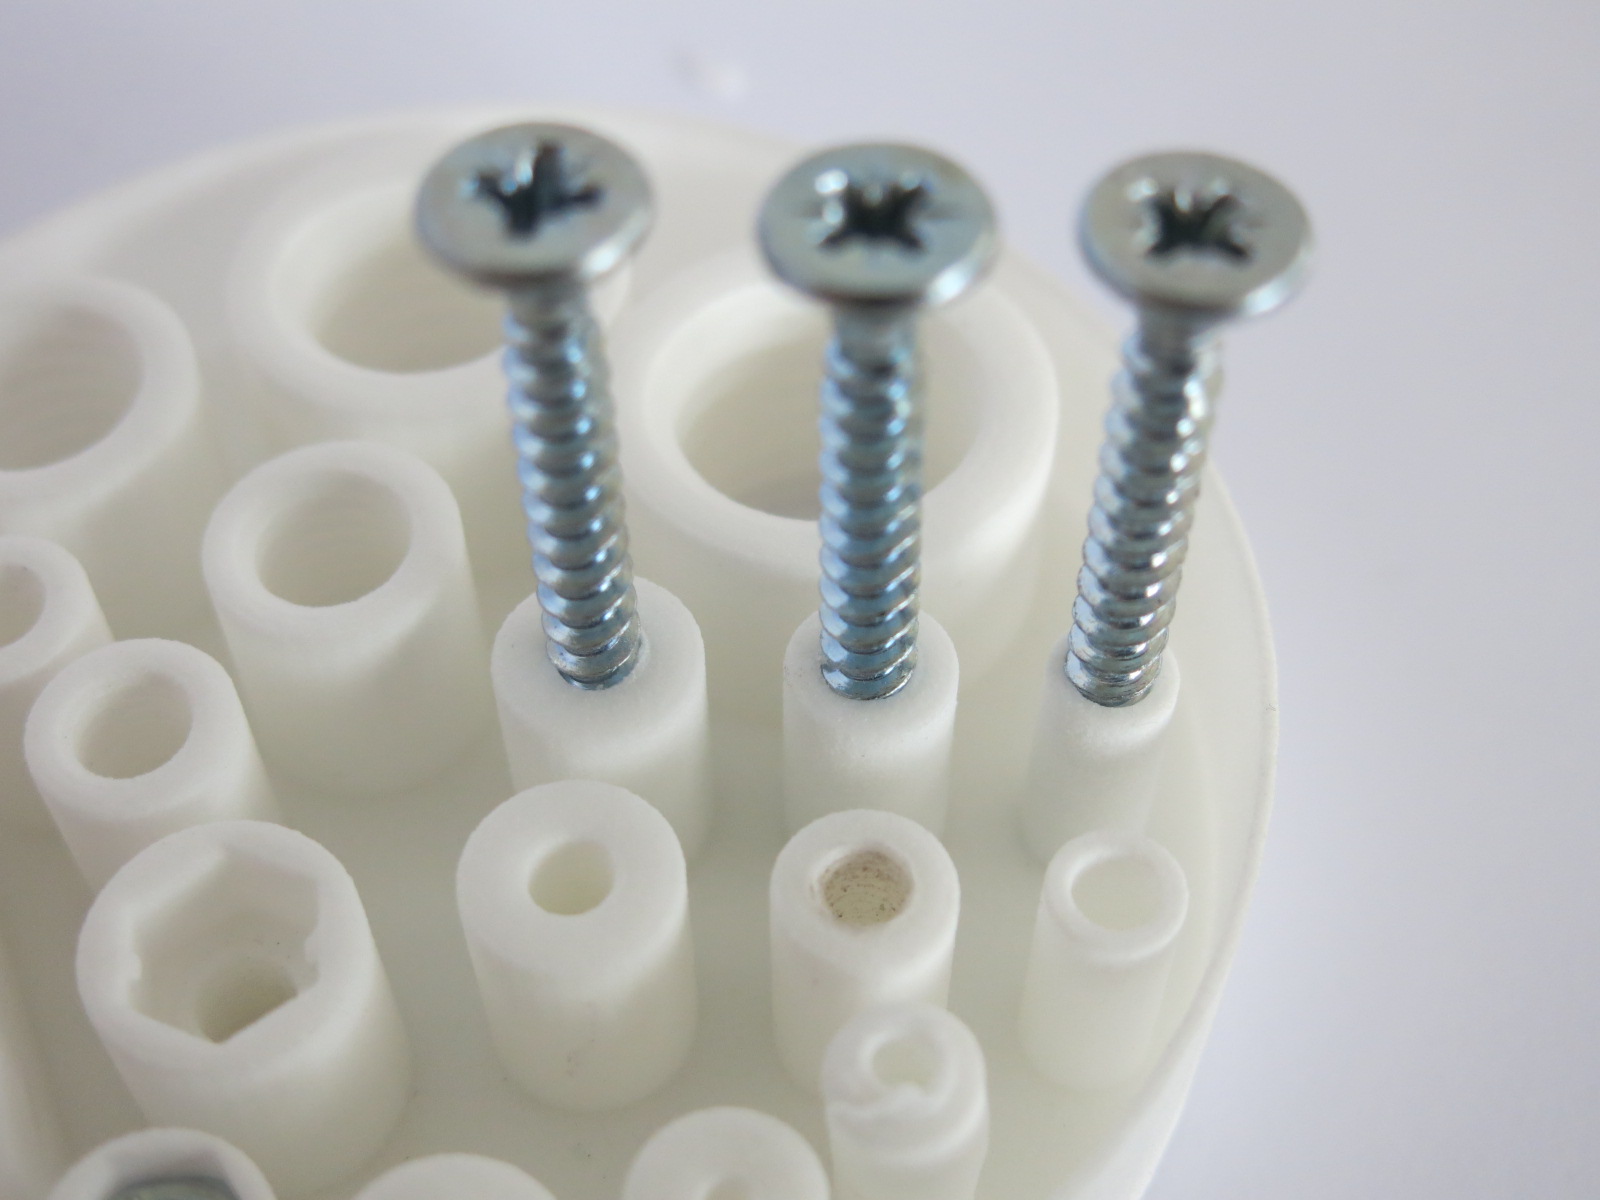
It is also possible to use this technique with classical screws, as you see here:
Tips we learned from the experiment
High strengths are applied when screwing in. Therefore, you need to make sure that the structure receiving the assembly is thick enough, that there is enough “skin” around the screw. Otherwise, it can tear, as you see in the image below:
We tried different sizes for the pre-drilling hole, and several total diameters (including the “skin” around the screw), to check when the skin is too thin. Here are the results, for wood screws:
For RPU:
| total diameter | 7mm | 9mm | 11mm |
| pre-hole 3 mm | tearing | OK | OK |
| pre-hole 5 mm | OK | OK | OK |
For PA:
| total diameter | 7mm | 9mm | 11mm |
| pre-hole 3 mm | tearing | tearing | OK |
| pre-hole 5 mm | OK | OK | OK |
With classical screws, the dimensions were fine for the PA, but we recommend to make larger tapping holes for RPU, since it is harder.
In both cases, once the first auto tapping has been done, the system is solidly fixed. However, after a few assemblies and disassemblies, the matter (both for PA and RPU) starts to be damaged.
Pros and cons of the auto tapping assembly method with 3D printing
Pros: fast assembly, large design freedom, holds together well
Cons: very sensitive to assembly-disassembly repetitions.
d) 3D Printed screw threads and screws
How this 3D printed assembly technique works and what it’s good for
When you need to create special threads, you can free yourself from the standards thanks to 3D printing, by modeling your own threads according to your needs. It can also be very useful when placing a nut or a screw in an inaccessible place.
This technique works just like inserting a standard screw into a standard screw thread: we put various screws into our test supports, with a screwdriver, and checked in which cases it worked and in which cases it got blocked.
Tips we learned from the experiment
We inserted PA screws, RPU screws, and standard metal screws into PA threads, RPU threads and standard metal nuts, to check which 3D printing materials were best suited for screws and screw threads. Here are the results:
| Screw | Thread | M5 | M6 | M8 | M10 | M14 | M18 | M20 |
| PA | PA | OK | OK | OK | OK | OK | OK | OK |
| PA | Metal | OK | OK | OK | OK | OK | OK | OK |
| RPU | RPU | NOK | NOK | NOK | NOK | OK | OK | OK |
| RPU | Metal | NOK | NOK | NOK | OK | OK | OK | OK |
| Metal | RPU | NOK | NOK | NOK | OK | OK | OK | OK |
| Metal | PA | OK | OK | OK | OK | OK | OK | OK |
| RPU | PA | OK | OK | OK | OK | OK | OK | OK |
| PA | RPU | NOK | NOK | NOK | NOK | OK | OK | OK |
At the scales we tested, PA showed high precision, as proven by the fact that it was compatible with standard metal parts in every configuration.
RPU, 3D printed with the CLIP technique, suffered some issues with the smallest dimensions because it lacked precision. This can be explained by the 3D printing process itself: CLIP uses liquid resin, that is solidified by UV as the building platform raises. At a very small level, details can be affected by gravity during the process. This is why, under 8 mm diameter, CLIP can’t be used to create nuts.
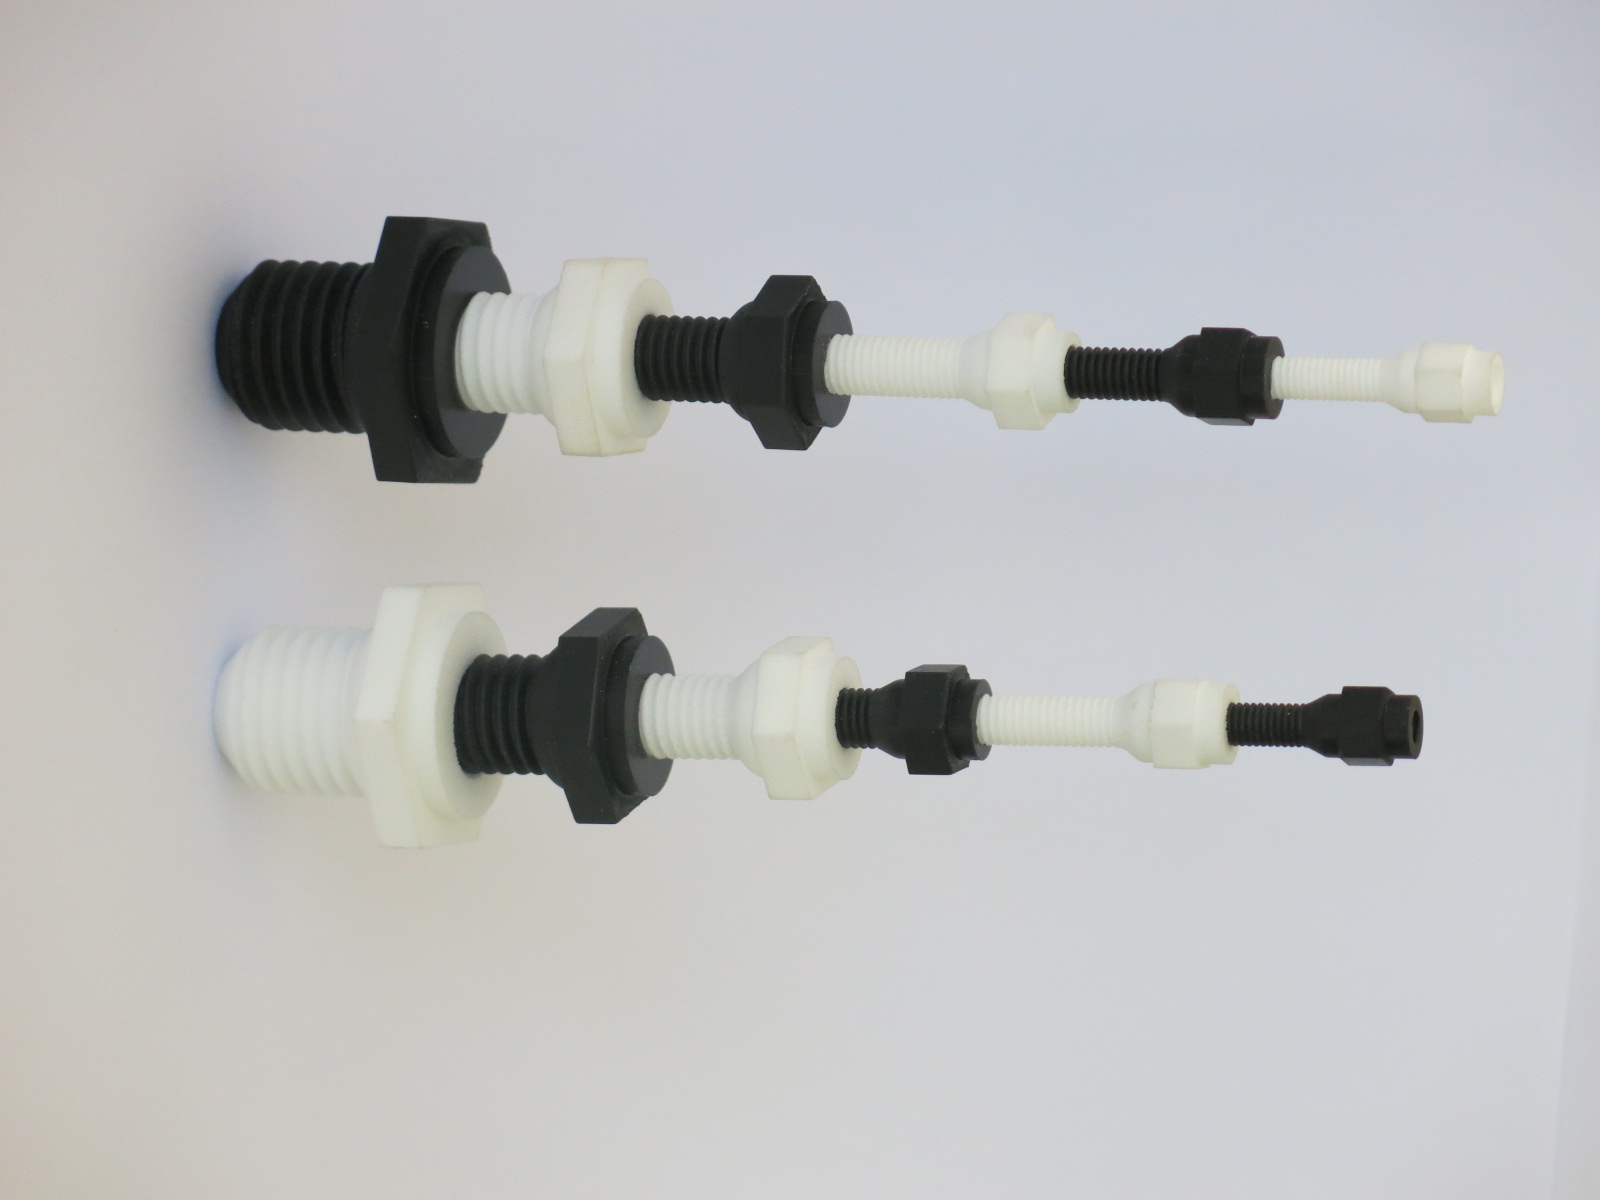
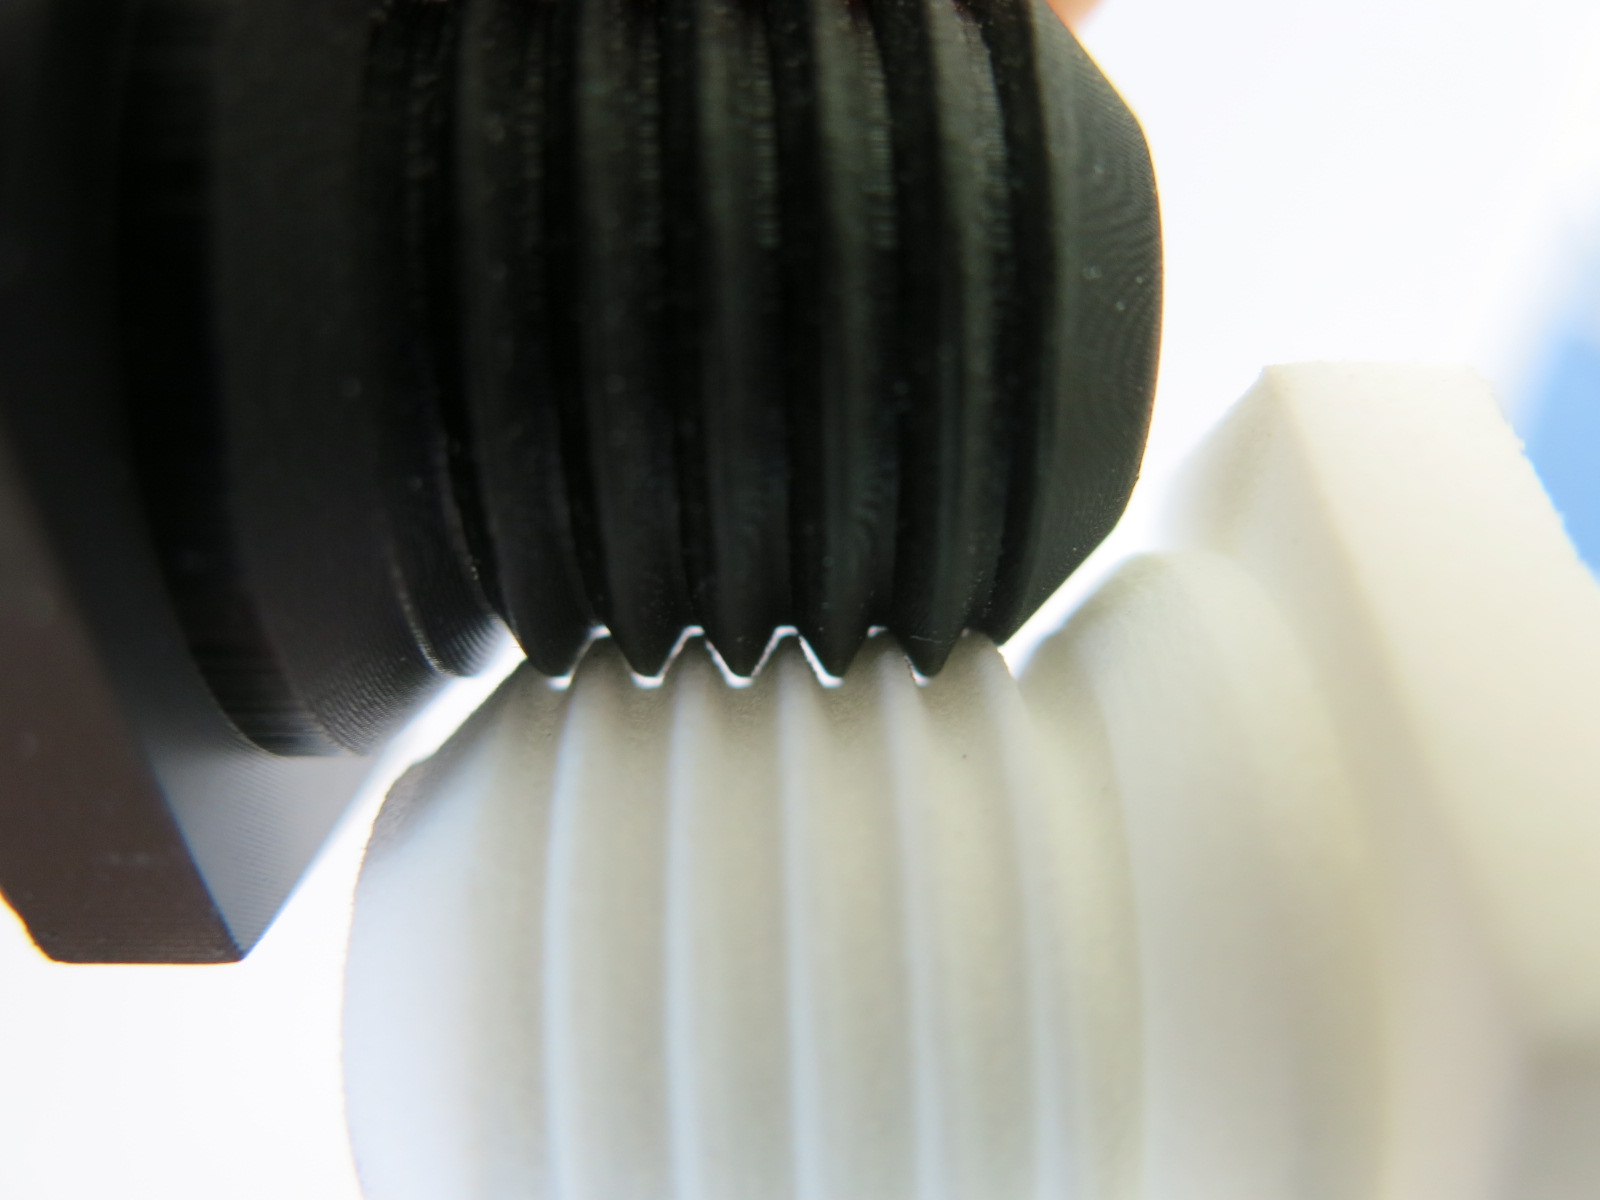
You can see in this picture the difference between a standard metal screw, a PA screw, and a RPU screw.

If the RPU screws fit with the PA threads, it is due to PA’s flexibility, not to RPU’s precision. This is interesting to keep in mind too.
We also tested the resistance to traction of our screws. What we wanted to test was whether the tread shapes would resist to traction (this is how we can know that the assembly screw-nut would resist on the long run). We tested the parts with a traction machine as you can see in the picture below. We tested a PA screw with a metal nut, and applied a force of up to 500N strength to it. The thread design resisted at every strength.
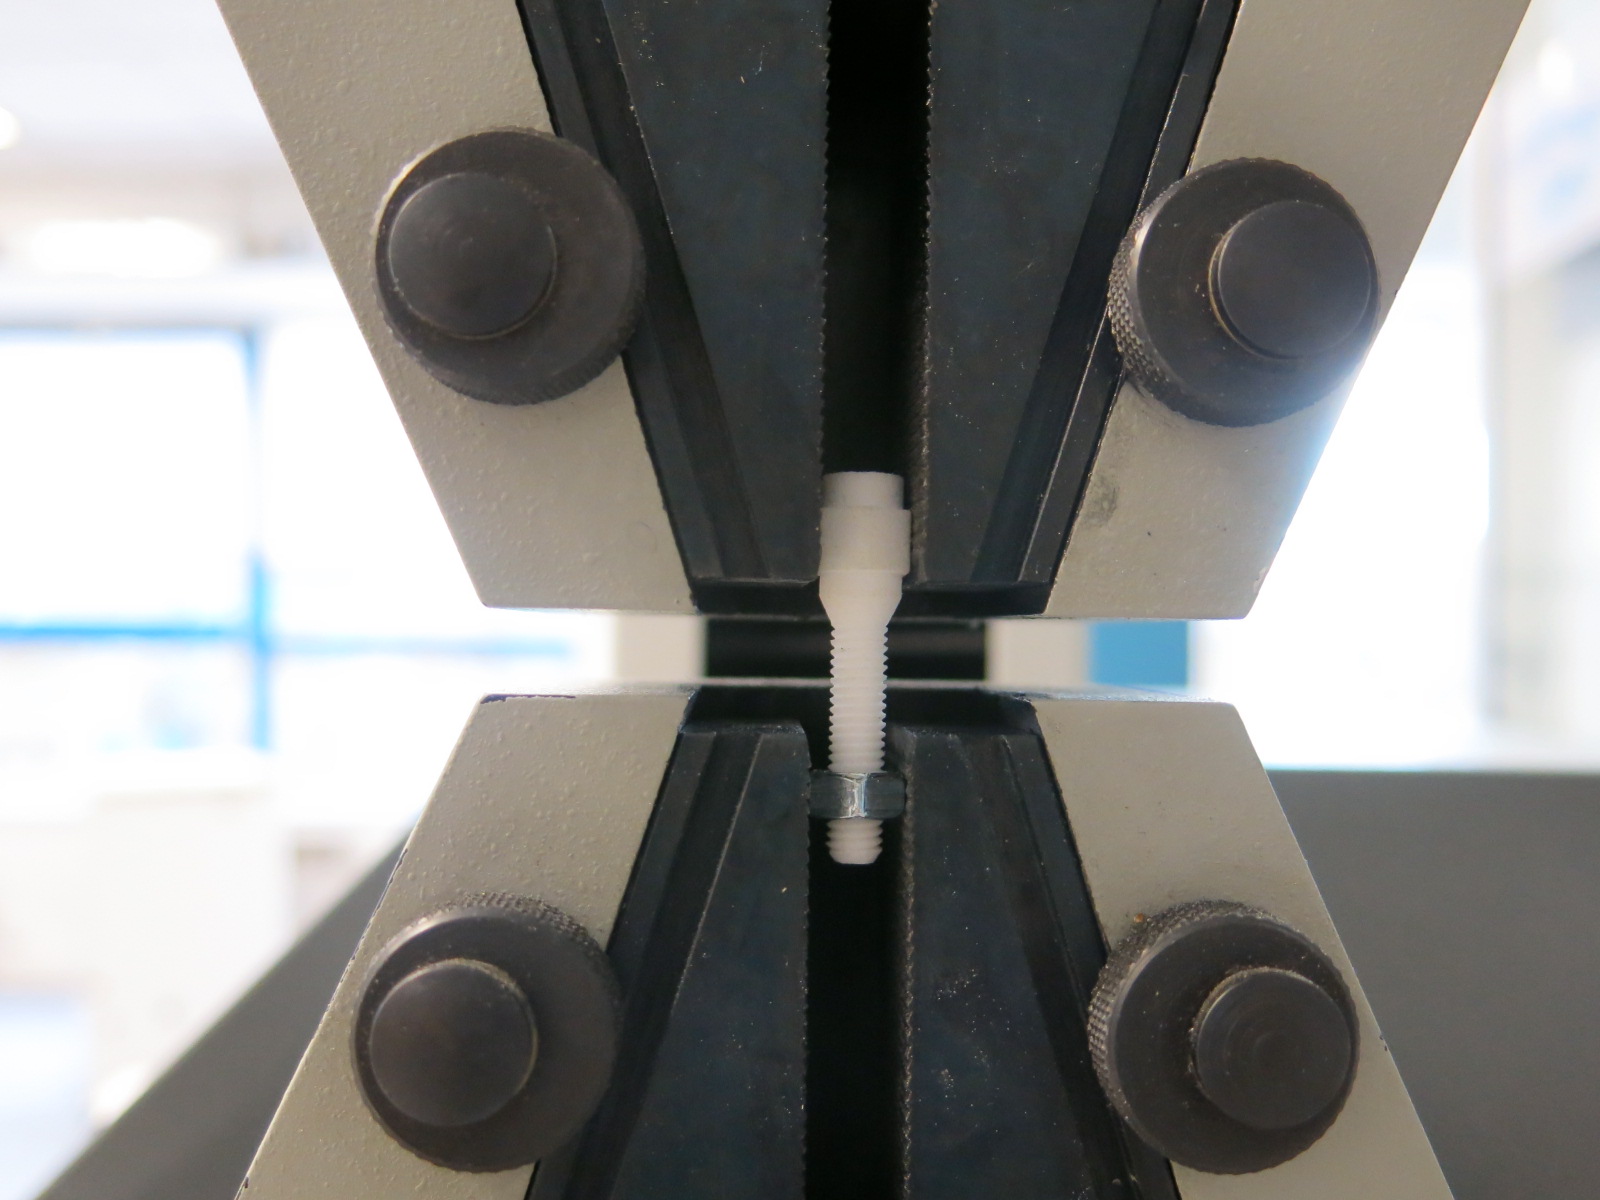
Some of our tested screws broke. However, it is important to keep in mind that the screws we created were hollow. With full screws, it would me more resistant.

Pros and cons of the 3D printed threads and screws assembly method with 3D printing
Pros: total freedom of design, avoiding the constraints linked to metal (corrosion)
Cons: not always compatible with small dimensions, less solid than metal, more expensive for standard dimensions
We hope this article helped you in your project.
To learn more about our polyamide for 3D printing and our RPU for 3D printing, and about all our other 3D printing materials, visit our materials pages. You can also check out our free ebooks about 3D printing, and start doing your own tests by uploading a 3D file on our platform.