 Connect with Google
 Connect with Facebook
Step-by-step easy guide: designing and 3D printing threads
Posted By Kat Plewa on Oct 31, 2018 | 0 comments
In this blog post, we will show you how easy it is to 3D model threads, which are used all around us. We have them in our bathrooms, kitchens, gardens. Most of them have universal size and can be easily designed and 3D printed with an online service like Sculpteo. Our 3D printing experts will show you how simple 3D modeling and 3D printing can be. Let’s get started!
What are the benefits of 3D printing threads?
One would ask, why would you 3D print threads if they are already available on the market? But the benefits of 3D printing threads are numerous. Let’s start with the customization. No other technology in the world gives you that much design freedom and a high level of details. With Additive Manufacturing you can design and produce parts perfectly fitting just your needs.
Second of all, Additive Manufacturing can also bring a new era to the issue of spare parts. As a manufacturer you have to waste money on stocking them, keeping the right amount of them for years. Say goodbye to that problem. Now it can be as easy as ordering the spare parts from an online 3D printing service like Sculpteo and getting them delivered straight to your client.
Additive Manufacturing also means a wide range of choices when it comes to 3D printing materials and technologies. Depending on what your production requirements are, you can decide 3D printing threads with metal powder is the best, or you can go for plastic. 3D printing threads can lead to many exciting solutions for your production, they can be robust, heat resistant and have corrosion resistance. Which one will suit you best?
What software to use?
Choosing the right software for your needs is never easy. Think first about your modeling needs, what type of thread you need, if it’s more universal or very customized. Consider what do you want to do with the screw thread once your 3D model is finished. Maybe you need it just for visualization purposes. However, if you’re planning to 3D print them, check if the software of your choice supports 3D printing file formats. We highly recommend using STL files for sending your models to our online 3D printing service.
Since we are going to show you how to design universal screw threads, we decided to work with Fusion 360 by Autodesk. This 3D modeling software has a user-friendly interface, is easy to operate, even if you don’t know much about 3D design, but also has advanced options, perfect for professionals. Follow up with our tutorial if you feel like you need to know a bit more about Fusion 360.
For the needs of this blog post, our 3D printing experts decided to go with Fusion 360, because it actually has an automatic thread creator which makes designing and 3D printing threads extremely easy and convenient. However, to give you the best 3D printing experience, we will show you two ways of 3D modeling threads. We will start with the automatic Thread Tool, but also show you a second option and how to customize them. Lastly, we will also showcase you how to design internal threads.
Option no 1: 3 steps of Thread Tool
It’s the easy way out, perfect for standard bolts. In this example, we will use fixed measurements, but of course, you can adjust them to your needs. The Thread Tool will fit 90% of applications.
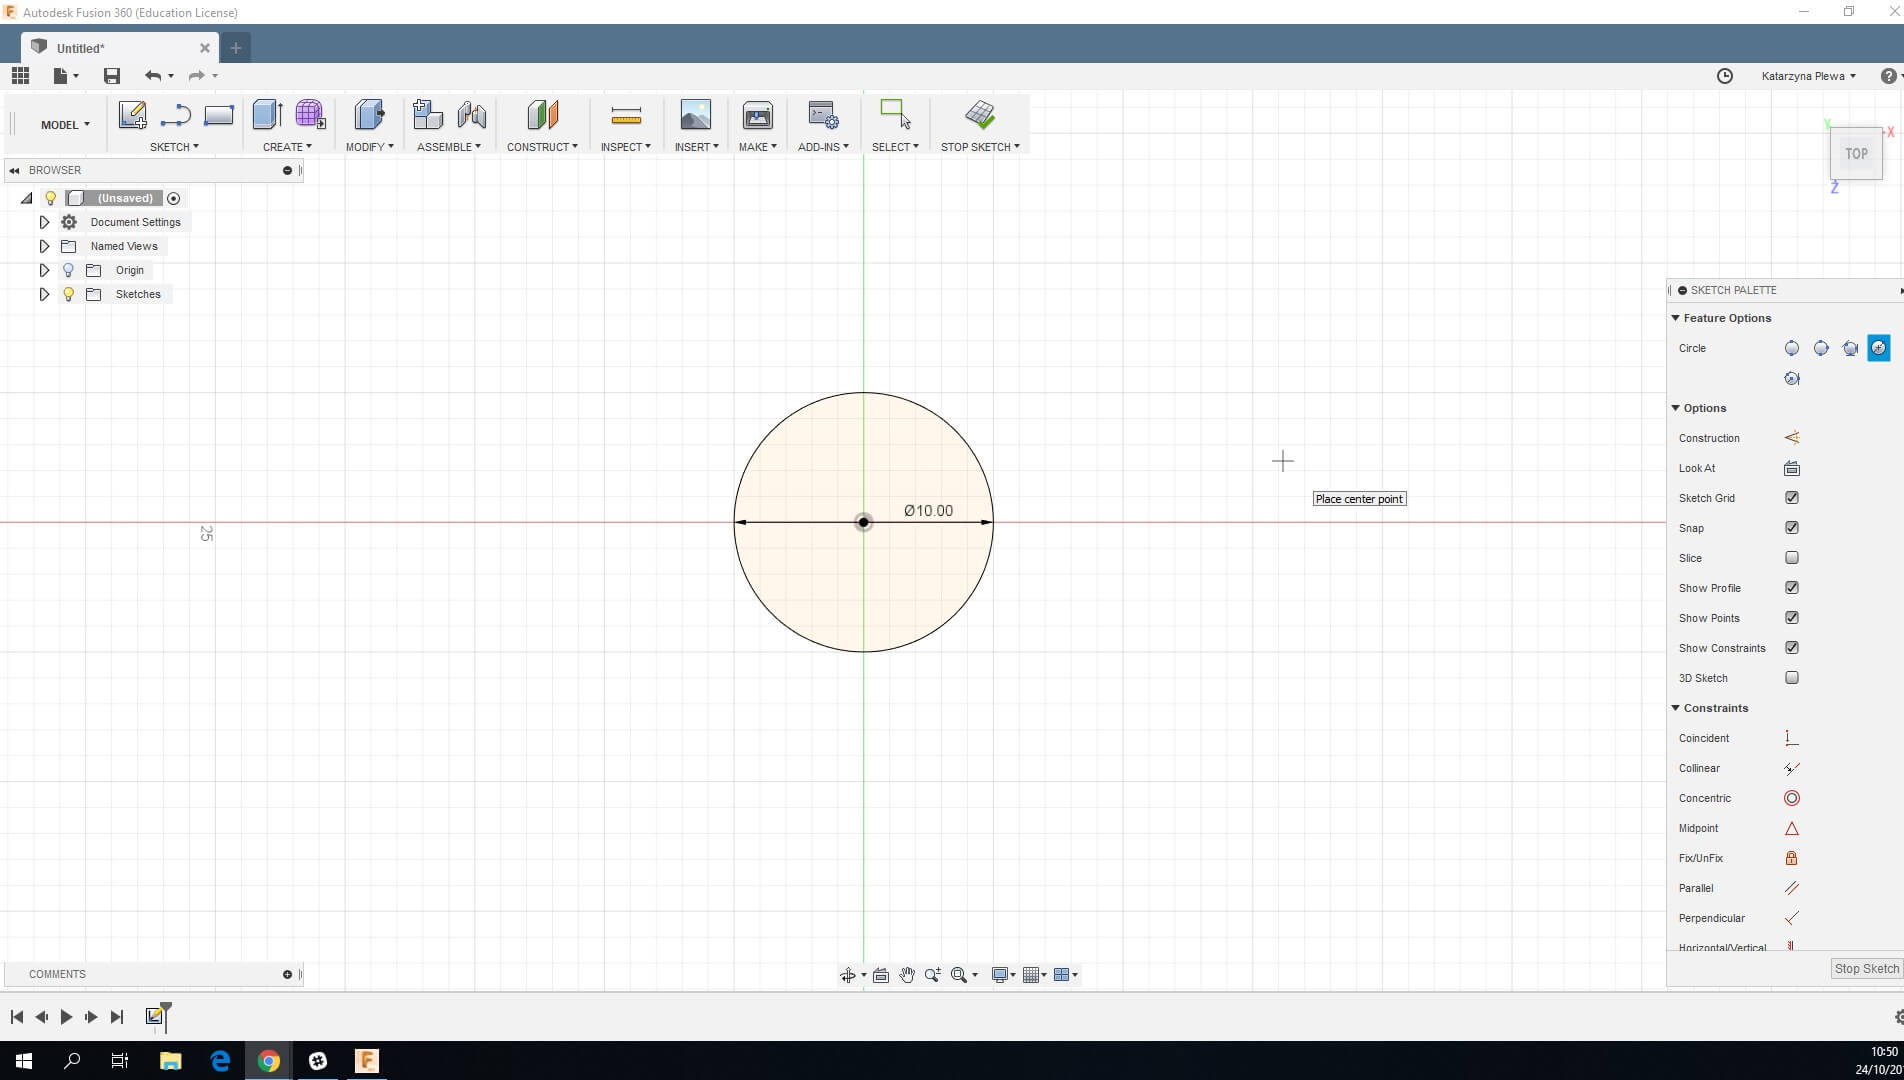
1.Create a circle
We will start by creating a circle, 10 mm in diameter.
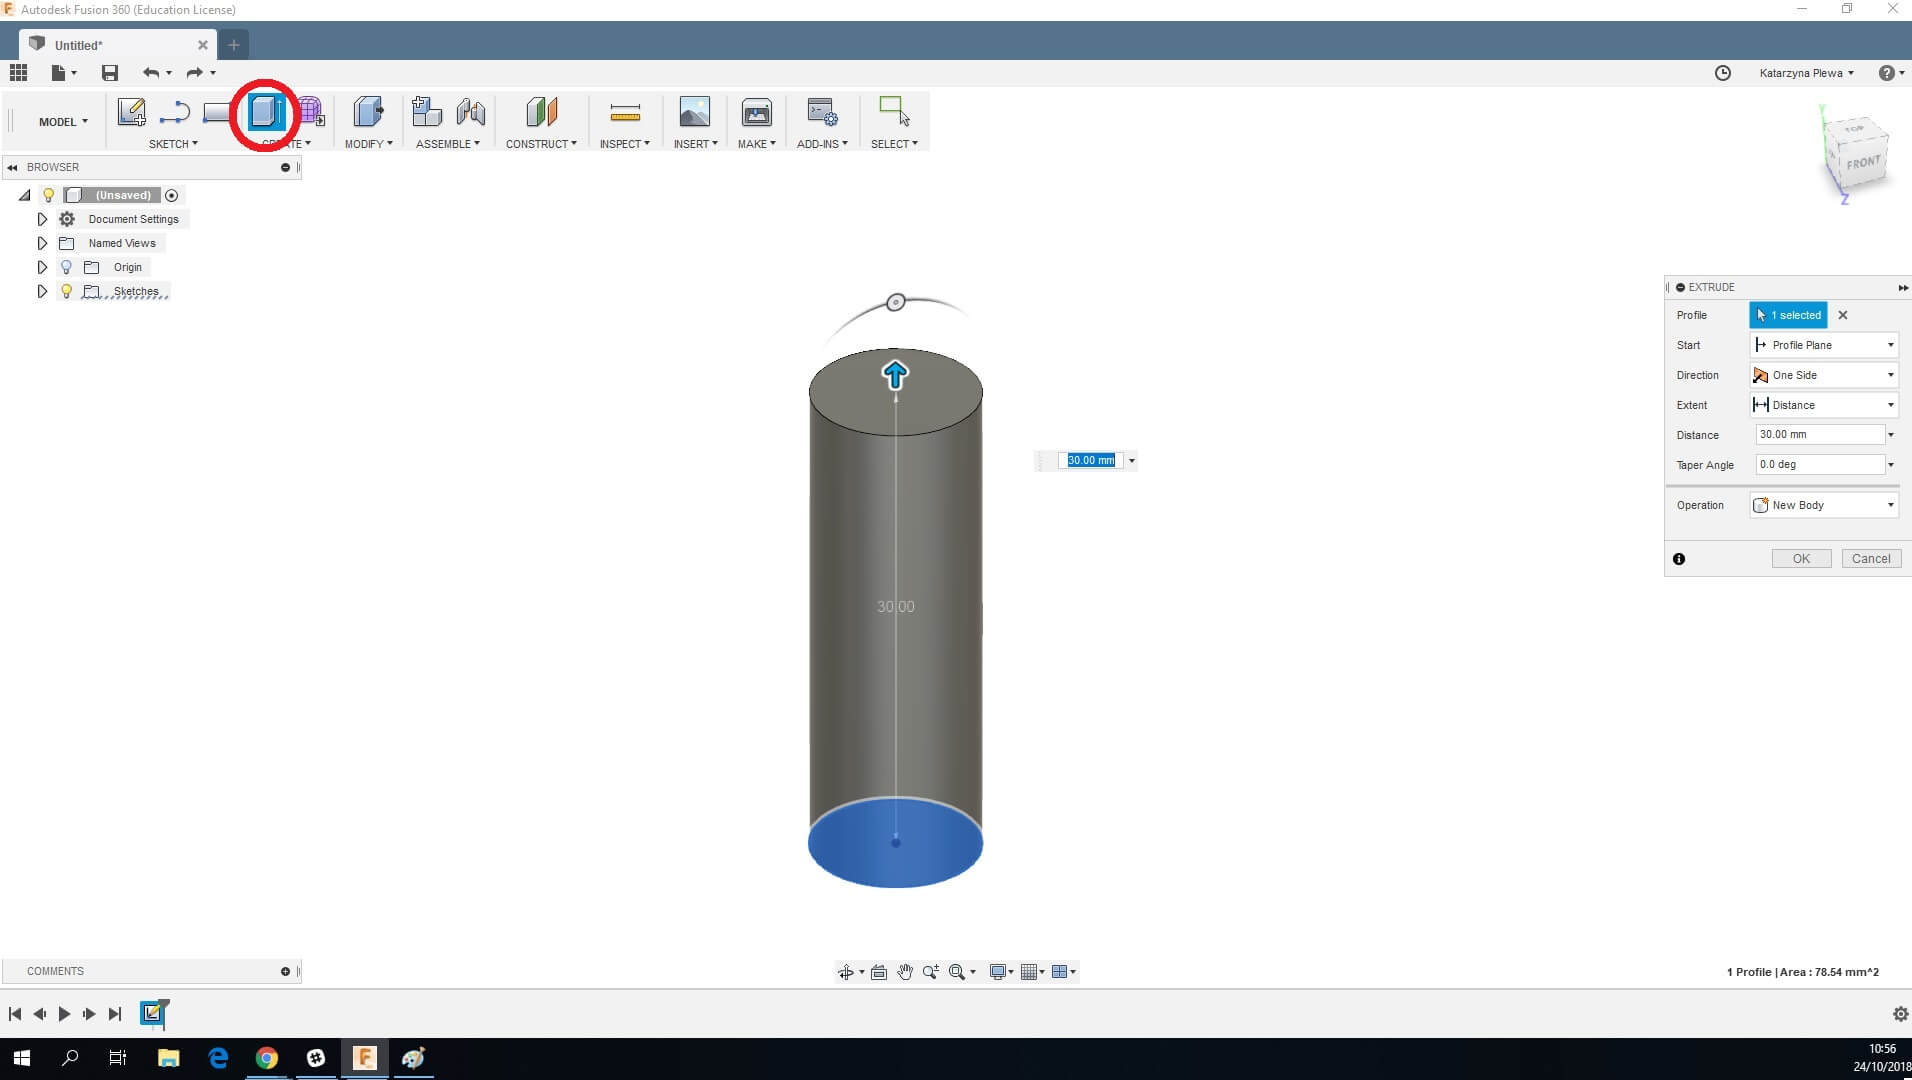
2. Extrude the circle
Next step is to extrude the circle. Click on the icon shown in the red circle on the picture below. Bring up the arrow manually or put the value 30 mm. Click OK.
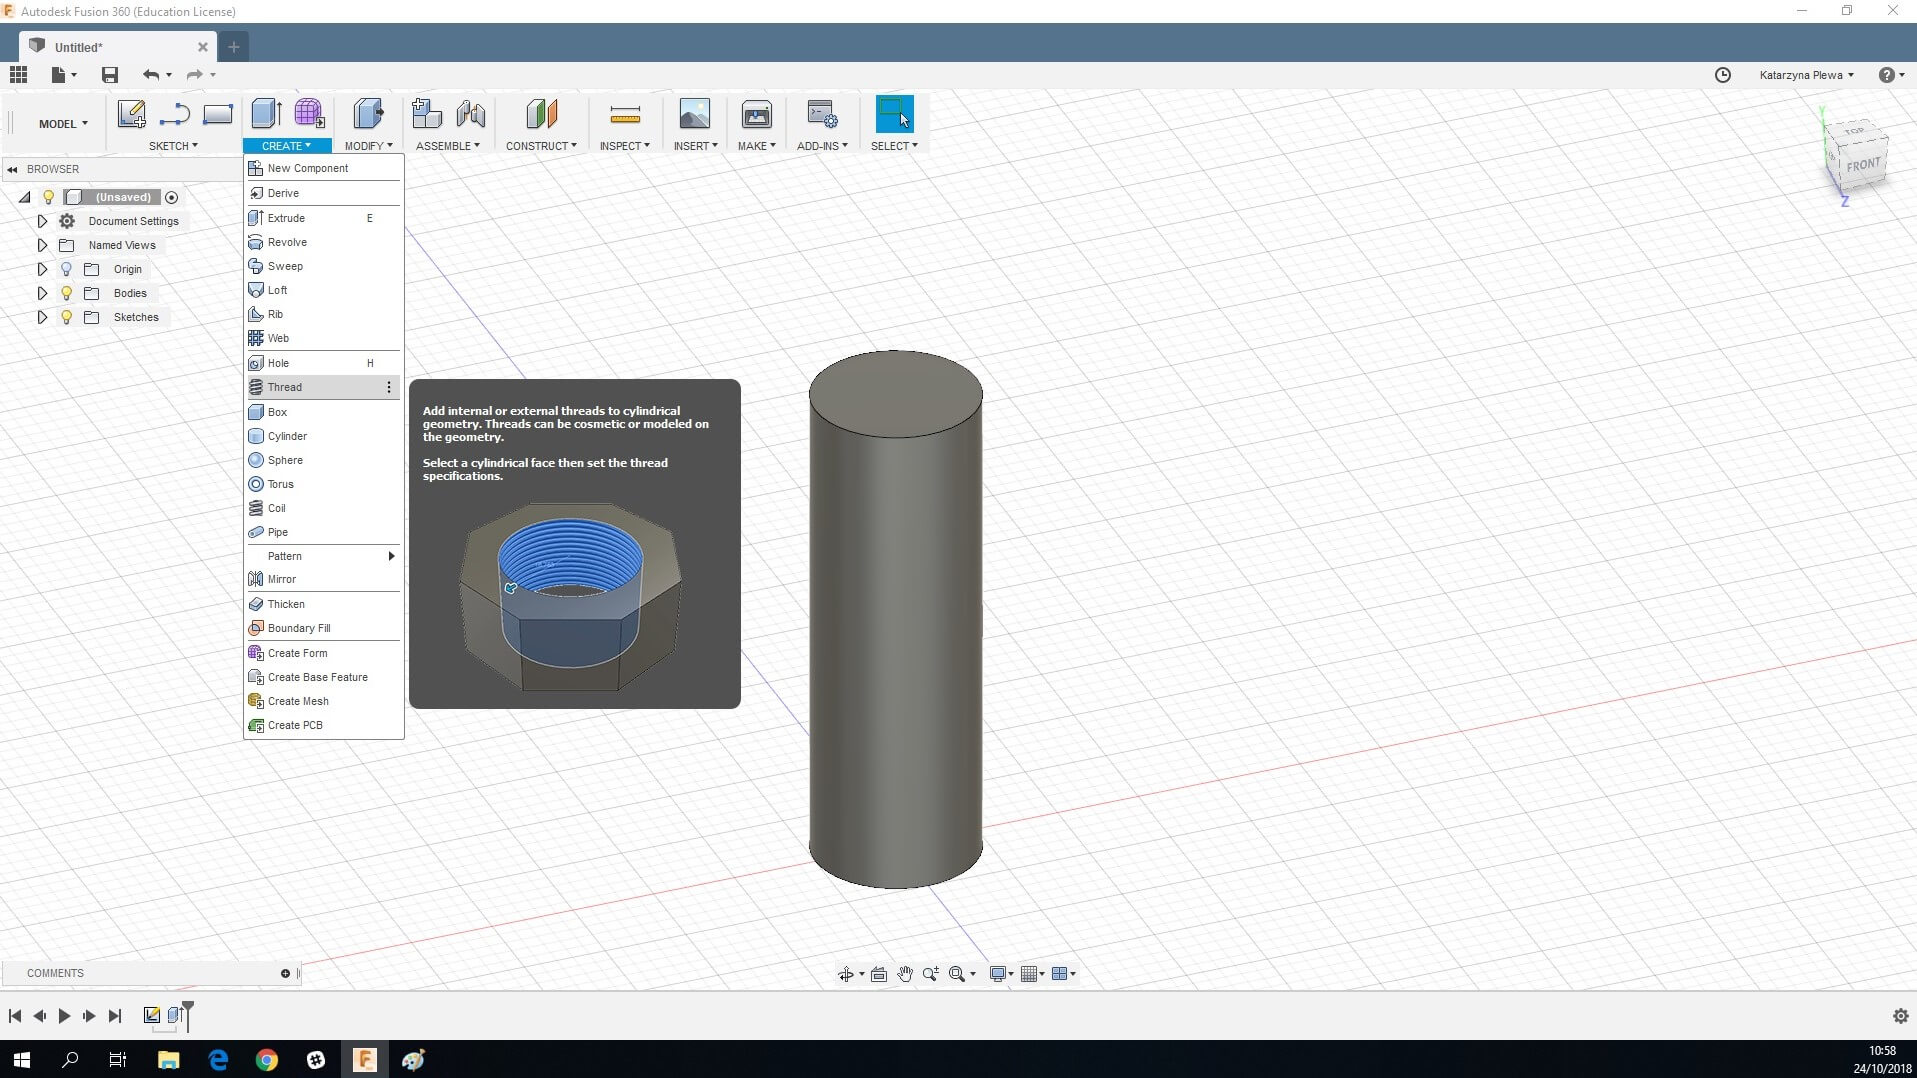
3. Use the Thread Tool
Now we will already move onto creating the thread. Go to ‘’Create’’ and find option ‘’Thread’’. See how easy it is?
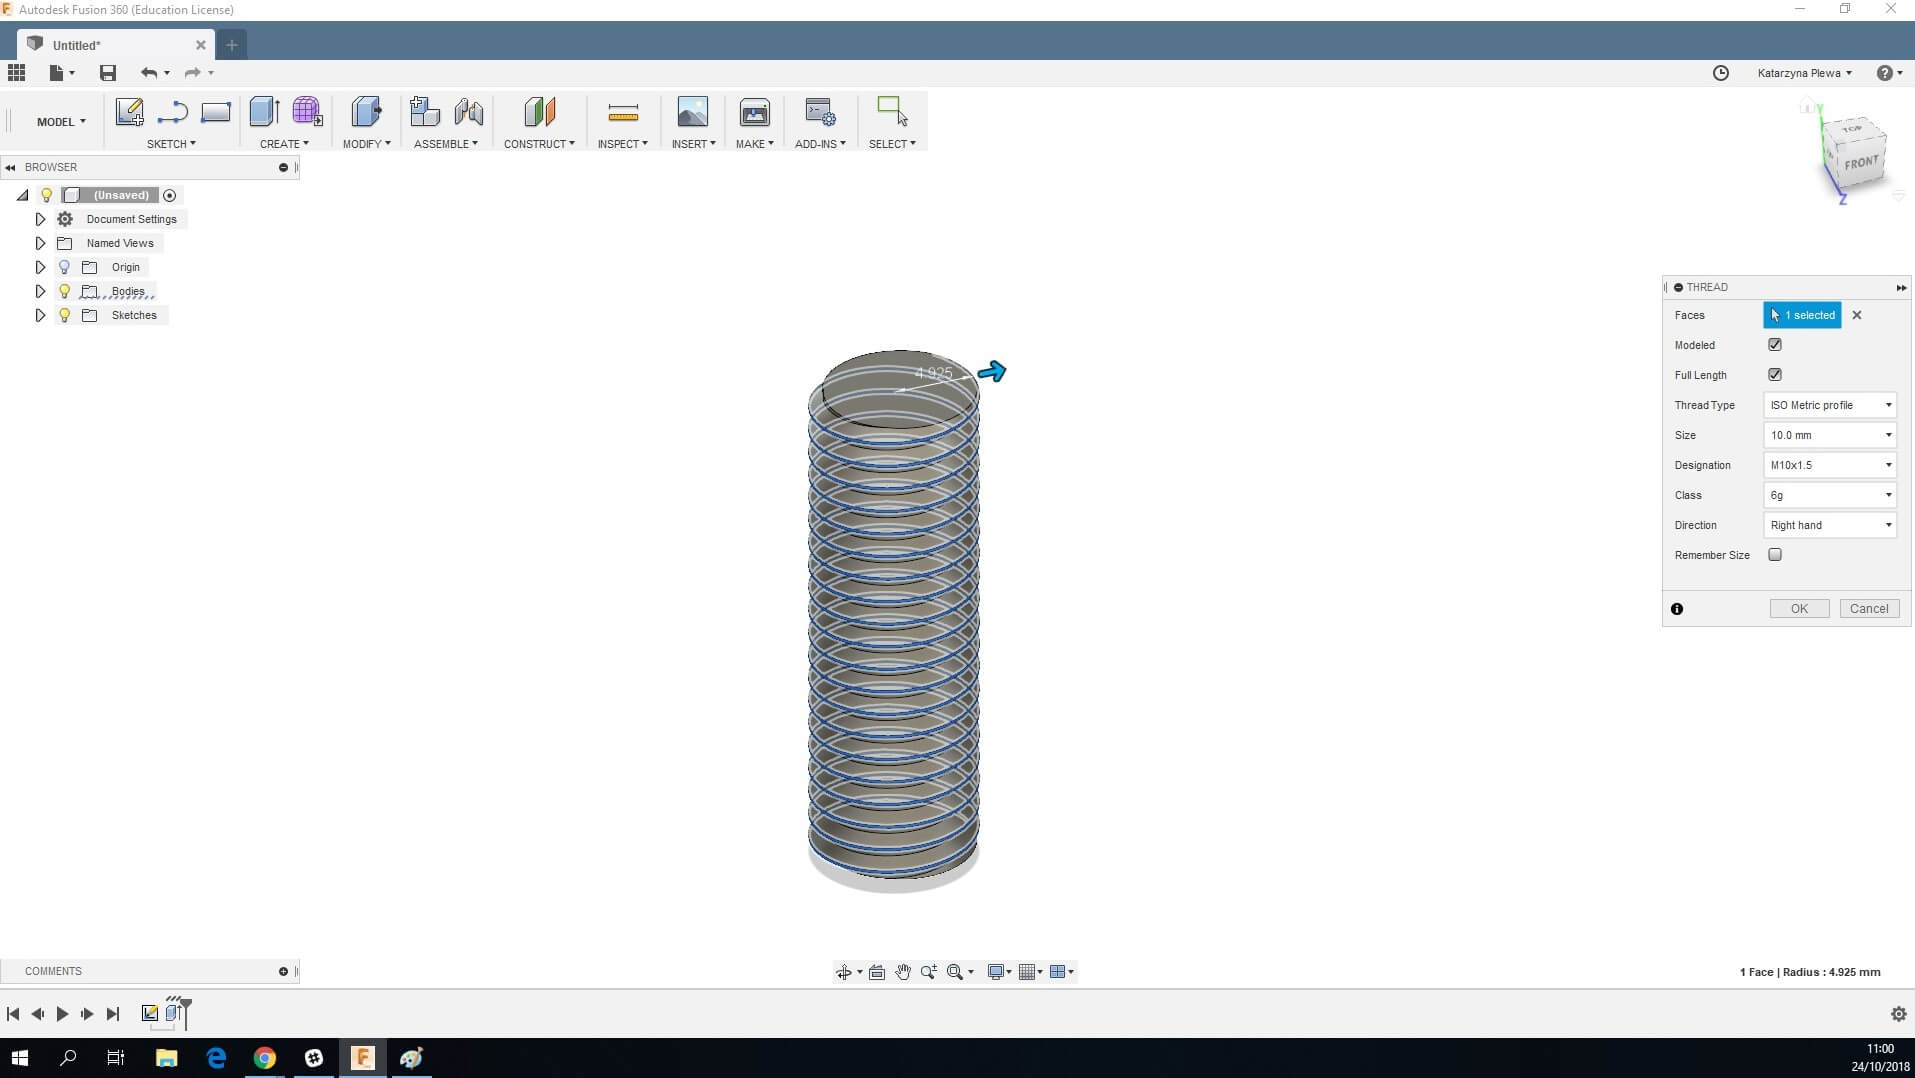
All you have to do now is to Select the wall of your cylinder. Fusion 360 will adjust the settings for us since we created a circle with 10 mm in diameter. For standard thread, settings are ISO Metric profile, 10.0 mm size, Designation M10x1.5, which sets the pitch of the thread to 1.5 mm, but you can edit it if you want to go finer. You can select the class, which states the tolerance class, however, most likely you will use 6 g, but you can set the nuts tighter if needed. You can also adjust the direction.
Remember: It is absolutely crucial that you select option ‘’Modeled’’ as active. Otherwise, Fusion 360 only shows a projection of the thread instead of actually modeling it.
And it’s done! Now just upload the model for 3D printing thread!
Option no 2: Coil Tool
This option is a little bit more advanced, however still very simple just like the Thread tool. The difference is that you can adjust the nuts better, making them more round if needed.
1. & 2. Repeat step 1 and 2
Create a circle and Extrude it.
3. The Coil Tool
Select the Coil tool under the Create option.

Select the wall of your cylinder. Adjust the settings accordingly.

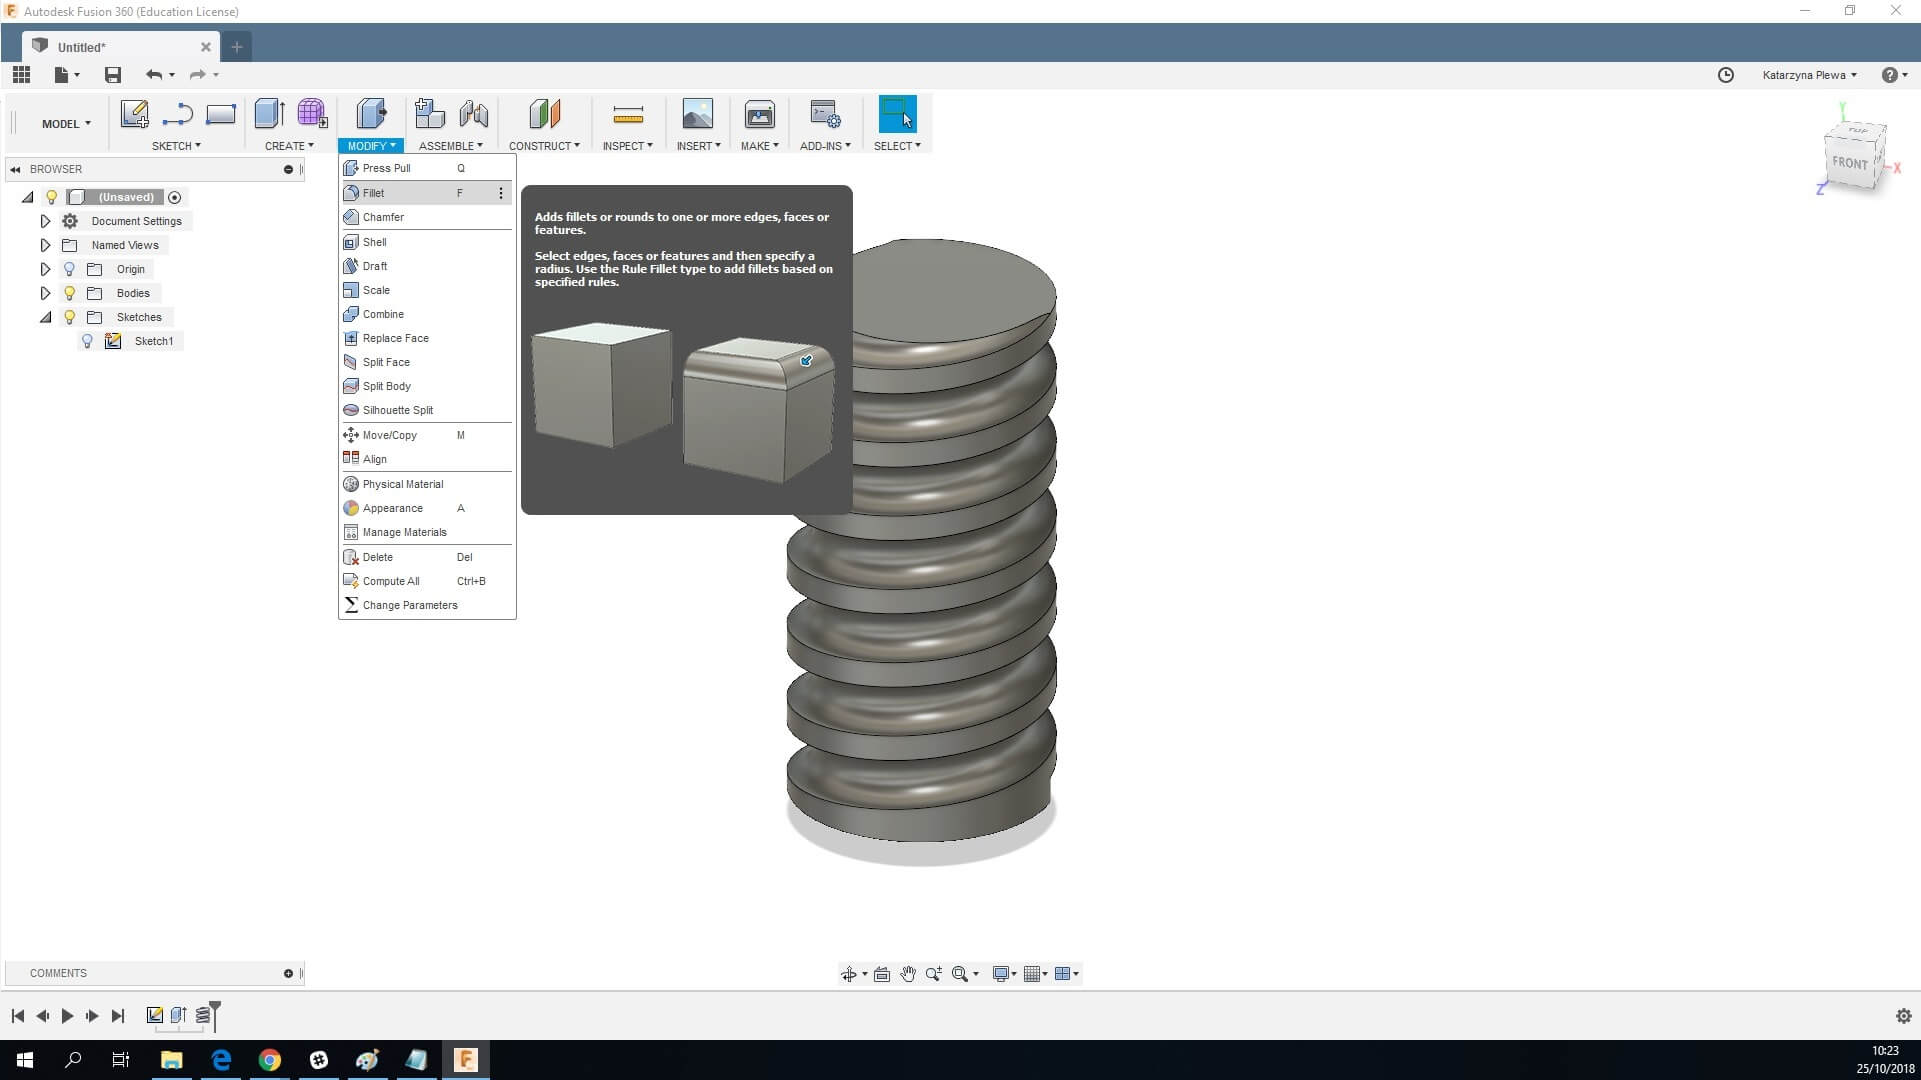
4. Smoothing the edges: Fillet
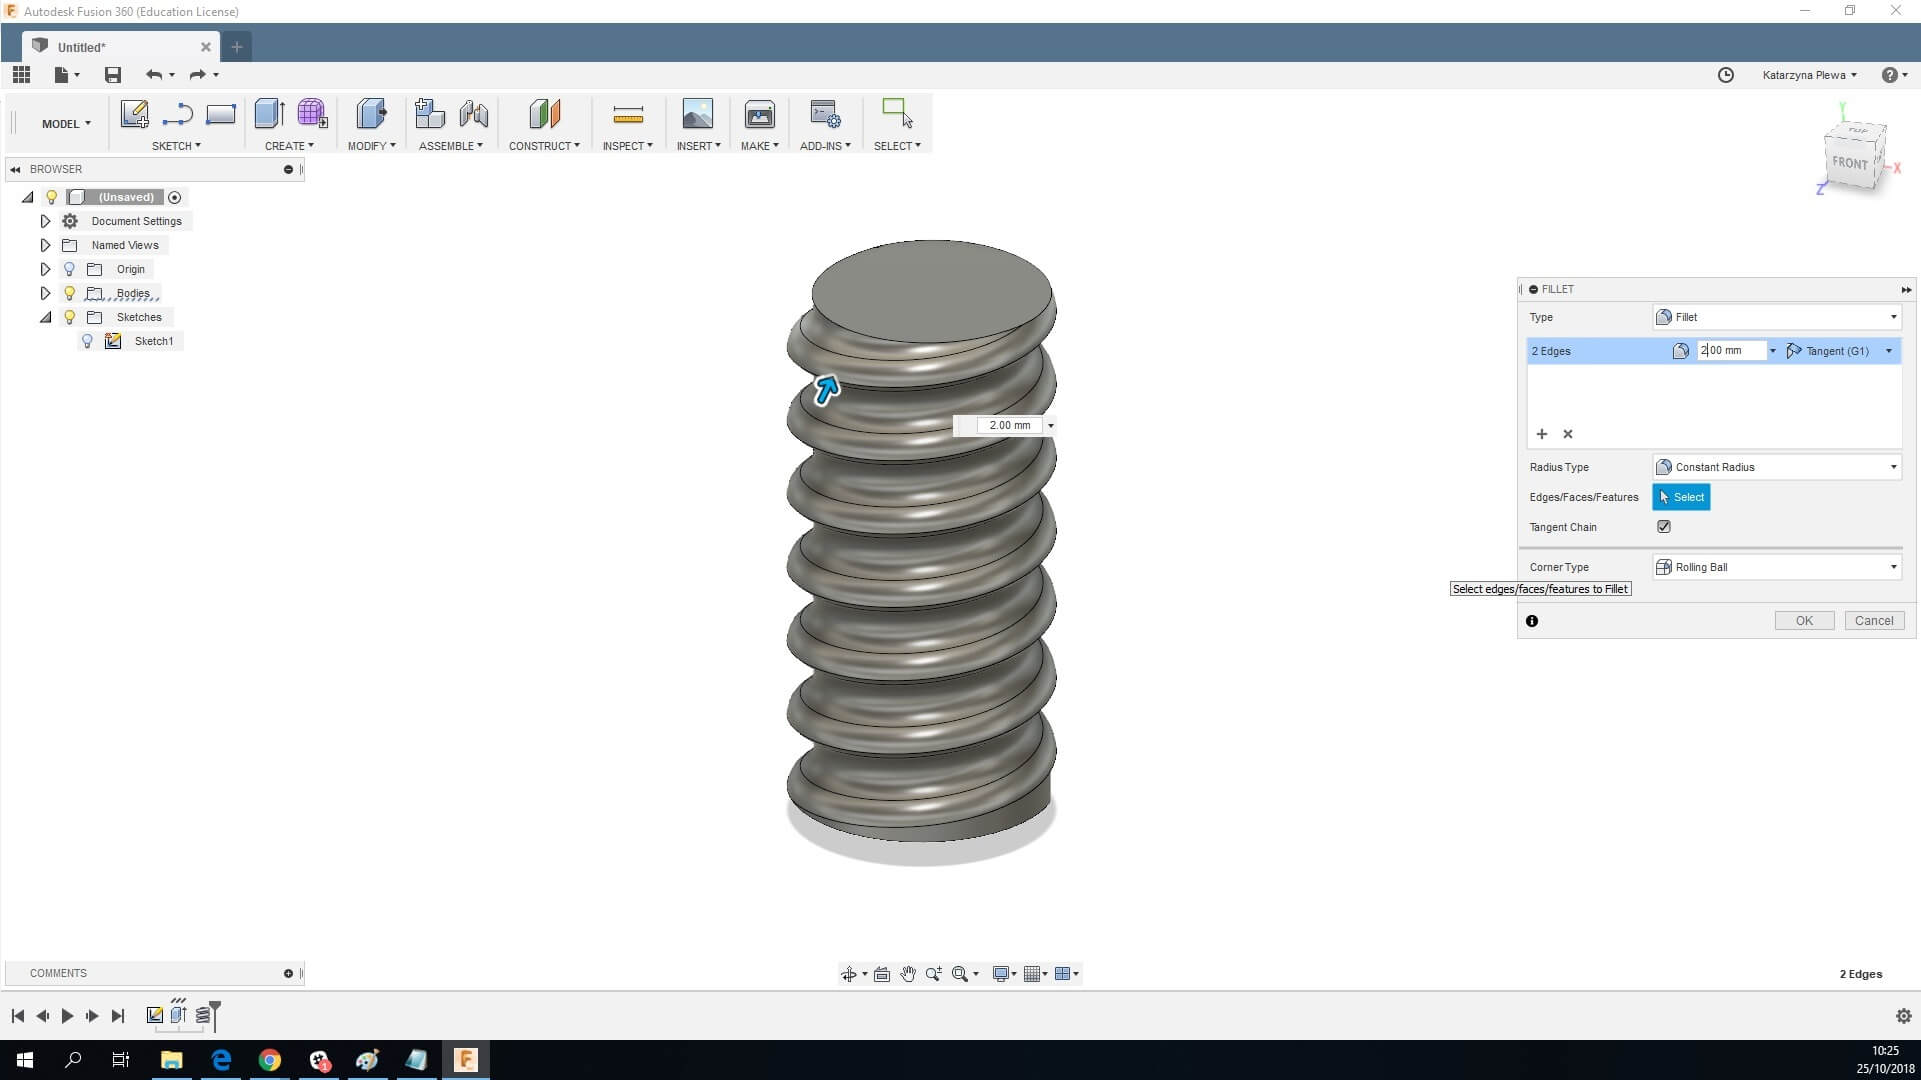
As you noticed, the nuts of your thread are straight, we can smooth them with fillet. Select the option Fillet under Modify.
Select the edges of the thread and set the amount of smoothing. And it’s finished!
How to design an internal thread?
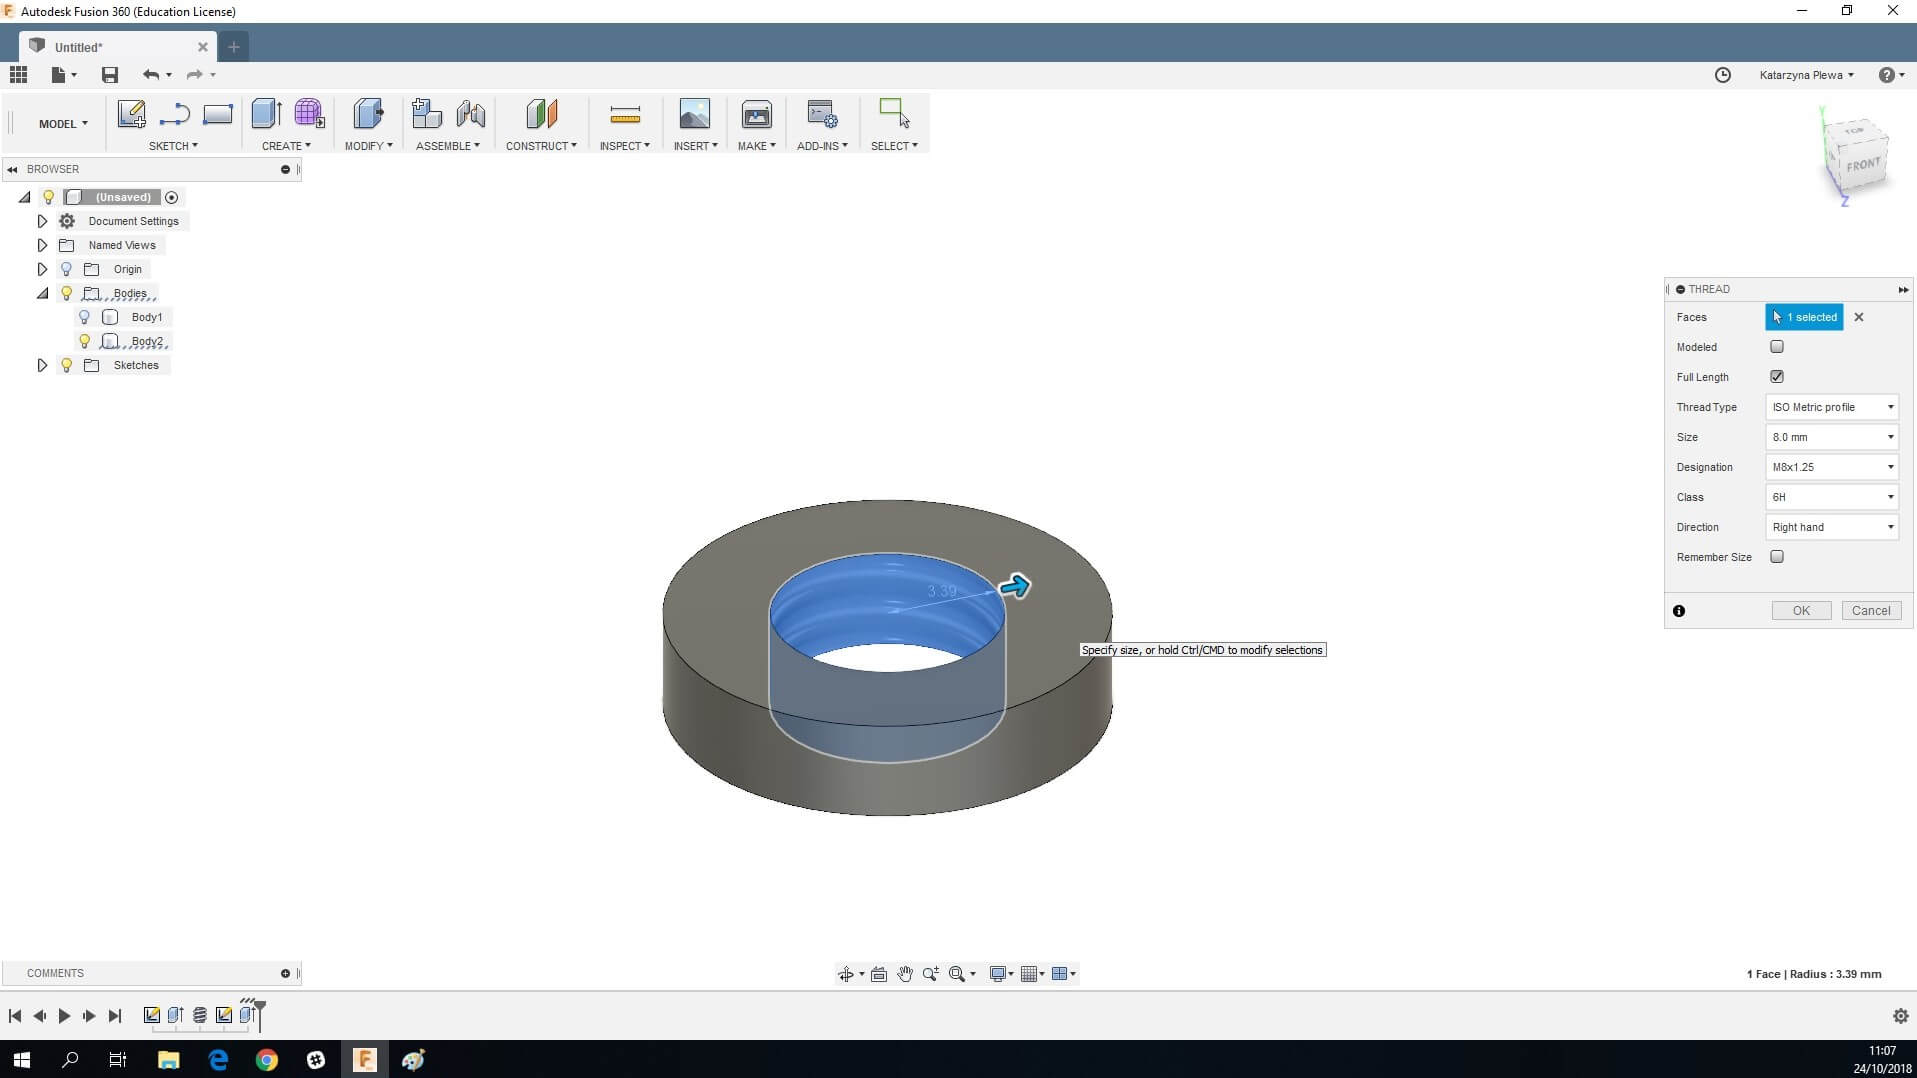
If you wish to design an internal thread, otherwise called a nut, it’s also very simple. We will use again the Thread Tool.
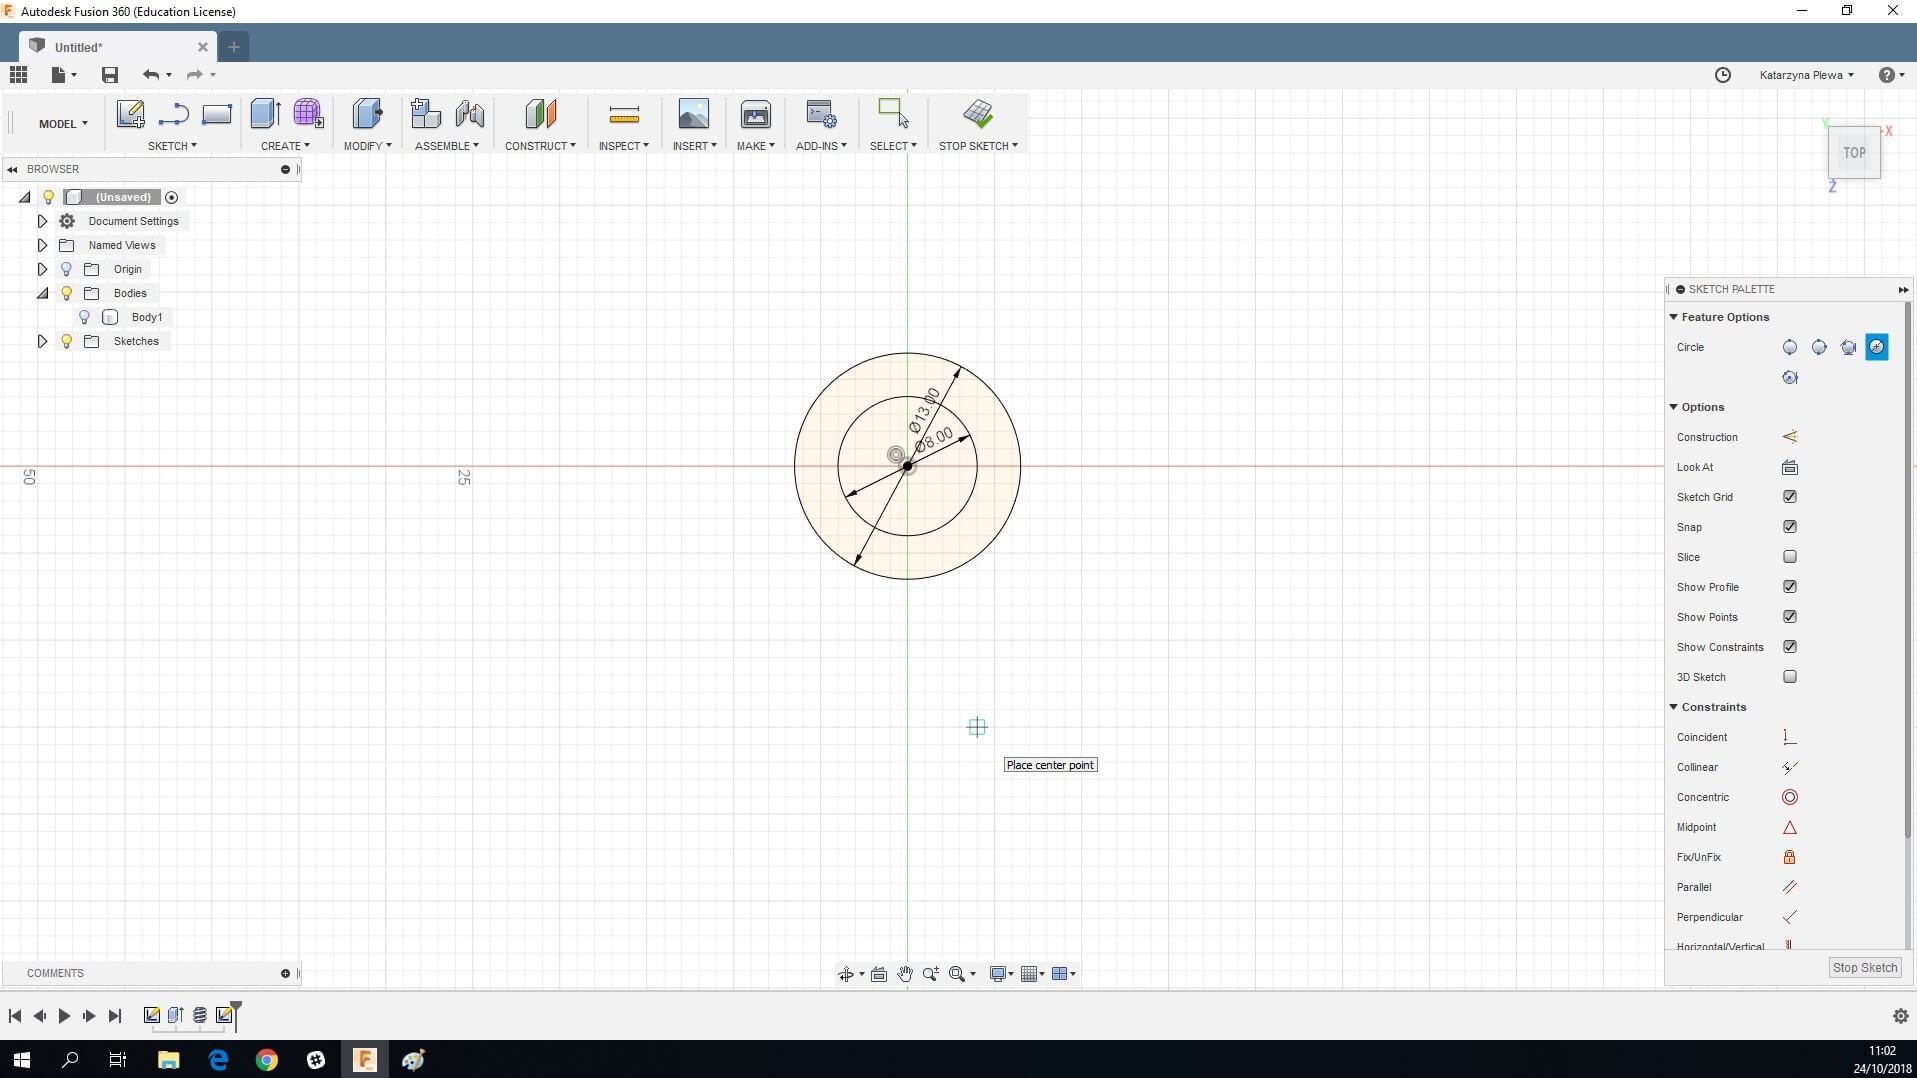
1. Create two circles.
We make on 13 mm in diameter and second 8 mm. Make sure their middle points are aligned.
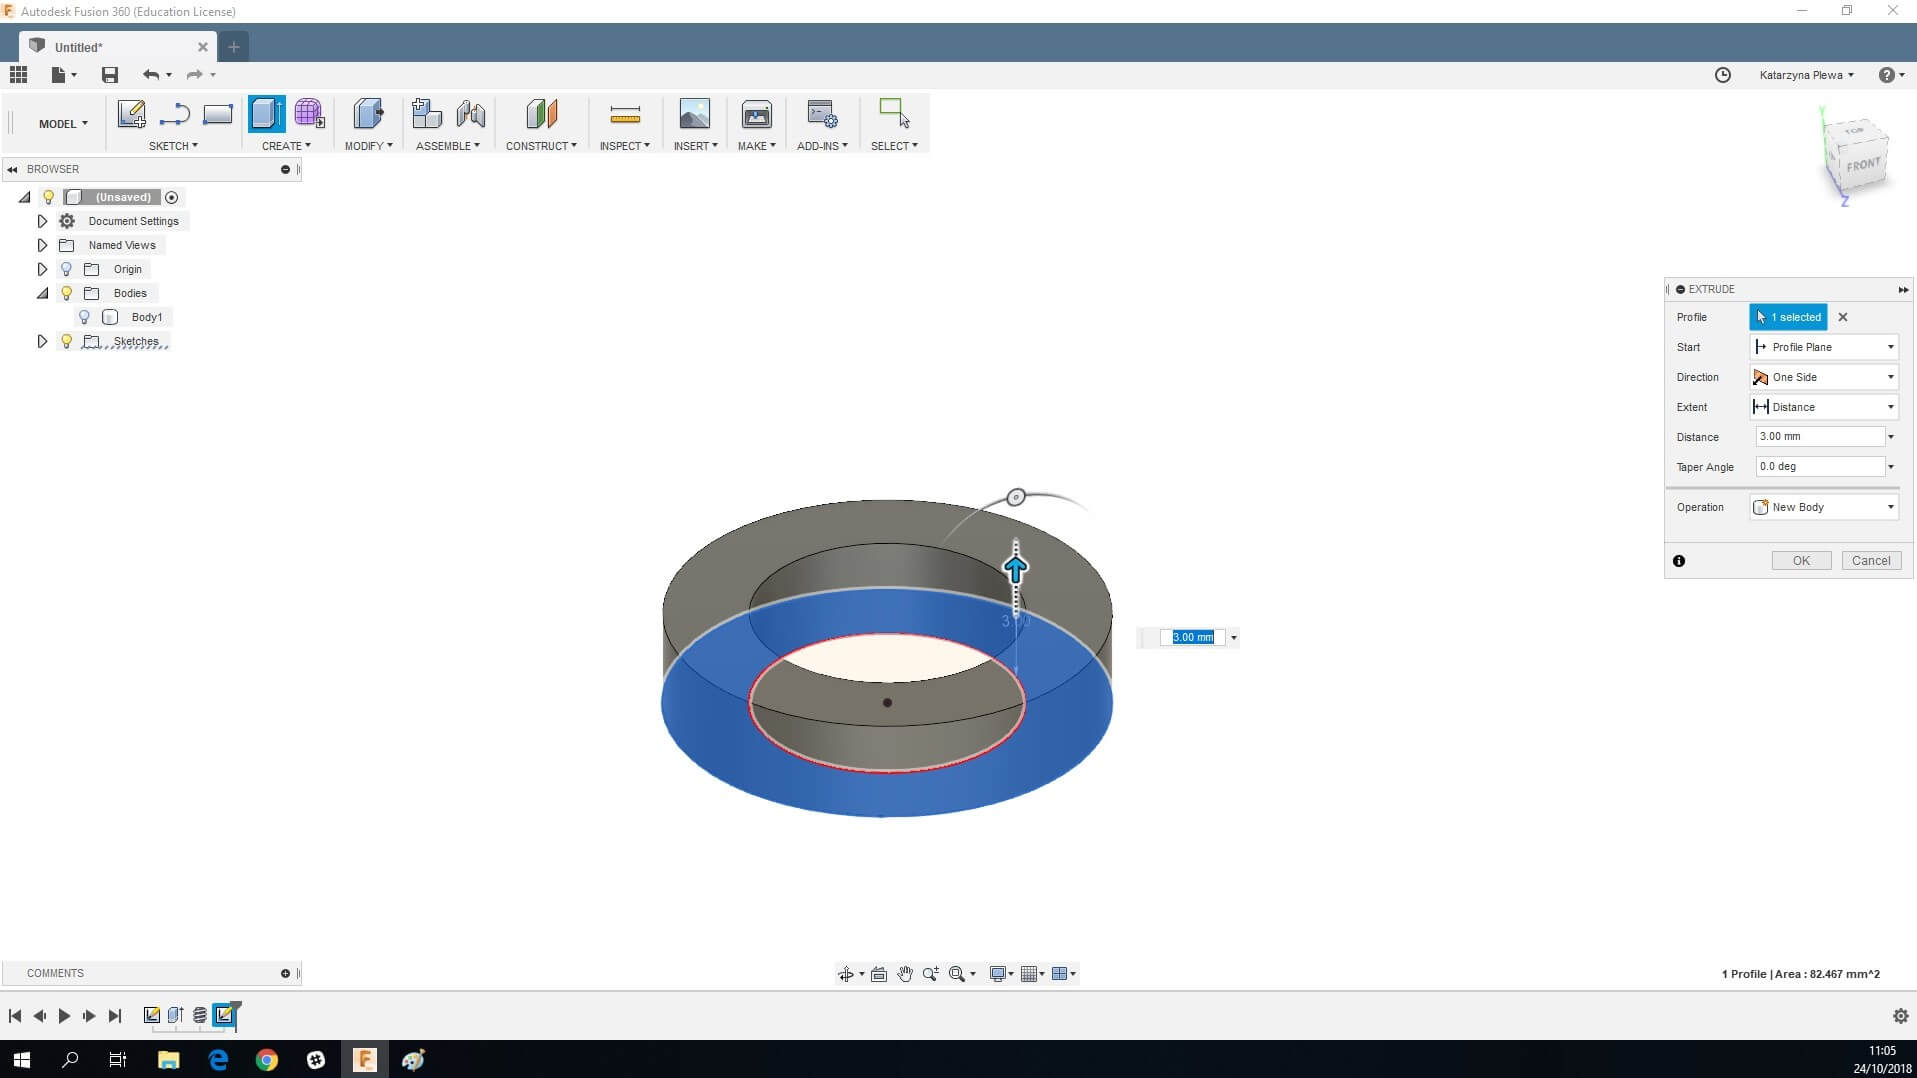
2. Extrude
Use the Extrude option on the outer circle. We extruded it 3 mm.
3. Thread tool
Choose the Thread Tool in the Create tools. Select the inside wall and adjust the settings.
Remember: select the modeling option for 3D printing.
3D printing threads
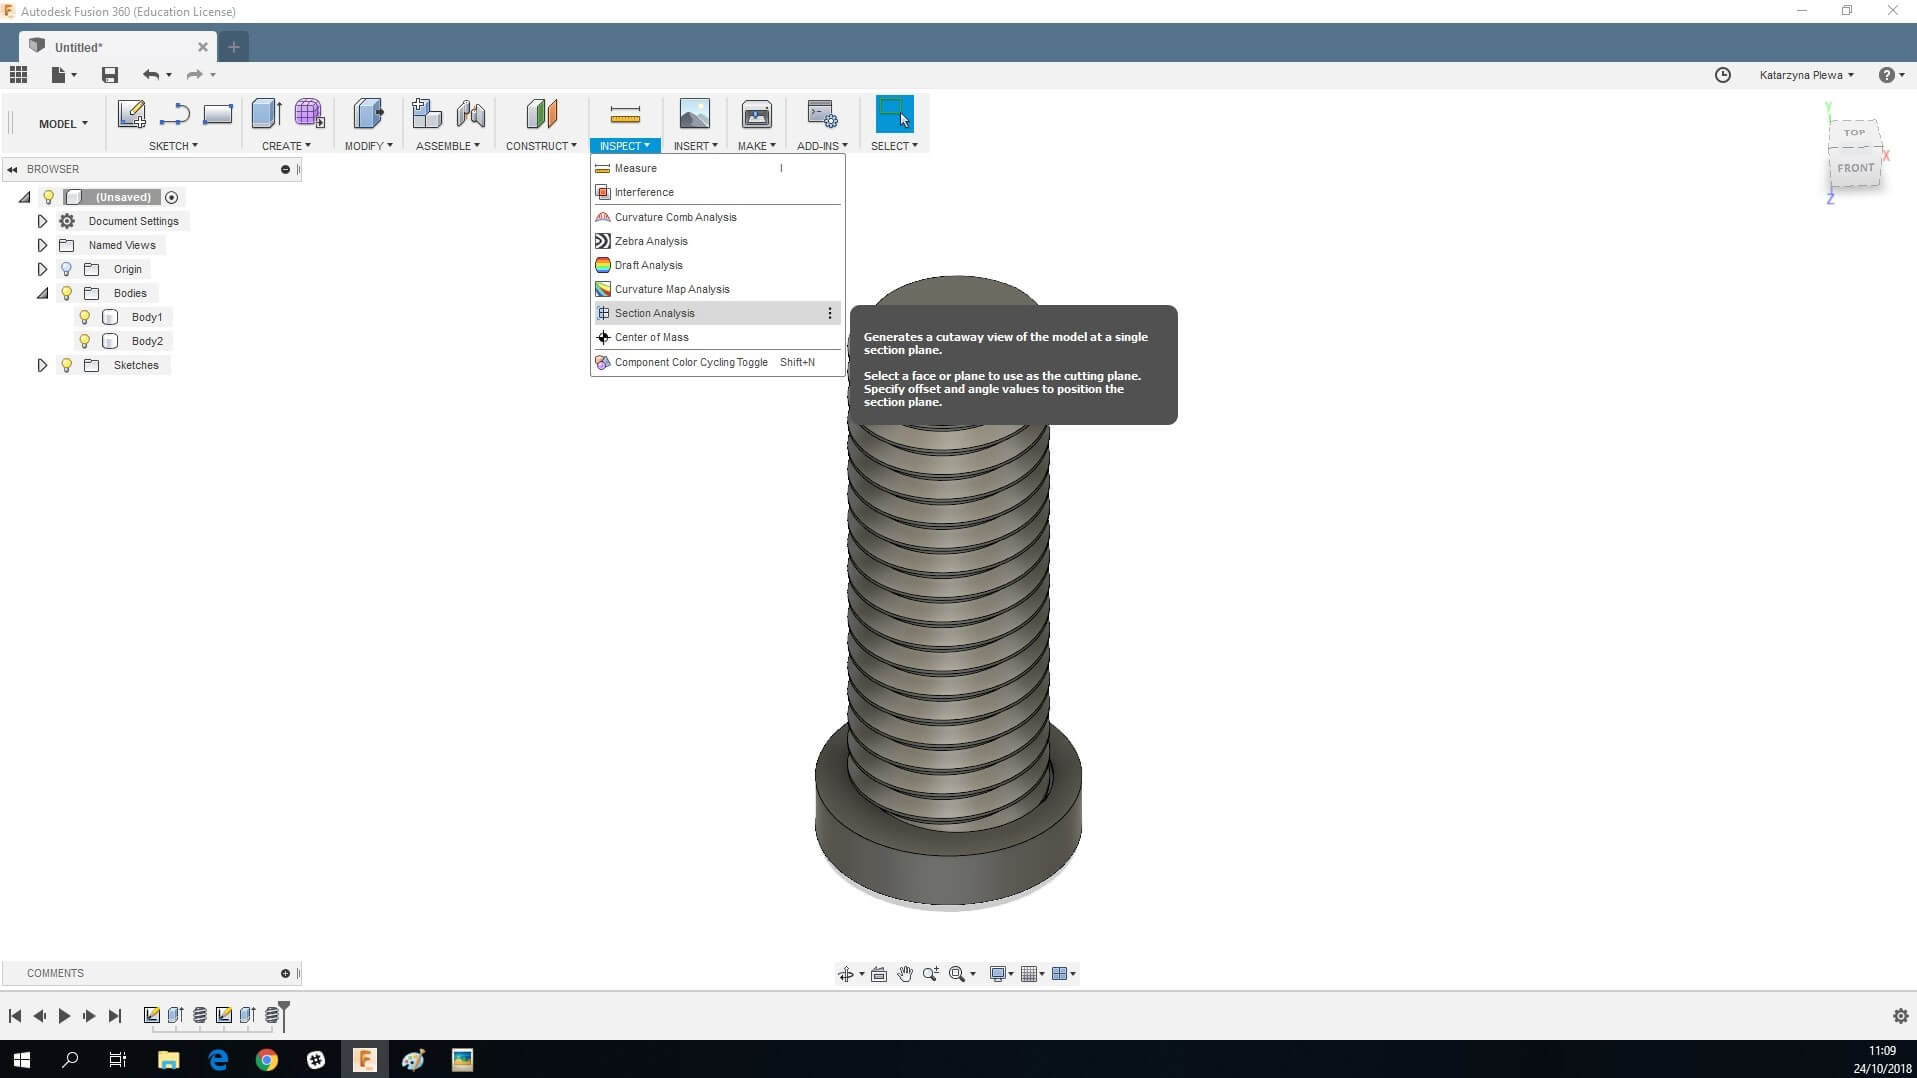
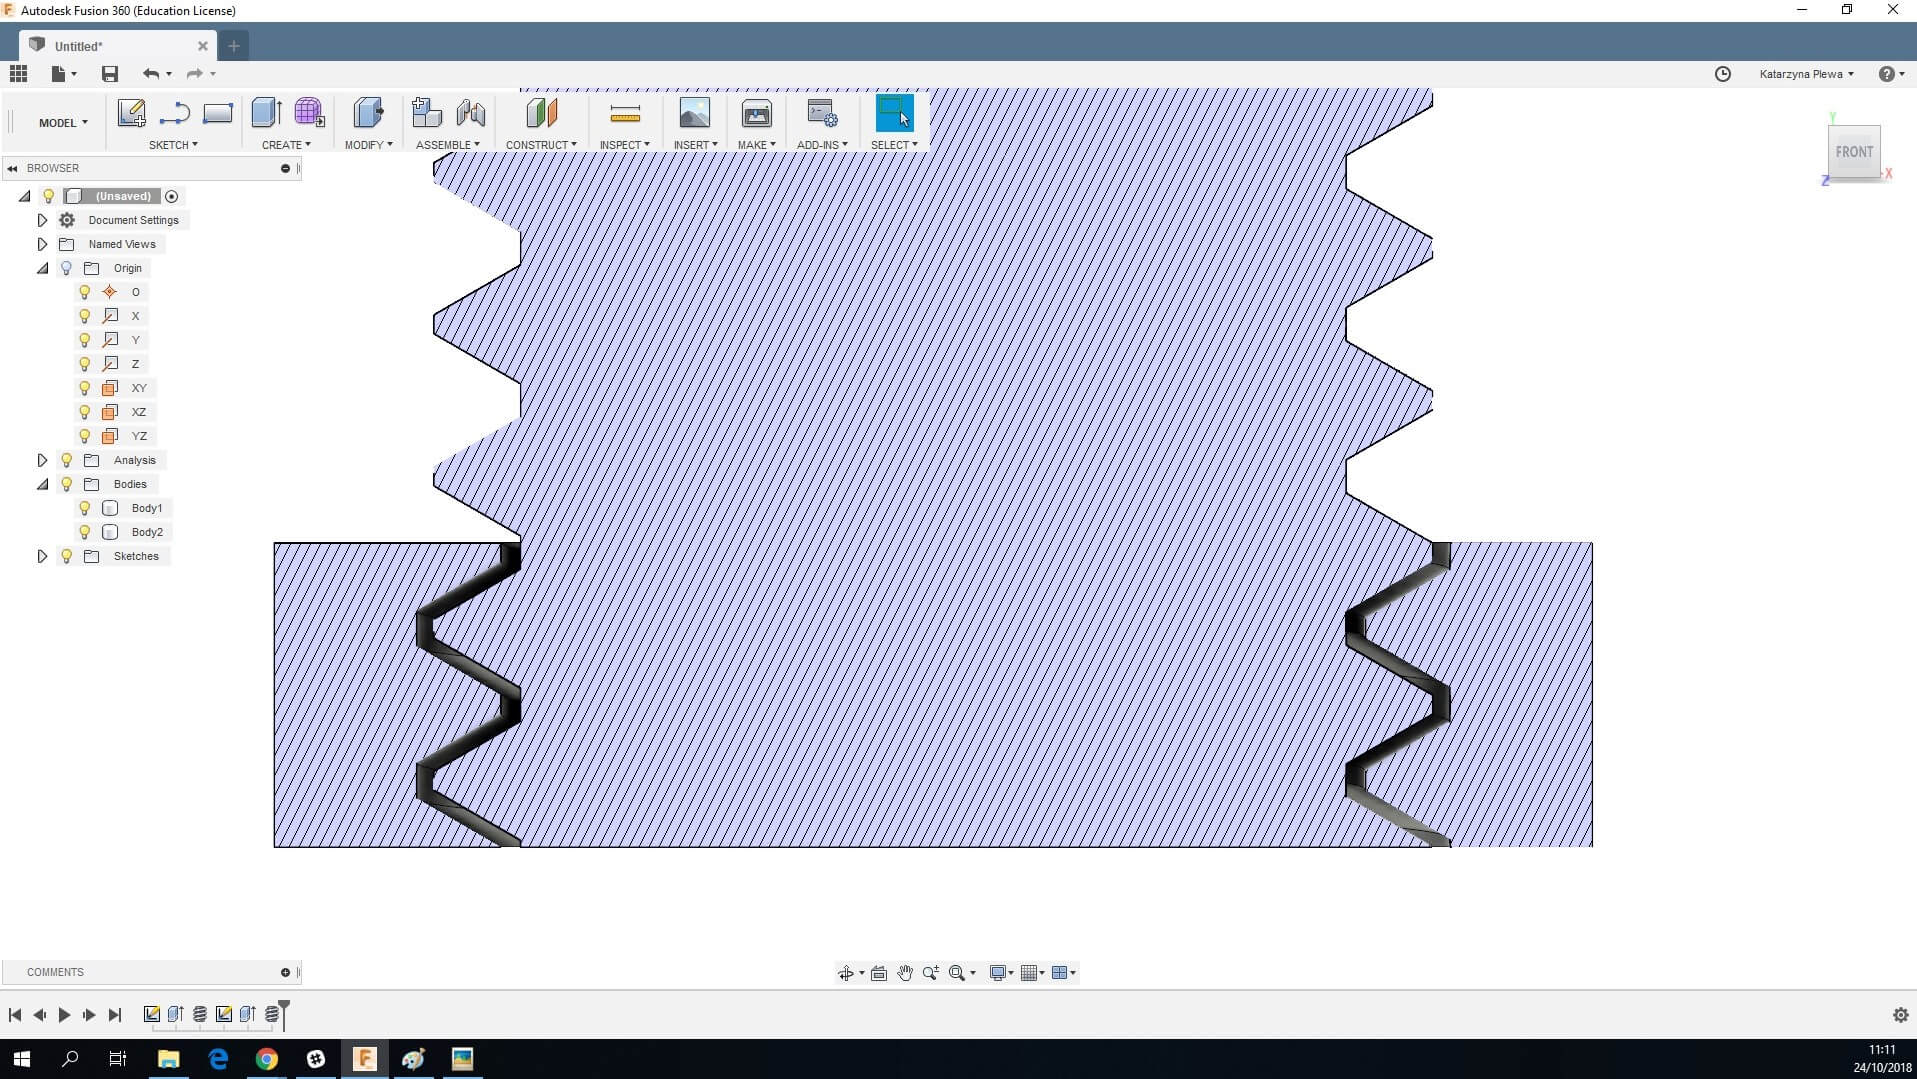
If you’re designing external and internal threads, make sure they match together. You can do that by going into ‘’Inspect’’ > ‘’Section Analysis’’ and choosing the right plane to see through the threads.

It’s also very important to pay attention to the details. Fusion 360 automatically matches two threads leaving enough space between them, but if you’re working with a different software, make sure the space between internal and external threads is 0.15-2 mm.
Save your file as an STL. If you’re 3D printing both external and internal threads, make sure you save them separately. In Fusion 360 it’s easy: right click on ‘’Bodies’’ on your left-hand side and select ‘’save as STL’’. In the dialog window choose to save each body separately and the software will automatically create a file for each body.
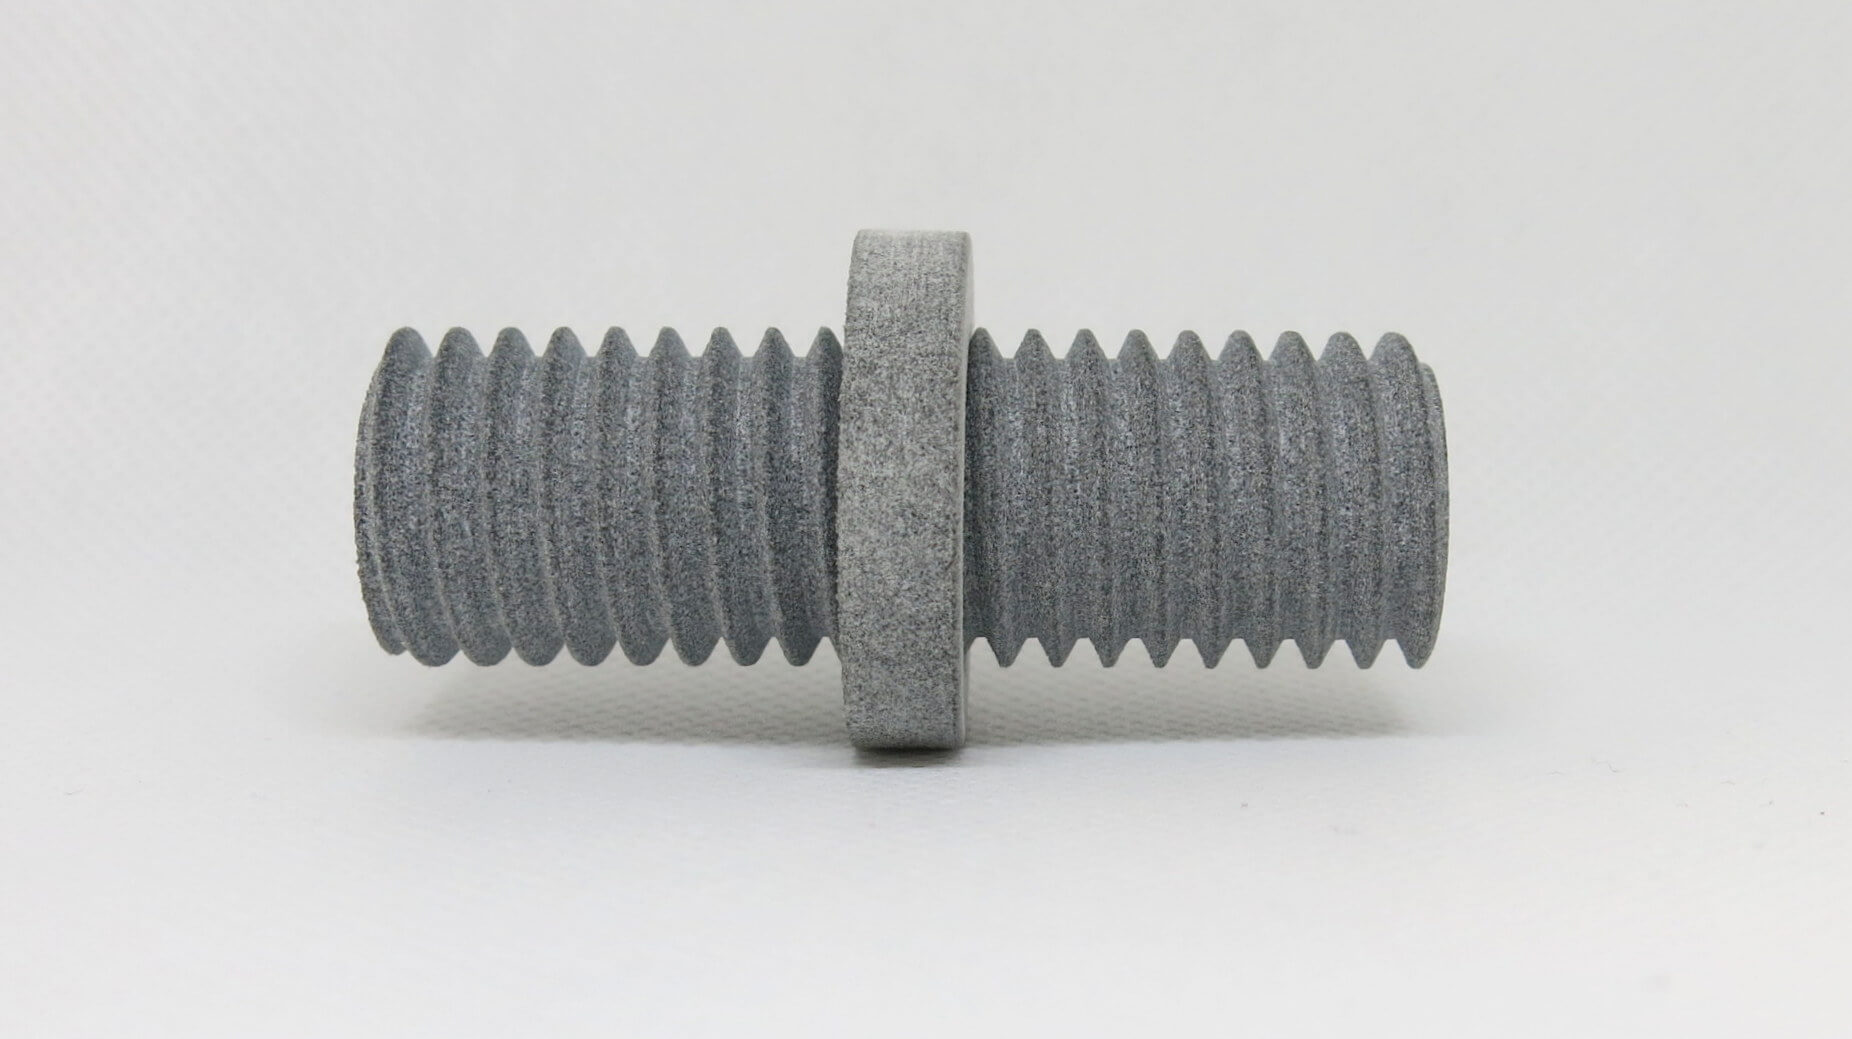
To give you the best example, we 3D printed our threads. We used MultiJet Fusion technology by HP. It is a powder-based Additive Manufacturing method which gives you an amazing level of details, perfect for 3D printing threads. Our high-resolution 3D printers provided us with well-fitted threads which smoothly work.
As you can see 3D modeling threads is as easy as our 3 stop guide. 3D printing threads are not much harder either and can be very beneficial to your production. It allows you to produce highly customized in size and materials parts, ideally suited for your production.
All you have to now do is upload your STL file to our online 3D printing service and you will get it delivered in no time. Don’t wait till your competitors start using 3D printing, stay on top of your game with our 3D printing service!
And don’t forget to sign up to our Newsletter for the latest 3D printing news!