 Connect with Google
 Connect with Facebook
Your TOP 5 3D Printing Software Tools
Posted By Hilmiyati Kusnadi on Jul 4, 2017 | 0 comments
Having a problem with your 3D file can happen, and you will then have to go back to your modeling software to fix it. Therefore, you waste more time, However, using Sculpteo’s 3D printing service helps you modify your 3D file online in a few clicks! In this article, you’ll find our best 3D Printing software tools that you need to edit, fix and improve your 3D model without having to go back to your modeling software. Thus, no more time wasted.
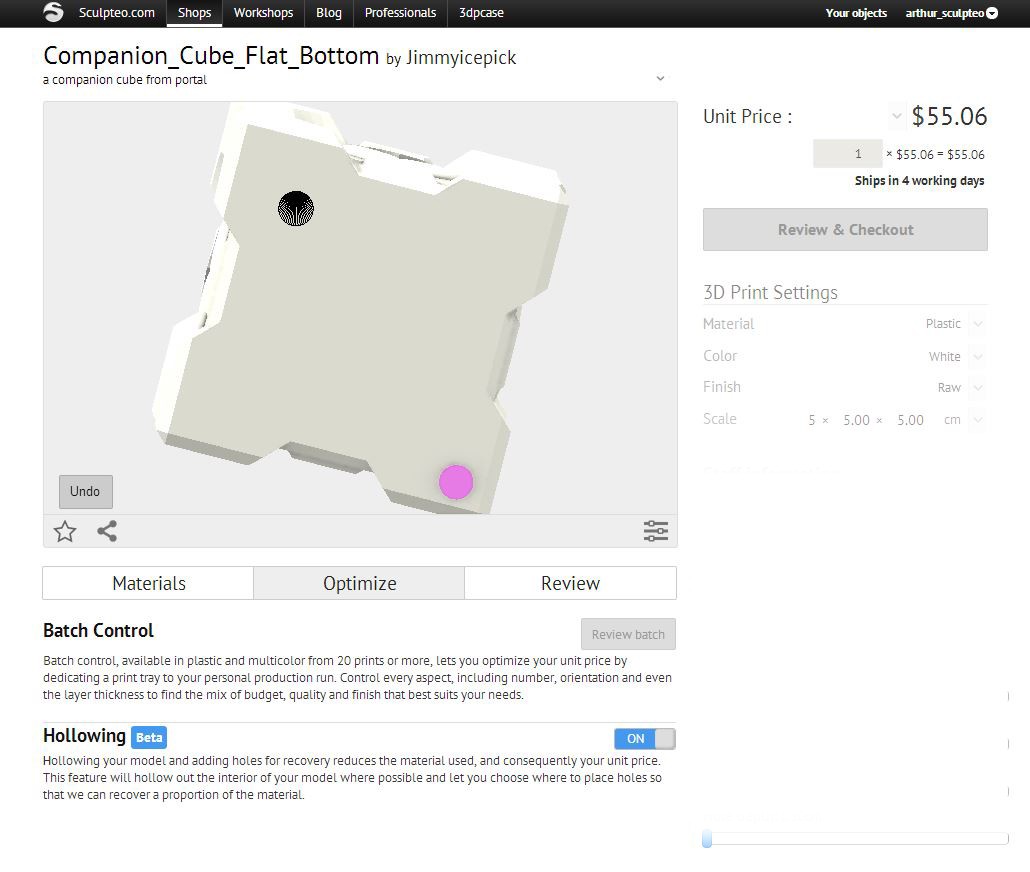
1. Hollowing
Hollowing, one of our top 3D printing software tools, allows you to add two or more holes to evacuate the unused material during the 3D printing process.

If you read this blogpost about “Our advice to choose between 3D printing services”, cost is one of the major concerns when it comes to choosing a 3D printing service. Obviously, price depends on several factors, including the material used, 3D printing finishes or even the space occupied in the 3D printers. In a nutshell, hollowing your 3D printed objects can reduce the cost, since less material used means cheaper price.
Moreover, hollowing makes the parts lighter, which is great for transporting and handling especially when ordering an important amount of 3D printed parts.
2. Batch Control
The batch control tool is designed to help 3D printing become a true alternative to traditional production techniques. Batch control is available when you order more than 20 units of the same item. The “Unit Price” (located on the upper right of the screen) will automatically change once your order reaches more than the requirement of batch production.
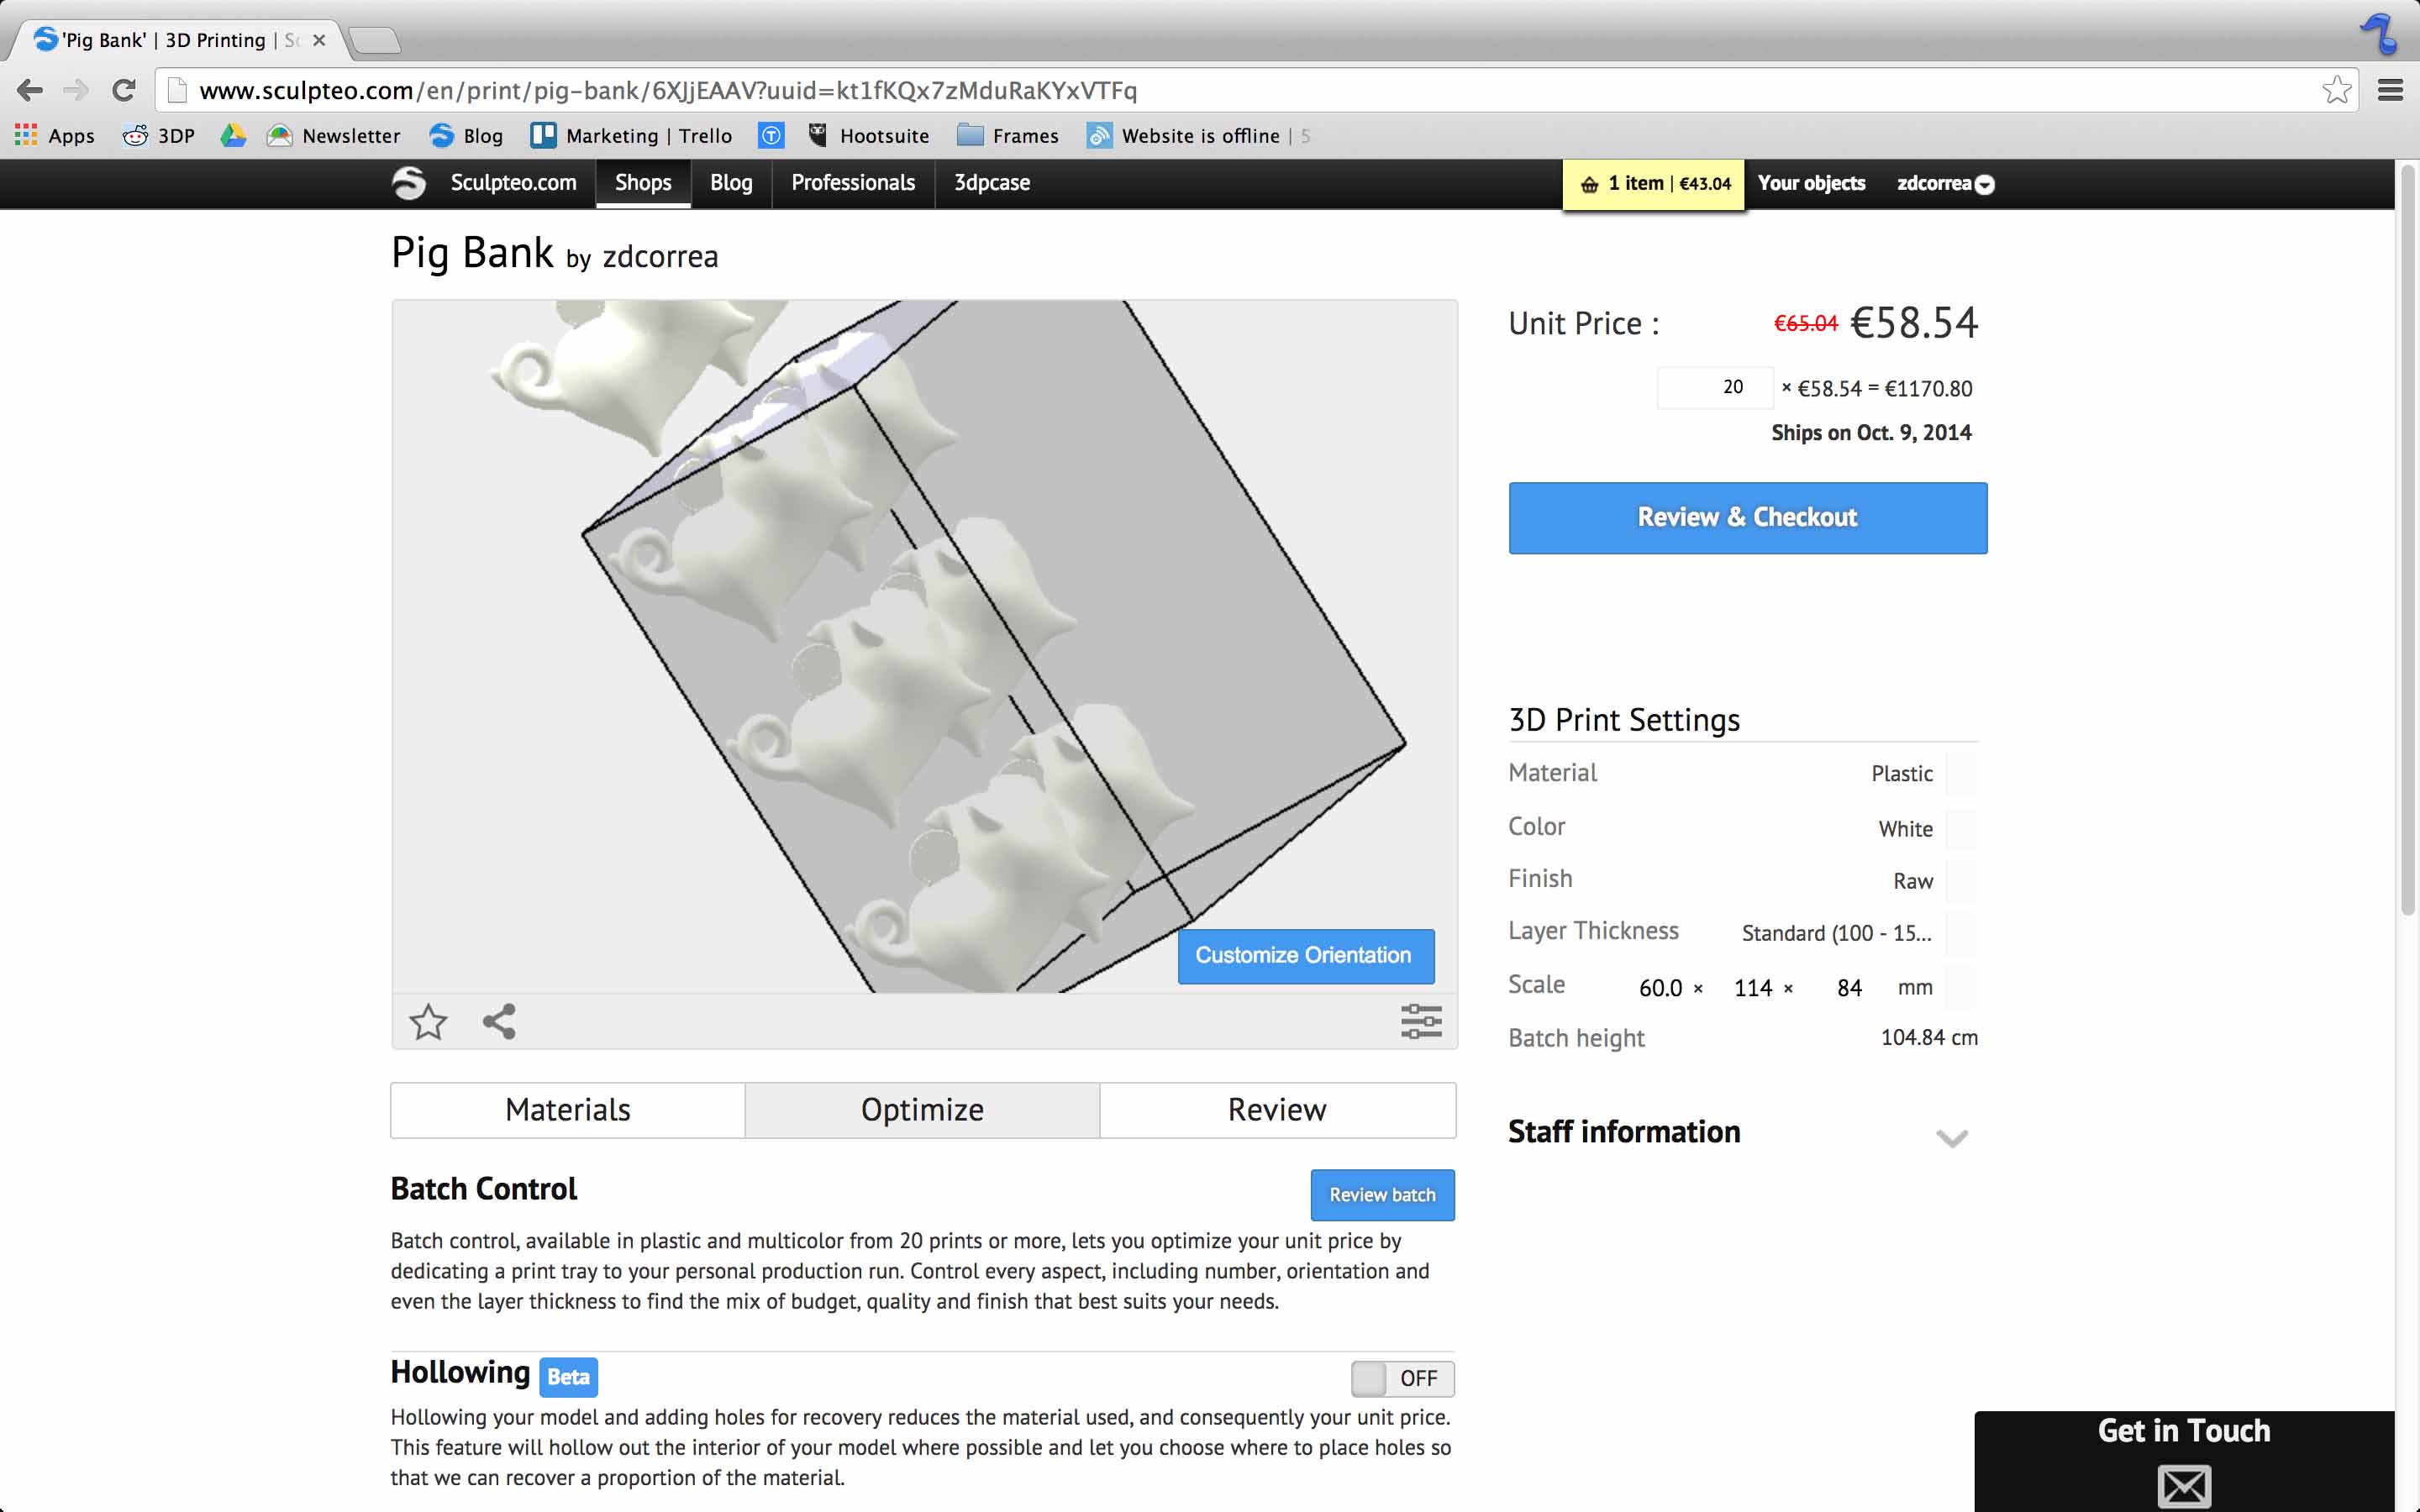
The reason why batch control is used by many of our clients is that it allows to reduce the price per unit of your 3D printed object. The bigger quantity that you order of the same 3D design and the same material, the lower will the price be. It can even be 80% cheaper that the original cost in some cases.
You can read the blogpost “Optimization Tools” to learn more about hollowing, batch control, and customized orientation.
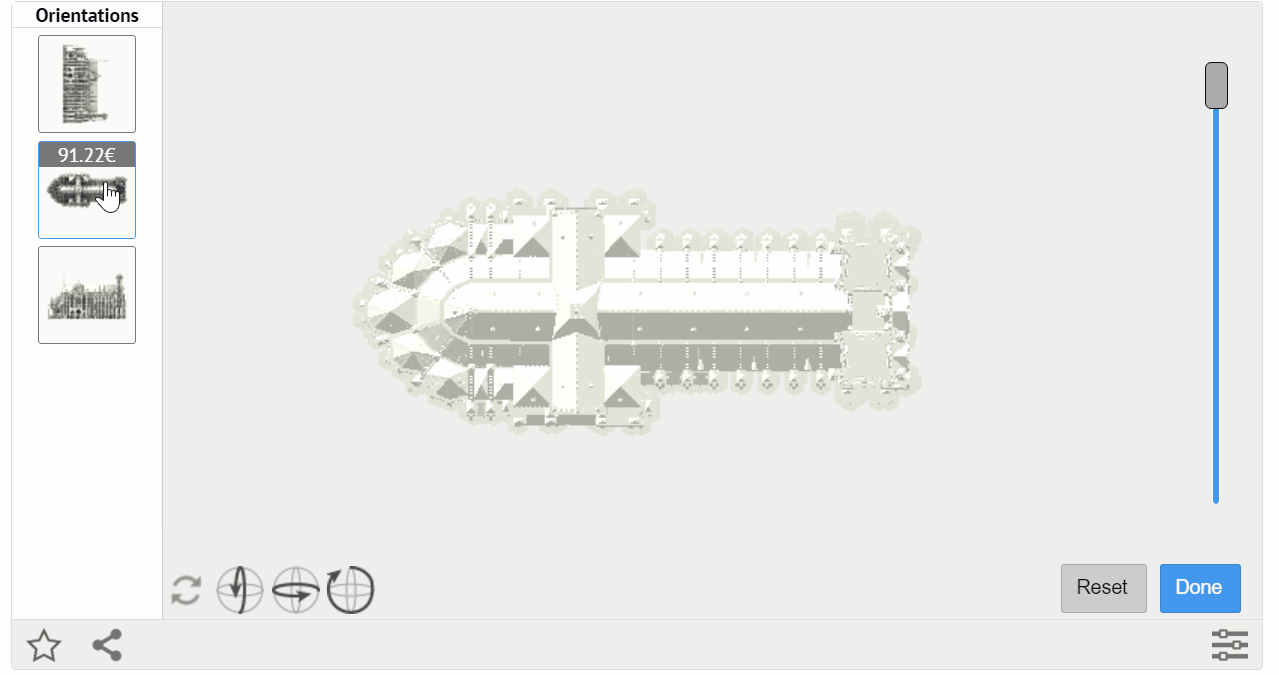
3. Customized Orientation
You can access the customized orientation software when you enable the batch control option or if you are an expert user. If you order a big quantity of 3D printed parts, you can access our 3D printing software tool that allows you to choose the orientation of your 3D model when it is 3D printed.
Since the object is printed layer by layer, part orientation gives you the choice of the position in which layers will be most visible and how those layers will be oriented.
This tool is designed to be a user-friendly 3D printing software in which once you turn on the “customize orientation” button, the 3D viewer will show some specific instruction and buttons to change the orientation of your object.
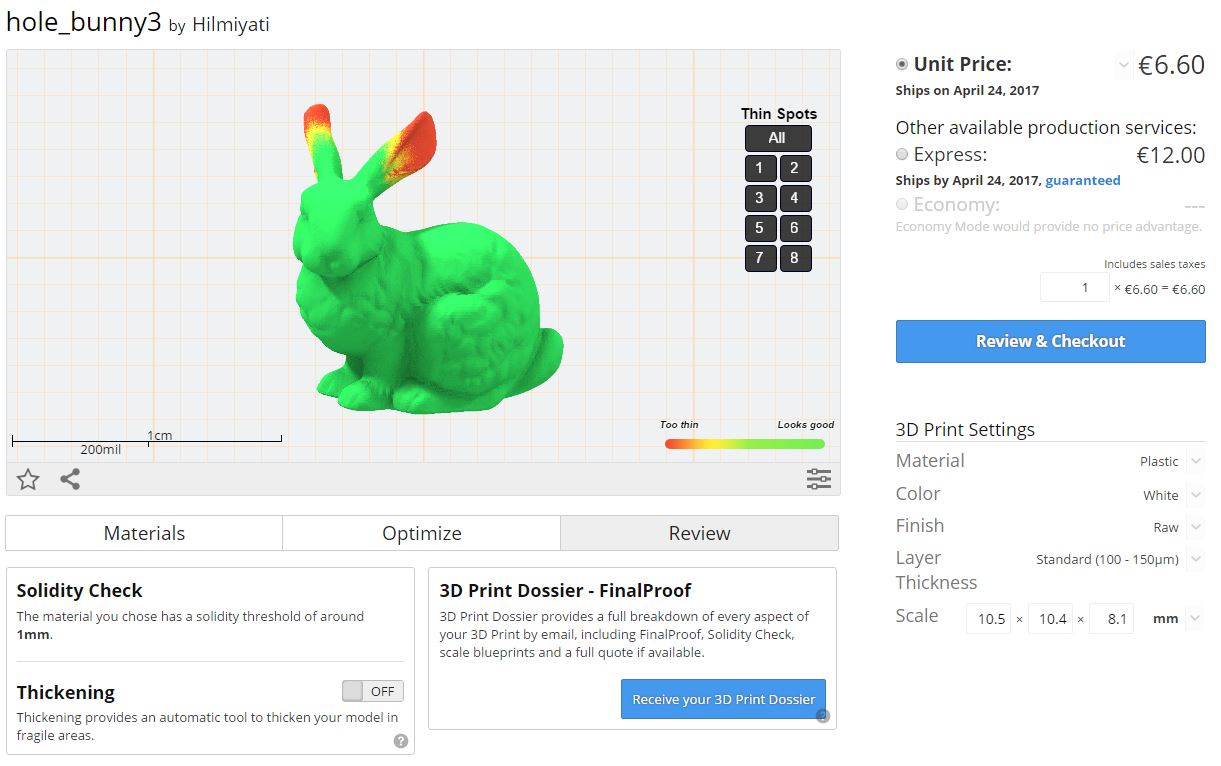
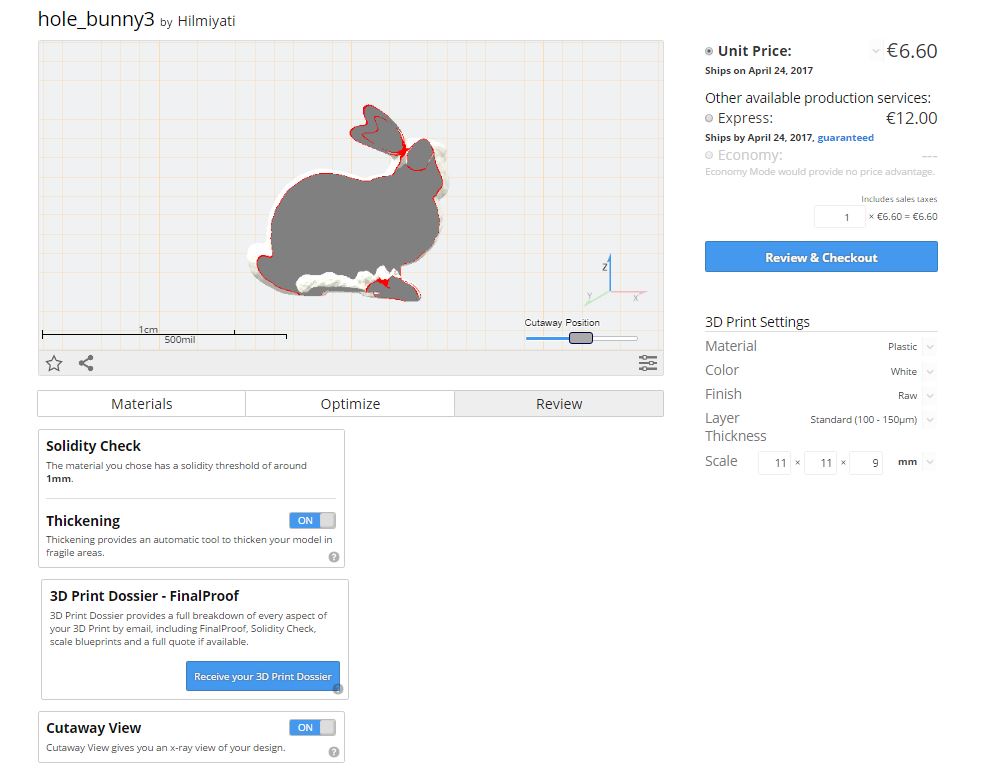
4. Thickening
Thickening is included in our set of Reviewing Tools 3D printing software with Solidity Check, Cutaway view, and 3D Print Dossier – Final Proof.
When you upload your 3D file, our solidity check feature will check the strength of your object. To make it simple, if your model becomes green, it’s a go. However, if you have big red areas, you need to thicken some parts of your 3D model, to make its size bigger or to change the 3D printing material.
5. Cutaway View
If you want to ensure that your object is correctly hollowed, and that the position of holes allows to drain unused material, Cutaway View is the good option to use. It works like an x-ray, to get a view of your design, both inside and outside.
Read this blogpost about the “Reviewing Tools” to get the detailed information about Thickening and Cutaway View.
There you go, you finally found out which are the best 5 3D printing software! But before you are ready to 3D print your parts, let’s discover some 3D printing software tools that our team uses to help make your model printable.
Discover more 3D printing software tools
Nesting
When you print several models or in batch production, nesting is included in the fabrication process to help optimize each batch. Nesting 3D printing software is used to group the 3D model together to reduce the space used inside the 3D printer. Heuristic algorithms are used to define the best spatial arrangement of meshes which results in less wasted powder and faster 3D printing process.
Slicer
The Slicer provides a quick preview of how the design will be sliced by the 3D printer, identifying and highlighting any potential issues prior to the real slicing process.
Support Generation
The support generation is mainly used for CLIP and Metal 3D Printing. With the SLM or DMLS technologies, the main functions of support generation are to prevent overhanging areas with >45° from collapsing during the 3D printing process and also to avoid the risk of deformation due to internal thermal stress. Moreover, it keeps the object rigid and attached to the build plate.
Quality Check
At Sculpteo, the quality check is a necessary process. There are six steps to ensure the quality check of our production:
- Queuing: When you complete your order, our team will check if the design is printable.
- Extra Verification in Progress: This is an optional step which happens if our team needs to make a specific check to ensure your 3D model is printable.
- 3D Printing: When your 3D model has been moved to one of our 3D printers and is ready to be 3D printed.
- Post-processing: Your objects are being removed from the 3D printing block and go to the next step of the post-processing process which includes finishes if it is required. This is the crucial process and an ultra-detailed check of your parts. If there are some issues regarding the object (distortion, a color that fades away, the object isn’t straight), we will inform you about the delay needed to reprint the parts.
- Ready to ship: Indicates that your objects successfully passed our quality control and are ready for shipping.
- Shipped: This last step is when your orders are transferred to the transporter.
One thing you need to take into account is that you can’t modify your order after it’s finalized. Our Customer Service will gladly help you fix some problems.
Tracking
One of the 3D printing software tools that you will keep an eye on after finalizing your order is the Tracking. It goes along with the quality control which allows you to follow your order in your order history. Each time your object is being checked or completes one step of the process, a status bar advances automatically.
![]()
As we are proud to be one of the fastest online 3D printing services, we designed our order tracking to be very detailed, with shipping and delivery estimates updated in real-time and made for humans, with any issues or errors clearly explained in plain language.
So, benefit from these TOP 5 3D printing software tools and create your own 3D printed creation now!