 Connect with Google
 Connect with Facebook
3 easy steps for best STL files resolution
Posted By Kat Plewa on Jul 17, 2018 | 0 comments
Additive Manufacturing is very useful when it comes to rapid prototyping or designing 3D CAD models for jigs and fixtures. It provides you with new solutions for your production, and can also bring the costs down as well as save time. 3D printing also means new materials which can revolutionize your production system and can be an amazing substitution to CNC machining.
But before we get to the manufacturing process, we need to start from the beginning. You’ve been working on your 3D model for a while and it’s looking perfect now, doesn’t it? You certainly don’t want all that hard work to go to waste. What you want is to make sure the 3D printed model will look just as gorgeous as on your screen. This blog post will help you to prepare the 3D design for printing. The guide includes just 3 easy steps: preparing your 3D model, setting the right STL resolution, and finally saving the correct file format. We will also talk about how to fix broken STL files. You will see how simple it is!
What are the STL files?
The origin of the file name is a mystery, it’s believed to be borrowed from word STereoLithography, but some people say that STL stands for Standard Triangle Language or is a file extension of Standard Tessellation Language. But what’s important about the STL files is the purpose. STL file is a data format. When you finish working on your design, you need to translate the file to the language a 3D printer will understand. And that’s why you save your CAD file as an STL file format. There are several different file types, but STL file is the most common file format used for rapid prototyping, 3D printing and in most CAD software. STL files are most suitable for the 3D printing process. It encodes the geometry of a 3D object which means it creates the surface that the 3D printer will print.
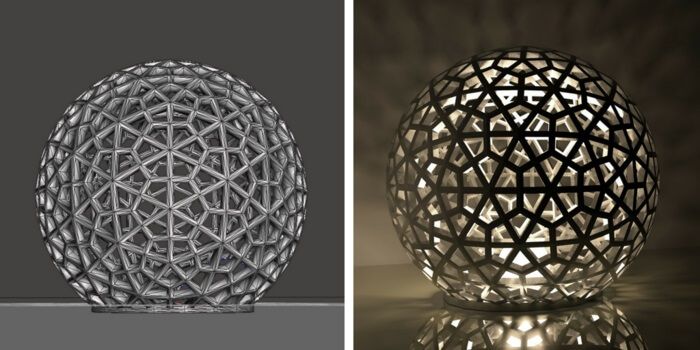
On the left, you have an example of STL file of the surface of the original 3D file presented on the right.
However, keep in mind that STL formats generally don’t contain information about the color or material of the 3D print (no one even thought of multicolor prints in the 80s!). Also, color is usually not as important when it comes to rapid prototyping. Although, if you’re using MultiColor Jet technology, the STL formats can carry the color information. If you are not using Multicolor Jet technology, we’ve explained for you the materials and other technologies here, as well as 3D systems to prepare your file for 3D printing.
Getting your STL files ready
1. Preparation of the 3D model
Not every STL file guarantees that the model is printable. STL files only contain the information that the 3D printer reads. Simple design guidelines are it’s impossible to print something if the thickness of the wall is 0 and it’s also essential to make sure the walls don’t have any holes, ex. faces or polygons missing.
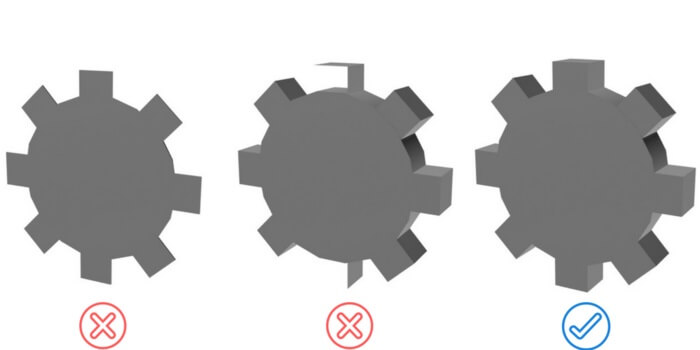
The first picture shows 0 wall thickness of the 3D design. The second picture is missing faces of some walls. The third picture is an example of a well prepared STL file
Tip: it’s easier if you scale the original design to the size you want it to be 3D printed before saving it as an STL file format.
2. STL Resolution
Optimizing your STL resolution is a very important step. Indeed, the smoother the surface, the better the print, BUT it also depends on the 3D printing technology you use. 3D printers are limited by the thickness of the layer, so before you add too many vertices, learn about the 3D printing technology and material you want to use. The more complex your object, the bigger the file size, and that can create problems not only with sharing the file with a 3D printing service but also for the 3D printer. Also, make sure to optimize your STL files, it can bring the costs of production down and waste less material. To sum up: you need to adjust the complexity of your object accordingly to the thickness of the layers of the 3D printed model. Setting right STL Resolution is the key factor here. The printer won’t be capable of 3D printing models’ surface if it’s too detailed with the limitation of layer thicknesses.

The first picture shows an STL file before optimization, second after and the third one is a render of the 3D model.
3. Saving the STL files
Depending on your 3D software, there are several ways to save or export options for STL files. We prepared for your knowledge based guides through different CAD programs as well as tutorials on how to prepare the model for 3D printing and export your STL file:
| Blender | Select File > Export > Select STL Check the Scene Unit box > Click OK |
| Rhinoceros | File > Save As > STL > OK |
| SolidWorks | File > Save As… Select File > In the File Format select STL > Click OK Options > Resolution > Fine or Custom > OK |
| SketchUp | Download SketchUp to DXF or STL plugin Start SketchUp Tools > Export or DXF or STL files |
| MeshMixer | Select the 3D Model Press Enter The export window will pop up Select STL > Click Save OR File > Click Save > STL |
| Autodesk Inventor | Select File > Print > 3D Print Preview Save Copy As… > STL > Click Save |
| Alias | File > Export > STL |
| Sculptris | This program does not support STL files export. Your best option is to convert an OBJ file in MeshMixer or Slicer software. |
| Catia | You file has to be a CATPart Select File > Click Save As > Choose STL files |
| SpaceClaim | Save & Export > STL |
| FreeCAD | Switch to mesh workbench Select the Solid to be meshed in the tree view Meshes > Create Mesh from the shape Select one mesh type and specify the options > OK Mesh object will be created > Right click on it > Export mesh > STL > Click Save |
| Fusion 360 | File > 3D Print Refinement options > export settings Output > untick ‘’Sent to 3D Print Utility > Click OK > Click Save |
| Inspire | File > Click Save As > STL |
| 3Ds Max | Menu > Export > Select STL |
| Wings 3D | Select File > Export > STL |
| TopSolid | Go to menu bar on the right Right click on the part Export > Select STL > Click OK |
| Mathematica | File > Export > STL |
| 3D Builder | Ctrl + S > STL > Click OK |
Broken STL Files
If it happened that you downloaded STL files, but they are broken, don’t worry. In this blog post, we prepared for you FAQ on how to edit and repair STL files, we also list for you 3D systems for STL viewers. You will learn what the most common mistakes are, how to use our free STL files viewer and how our software can help you to fix the STL files. And if you’re still in trouble, we also made for you a list with tips on how to use most popular and free 3D systems software to fix your different file types. Also, if you still run some problems, we are here for you. At Sculpteo we provide a wide range of services, including a Design Studio that will help you to fix your problem. You can also contact our Customer support.
And you’re done! Now that your STL files are ready to 3D print sent it straight to our 3D printing service and get an instant quote. Check out our laser sintering and other services. Don’t forget to sign up for our newsletter to find out more about the 3D printing world!