 Connect with Google
 Connect with Facebook
Our Best Tips about Wall Thickness for 3D Printing
Posted By Sculpteo on Jul 26, 2017 | 0 comments
Have you ever created a 3D model that could not be 3D printed because of its fragility? Calculating the minimum wall thickness is one of the most important steps when preparing a 3D model for 3D Printing. In this blogpost, we prepared for you some tips to keep in mind when designing your part and a review of Sculpteo’s 3D printing tools that will help you to succeed.
The minimum wall thickness refers to the minimum thickness that your model should have for any given material or technology. Having a better understanding about wall thickness is necessary before you decide to 3D print your object because a 3D printer needs this specific thickness to successfully 3D print your object. When it comes to 3D printing, wall thickness issues are often the reason why your model can’t be printed. There are four essential points that you need to take into account to prevent a bad outcome when sending your 3D model to an online 3D printing service or even to your own 3D printer.
Set the minimum scale of your model
The modeling of your 3D file doesn’t necessarily require that you work with a given unit or scale. It’s particularly true with software like Blender in which you’re able to give proportion but no unit. This job will be done after the modeling phase when you send your model to a 3D printer. That’s why you need to pay extra attention to both scale and size of your 3D model at that point. Creating a 3D print in millimeters instead of centimeters might very well result in a bad 3D print.
An example of that can be found in architectural models. This is, in fact, one of the main issues we encountered while working with La Cité de L’Architecture on La Merveille’s reproduction. With architectural models, it can, for instance, be entirely possible to 3D print a scale 1/10 of something and just impossible to do the same at 1/250. After a certain level of miniaturization, the details (present in the digital 3D file) are starting to vanish when it turns to physical object because the 3D printer is not able to create them (or will create very fragile ones). Quite often for architectural models, human intervention is necessary to decide which details will be kept and which won’t so that the 3D file doesn’t contain information that won’t be printable.
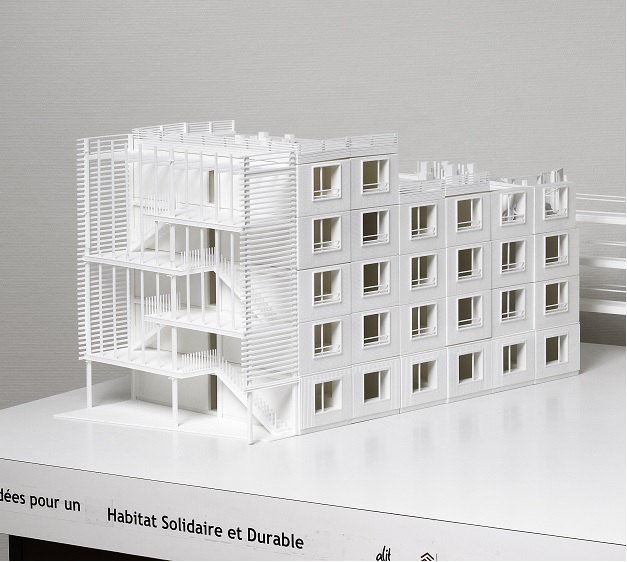
a 3D printed model for architectural purposes
Once again the outcome is that the details can’t be printed or at worse, they could break or even make the 3D printer crash.
Check the minimum wall thickness of the 3D printing material you choose
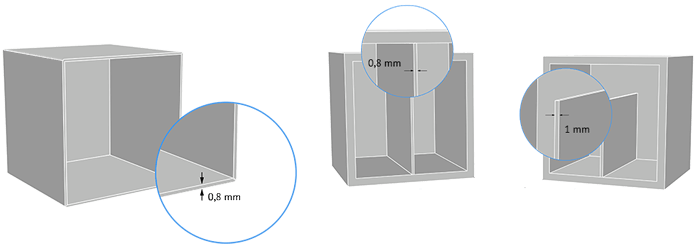
Every 3D printing material (and therefore, technology) behaves differently. While the specifications remain roughly the same for each 3D printing technology when switching between different technologies you can find guidelines that are very specific. For instance, if you decide to 3D print your parts with our Plastic or Alumide materials, you can easily refer to the limits of the technology used. In the case of plastic, the minimum wall thickness is set to 0.8 mm on our design requirements. However, if you’re trying to 3D print with Multicolor, you’ll have to, at least, set the minimum wall thickness to 2 mm.
For our strongest metal 3D printing materials, particularly the metal materials using DMLS technology such as Titanium Ti64 and Stainless Steel 316L, the minimum wall thickness that you need for your 3D model is 2 mm. Moreover, for a light and strong material such as Aluminum AlSi7Mg0.6, it needs to be thinner at least 0.5 mm.
Create optimized shapes for 3D printing
An important factor for wall thickness is, of course, the structure and the geometry of the design. There are two things at which 3D printers are bad: overhang and large flat surface.
To avoid the issue of overhangs, some 3D printing technologies are using supports that are holding the part while it’s being printed. These supports can be removed using a chemical bath, while others (like SLA or DLP) require supports to be removed manually and that will probably leave some “marks” on the 3D print. For powder-based 3D printing (SLS or Binder Jetting), the issue is a bit different as the powder itself inside the printing volume works as a support. This allows the machine to construct complex shapes without support. However, physics still applies here, and extreme overhangs are still not printable or need to be tested first.
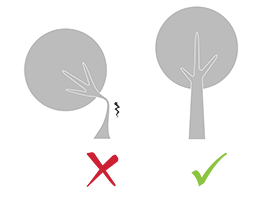
Example of an overhang that would result in a non printable object.
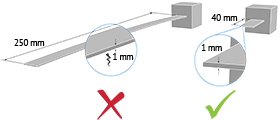
If you want to 3D print large surface (or even better large flat surface), one thing you need to take into account is that the machine has to be able to build physically the “unsupported walls” or that the flat surfaces tend to wrap while cooling. It means that flat surfaces on a 3D file that aren’t thick enough won’t remain flat after being printed.
Example of the plastic minimum wall thickness for supported versus unsupported walls
Try to avoid creating walls that are too thick
Having walls that are too thick can also be a reason why we can’t 3D print your part. A wall thickness that is too high can generate too much stress which might cause your 3D printed object to crack or if it is even more thick, your object can break. That is the reason why we always recommend you to check each of the material guidelines and to respect the maximum wall thickness.
Don’t forget about gravity!
Even if you’ve taken care of every issue mentioned above, sometimes it’s easy to miss things that are really obvious: gravity exists. While our operator will work to detect physical aberrations such as floating parts, unstable position, parts supporting too much weight relative to its thickness, it’s always easier to correct them in the first place. Particular care must be given to the geometry of your design and the most stressed parts must be thickened.
That’s self explanatory right?
What can be done to fight those mistakes easily?
At Sculpteo, 3D printing can be accessible and simple just in a few clicks. In this second part of the post, discover our online 3D printing software tools to help you check and improve the wall thickness of your design directly on our interface. Thus, there’s no need to go back to your 3D modeling software again.
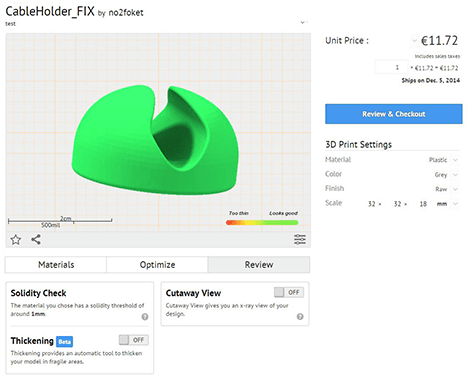
1. Verify and check the strength of your 3D printed part using Solidity Check
When you upload your 3D file to our website, you will notice that we display a proper rendering of your 3D file. This heat map or Solidity Check is a part of the review tab and shows where your model is too thin. This heat map is built depending on the material and the final size of your objects. When everything is green, your model is good to go. However, if some parts are too fragile and do not respect the minimum thickness, they will be shown orange or even red. This means that your object is fragile and easy to break. The best thing to do is then to review your model once again.
Solidity check is an excellent tool to verify the strength of your object and at the same time very easy and fast to use. It’s the first step to take before finalizing your order. When you’re changing the model size or the material, the update is made automatically.
You can refer to our review page on Solidity Check to learn more about how this 3D printing software tool is working.
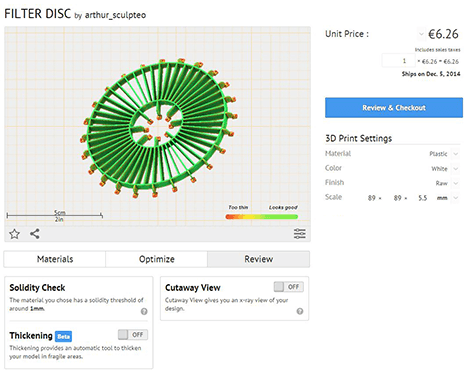
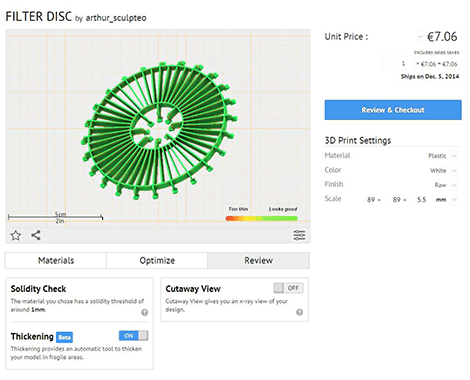
2. Automatically correct your 3D model with our Thickening tool
Thickening tool works by automatically correcting the lack of thickness of your 3D model to respect the minimum thickness. This 3D printing software tool calculates for each point that belongs to fragile parts a new position to create a mesh that respects the minimum wall thickness. Our thickening tool is included in our set of Reviewing Tools along with Solidity Check, Cutaway view, and 3D Print Dossier – Final Proof.
Before using Thickening:
After using Thickening:
3. Use our hollowing tool to optimize your model
If you’re wondering about the best wall thickness for a complex model that has to be hollowed to reduce weight and material cost, then a good solution could be to create the model as a filled solid and then to use our automatic Hollowing tool to hollow it. Considered as one of our most used 3D printing software tools, hollowing helps you adding holes to your structure, and creating empty parts inside. It has two benefits: evacuating the unused material, and making your object lighter. As a result, it reduces the cost of 3D printing
You can refer to our previous blogpost, “Online Optimization Tools for 3D printing” to learn more on how to use this feature.
For you to create a perfect 3D printed object, we recommend you to consult our dedicated page about design guidelines. You can find all the information you need about different minimum wall thickness of each of our 3D printing materials. Or simply upload your file and discover our 3D printing software tools to help you improve your 3D model!